6.6. Handling digital terrain models
Cesium offers the possibility of high-performance streaming and
rendering of Digital Terrain Models (DTM) for the realistic
representation of the Earth’s surface. Cesium provides per default two
available terrain layers, which can be selected in the BaseLayerPicker
(2) widget. The first one is the so-called WGS84 Ellipsoid (default
terrain layer) which approximates the Earth’s surface using a smooth
ellipsoid surface with a constant height value of 0. The other one is
the so-called STK World Terrain using a worldwide 3D elevation
data with an average grid resolution of 30 meters.
However, starting from September 1st 2018,
this was replaced by Cesium World Terrain,
which requires a Cesium ion account.
For specific application cases, high-resolution Digital Terrain Models
might be required. For this case, the 3D web client provides a simple
widget to facilitate handling the terrain data that must be created in a
specific terrain format (heightmap or quantized-mesh) defined by
Cesium. There exists an open source software tool
Cesium Terrain Builder
for creating terrain data in heightmap format. The
created terrain data is generated in a hierarchical folder structure
according to the TMS tiling schema and can be easily published on the
web by uploading the terrain data files to a CORS-enabled web server.
The input panel (1) on the 3D web client for adding and removing terrain
layers can be expanded and collapsed by clicking on the Terrain Layer button.
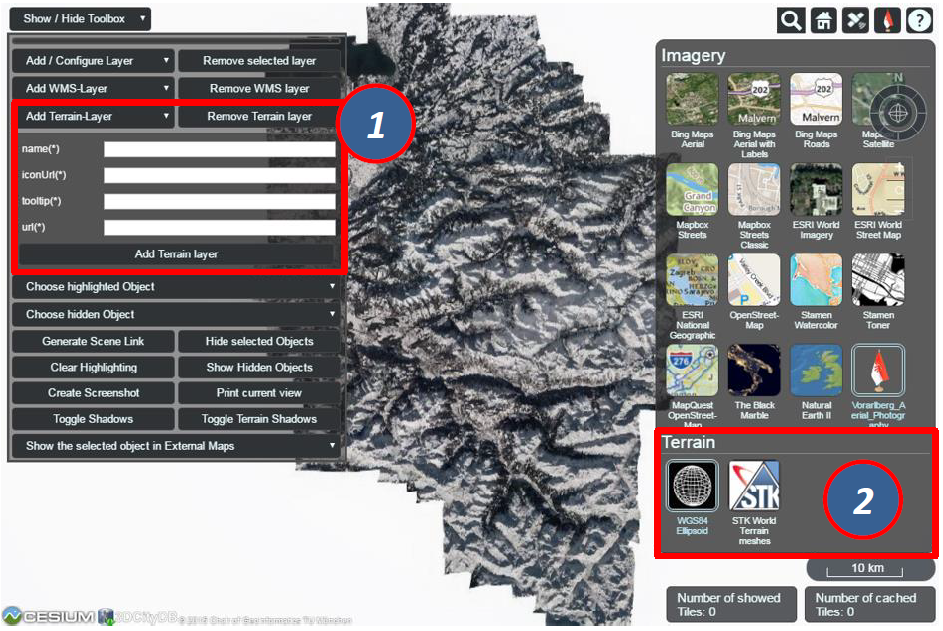
Fig. 6.14 The input panel (1) for adding a new terrain layer and the
BaseLayerPicker widget (2) where the added terrain layers will be listed
together with the per default available base layers
For adding a new terrain layer, the input fields URL (*),
Name (*), Icon URL and Tooltip in the input panel (1) are required,
which describe the location on the web, the name, URL of an icon image and a short tooltip of the terrain layer,
respectively. When a terrain layer has been loaded, its icon image
together with its label name will be listed in the BaseLayerPicker
panel (2). The tooltip will automatically appear when the mouse is moved
over the respective icon image.
Usage example
In this example, a high-resolution (0.5m) Digital Terrain Model provided
by the Vorarlberg State Government will be added to the 3D web client.
This terrain data was created in heightmap format using the open
source tool Cesium Terrain Builder. Here, the following parameter
values should be entered into the corresponding input fields:
|
https://www.3dcitydb.org/3dcitydb/fileadmin/mydata/Vorarlberg_Demo/Vorarlberg_DTM |
|
|
|
https://cdn.flaggenplatz.de/media/catalog/product/all/4489b.gif |
|
|

Fig. 6.15 Example showing how to add a new terrain layer to the 3D web client
Note
For your convenience, this example is readily available for access here.
As shown in the figure above, once the parameter settings have been
completed, the terrain layer can be loaded by clicking on the
Add / Update Terrain Layer button (3) and its icon image together with its label
name (4) will be listed on the BaseLayerPicker widget. You can use the
Geocoder widget (5) to zoom the Earth map to the region of Vorarlberg
state and check the loaded terrain data. Clicking on the
Remove terrain layer button (6), the terrain layer will be removed and substituted
with the default WGS84 Ellipsoid terrain layer.