1.4. Migration from previous releases
Shell scripts for migrating an existing 3DCityDB instance to the latest version are located in the folder ShellScripts/[Windows|Unix]/MIGRATION inside the installation directory of the Importer/Exporter tool.
You will only need the migration scripts for a major version update, for instance, if you want to upgrade a 3DCityDB instance from version 2.x or 3.x to version 4.x. For minor version updates (i.e., from version 4.x to 4.y), separate upgrade scripts are provided (see Section 1.4.4 below). A migration might involve changes to the 3DCityDB tables or objects, so please make sure to backup your data before starting the migration.
Hint
Another safe and simple migration approach is to export the database content from the v2.x/v3.x instance as CityGML with the previous version of the Importer/Exporter and re-import the data into the new 3D City Database version using the new Importer/Exporter shipped with this release. This approach might take more time though, depending on the amount of data stored in the database.
Note
The migration scripts do not handle version-enabled tables under Oracle. Therefore, if you are using Oracle and have enabled versioning, then exporting and re-importing the data is the recommended way to migrate to the new 3DCityDB version.
To start the migration process run the MIGRATE_DB shell script. Make sure that the database credentials entered in the CONNECTION_DETAILS file are correct. The script will first prompt the user for the major version number of the currently installed 3D City Database instance – either `2` or `3`. To identify the actual version of your 3D City Database you can use the Importer/Exporter tool to connect to the 3D City Database instance that you want to upgrade. Starting from v3.0.0 the version string is printed to the console window after the connection has been successfully established as shown below (see also Section 4.3).
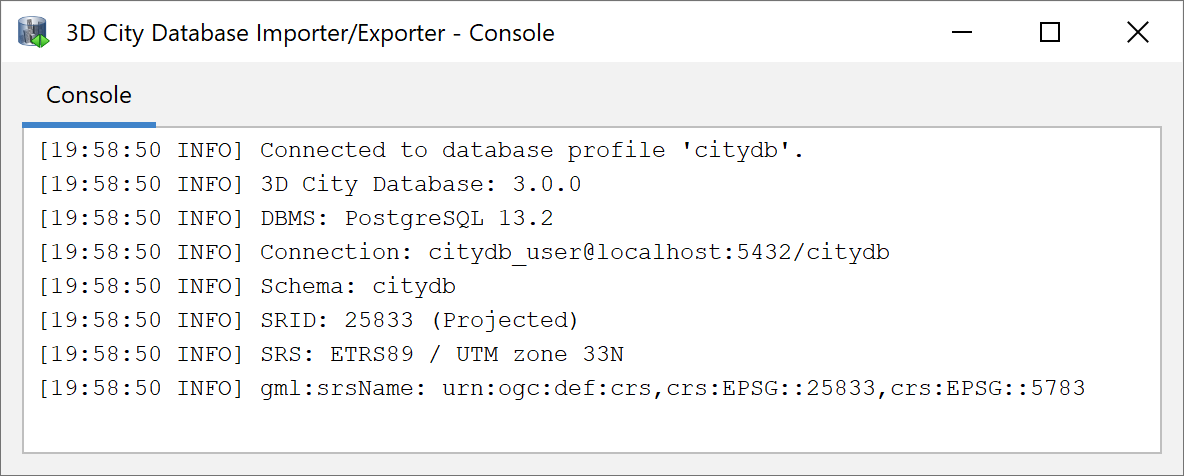
Fig. 1.3 Version information of a 3D City Database.
If the version string does not show up, you are running a v2.x instance. Alternatively, the version information can also be queried using database functions.
For PostgreSQL the command is:
psql> SELECT major_version FROM citydb_pkg.citydb_version();
For Oracle it is:
SQL> select MAJOR_VERSION from table(CITYDB_UTIL.CITYDB_VERSION);
If the function is not known to the system, you are probably running a v2.x instance. For Oracle, migrating from v2 to v4 has some prerequisites which are explained in the next chapter.
1.4.1. Migration from v2 to v4 on PostgreSQL
Step 1 – Run MIGRATE_DB
For PostgreSQL, migrating an existing v2.x of the 3DCityDB simply requires executing the MIGRATE_DB shell script and choosing the value 2 as first user input.
Step 2 – Be sure of using unique texture URIs
Starting from v3 of the 3D City Database, textures that are referenced by more than one geometry are no longer stored redundantly in the SURFACE_DATA table but only once in the TEX_IMAGE table. This optimization can also be applied during the migration process, if you can guarantee that texture URIs are unique and not used for different texture files. Otherwise, some textures would get lost during the migration and remaining images would be referenced to wrong surfaces.
If you can assure that there a no duplicate texture URIs in your database, then trigger the optimization by choosing ‘y’ or ‘yes’ as second input for the migration script. In case you know that textures in the database are named equally (or if you do not know) you can still run the script by entering ‘n’ (which is also the default value). Entries in the TEX_IMAGE column of the SURFACE_DATA table from v2 are then further mapped 1:1 to the TEX_IMAGE table of v4.
Note
A simple unification of texture URIs in advance of the migration will not help to store the textures only once, because same textures with different URIs are regarded as different image files and would all end up in the new TEX_IMAGE table. You would have to compare the binary data itself.
Step 3 – Check if the setup is correct
After a series of log messages reporting the selection of data from the v2.x schema, updates of references and the creation of database objects, the script is finished with the message ‘3DCityDB migration complete!’. If the old database schema is not dropped during the migration (see last step), both versions of the 3D City Database will remain in one database. This is actually a good thing, because you can further compare if everything has been transferred correctly.
Re-run migration if required
If the migration process has been interrupted by the user or by severe software errors, the migration script can be simply executed again (only if the old v2.x schema still exists) without manually dropping already created parts of the v4 schema because the script does it for you.
Step 4 – Drop the deprecated v2.x schema
To remove the deprecated parts of your 3D City Database invoke the DROP_DB_V2 shell script.
Caution
DO NOT execute the DROP_DB script from the ShellScripts/[Windows|Unix] folder.
The old and new instances of the 3D City Database are both stored inside the same database
(new = citydb schema, old = public schema). DROP_DB drops all
database schemas for which it finds a DATABASE_SRS table, so all your data
would be lost. So be careful to use DROP_DB_V2 instead!
1.4.2. Migration from v2 to v4 on Oracle
Step 1 – Upgrade an existing installation
The migration to v4.x must be carried out on a version 2.1.0 instance of the 3D City Database. Versions prior to version 2.1.0 must first be upgraded to 2.1.0 since the internal storage of envelopes of city objects changed substantially. Corresponding upgrade scripts are shipped with the v2.1.0 release. Upgrades to 2.1.0 can be carried out from any older version 2.0.0 to 2.0.6. A more detailed description of the upgrade procedure can be found in the version 2.1.0 manual.
Before upgrading your 3D City Database, a database backup is highly recommended to secure all data. The latter can be easily done using the Importer/Exporter tool or by tools provided by Oracle.
Note
Please note that the last step in the upgrade process is a lengthy one. Altering the internal storage of the envelopes of all city objects in a large and/or versioned database may take hours. Depending on their initial state, spatial indexes may be disabled and re-enabled in the process, adding to the duration as a whole. This process MUST NOT be interrupted since it could lead to an inconsistent state. Please be patient and remember that backing up all of your data before starting any database upgrade is the commonly recommended practice.
Step 2 – Creating a new installation
The migration script transfers data from a user schema with the v2.1.0 installation to another user schema that has to contain the 3D City Database schema v4. Install the new version like it is described in Section 1.3 if not done so yet.
Step 3 – Grant select on v2.1.0 schema to v4 schema
The migration process requires that the user with the v4 schema can access the user schema with the v2.1.0 version. Therefore, run the GRANT_ACCESS_V2 shell script (see Section 1.3.1) as the v2 user. When executed the user is requested to type in the schema name for the 3D City Database v4 instance.
Step 4 – Run MIGRATE_DB
Now, start the MIGRATE_DB script located in the same folder like GRANT_ACCESS_V2 as the v4 user. Choose the value 2 as first input and specify the name of the schema with the v2.1.0 instance.
Step 5 – Be sure of using unique texture URIs
Like with the PostgreSQL version, you are requested to guarantee that there are no duplicate texture URIs used for different images, or enter ‘n’ to skip the texture storage optimization. See Step 2 in the description of the PostgreSQL migration for more details.
Step 6 – Choose Spatial or Locator license option
With the last input parameter you specify the database license running on your Oracle server, like you have done when setting up the v4 instance of the 3D City Database. Choose ‘S’ for Spatial (which will additionally migrate raster data) and ‘L’ for Locator.
Step 7 – Check if the setup is correct
The script temporary disables databases indexes and foreign key constraints and creates an additional package with migration procedures (CITYDB_MIGRATE). The package is removed again when the migration progress is completed and the message “DB migration is completed.” is displayed on the console. It is recommended to generate a database report of the new user schema and compare it with a report of the schema that contains the 2.1 instance of the 3D City Database (done with the previous version of the Import/Export tool). Verify that
- no city objects are missing (do a database report),
- indexes and foreign keys got activated again,
- relations between features and attributes are correct, and
- exports look correct inside a viewer application.
Step 8 – Drop the deprecated v2.x schema
If the migration was successful, the v2.x user simply has to invoke the DROP_DB (of version 2.x) to drop the deprecated schema. Deleting the v2.x user works as well.
1.4.3. Migration from v3 to v4
The migration process from v3 to v4 does not require any user inputs after entering the value `3` in the MIGRATE_DB script (except for choosing the license under Oracle).
Note
Schema changes on existing tables are applied with ALTER TABLE statements which can lock these tables for a longer period if they contain millions of rows.
1.4.4. Upgrade between minor releases
Every minor release of the 3D City Database is shipped with an UPGRADE_DB shell script to update an existing database instance that is already of version 4.x. This script can also be found in the MIGRATION folder.
When running the UPGRADE_DB script, it will try and check whether a minor version update is appropriate or whether a major version update must be performed instead. In the latter case, the script terminates with a corresponding error message. It is always recommended to also manually check the version information of your existing 3DCityDB instance as described above before running the upgrade script.
During the upgrade, check the output messages of the script for errors and warnings. The process should finish the message 3D City Database upgrade complete.
Hint
When using the PostgreSQL version, it is highly recommended to execute the
VACUUM ANALYZE command after an upgrade or migration process in order
to increase the overall database performance.