4.5. Export
3D city model content stored in a 3D City Database can be exported as CityGML and CityJSON datasets on the Export tab of the operations window.
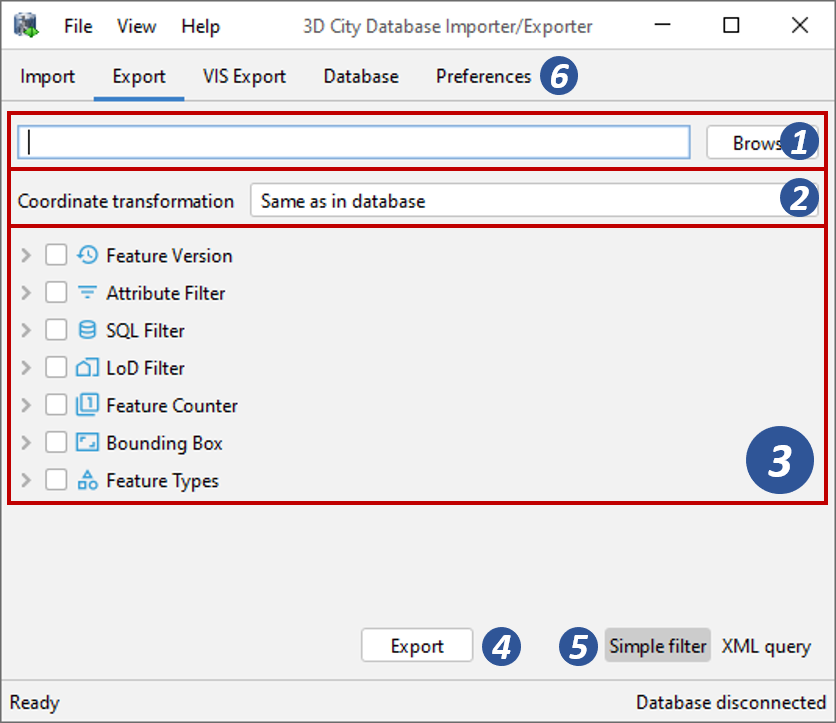
Fig. 4.53 The export dialog.
Output file selection
At the top of the export dialog, the folder and filename of the target dataset must be specified [1]. You can either enter the output file manually or open a file selection dialog via the Browse button. The export operation supports the output file formats listed below. Simply make sure the output file ends with the file extension of the format you want to export.
Format
|
File extensions
|
CityGML (version 2.0 or 1.0)
|
*.gml, *.xml
|
CityJSON (version 1.0)
|
*.json, *.cityjson
|
GZIP compressed file
|
*.gz, *.gzip
|
ZIP archive
|
*.zip
|
For compressed formats, you can specify whether the data should be encoded in CityGML or CityJSON using the General preference settings (see Section 4.5.9.1). When choosing ZIP as target format, additional export files such as texture images are also written to the ZIP archive by default.
Coordinate transformation
In general, coordinate values of geometry objects are associated with the coordinate reference system defined for the 3D City Database instance during setup and are exported “as is” from the database. The export operation allows a user to apply a coordinate transformation to another reference system during export. The target coordinate reference system is chosen from the corresponding drop-down list [2]. This list can be augmented with user-defined reference systems (cf. Section 4.7.2 for more details). When picking the entry “Same as in database”, no coordinate transformation is applied (default behavior).
Export filters
Similar to the import process, the export operation offers thematic and spatial filters to restrict an export to a subset of the 3D city model content stored in the database [3]. The following filters are available and discussed in separate sections of this chapter:
- 4.5.1 Feature version filter
- 4.5.2 Attribute filter
- 4.5.3 SQL filter
- 4.5.4 LoD filter
- 4.5.5 Feature counter filter
- 4.5.6 Bounding box filter
- 4.5.7 Feature type filter
To enable a filter, simply select its checkbox. This will automatically make the filter dialog visible. Make sure to provide the mandatory input for the filter to work correctly. If more than one filter is enabled, the filters are combined in a logical AND operation, i.e. all filter criteria must be fulfilled for a city object to be exported. If no checkbox is enabled, no filters are applied and, thus, all features contained in the database will be exported.
Note
All export filters are only applied to top-level features but not to nested sub-features.
Advanced XML-based queries
Besides the simple export filters discussed above, the export can also be controlled through a more advanced query expression that offers logical operators (AND, OR, NOT) to combine thematic and spatial filters to complex conditions. Moreover, it allows for defining projections on the properties of the exported city objects and provides a filter for different appearance themes. All simple filters from above are, of course, also available for query expressions.
Query expressions are encoded in XML using a <query> root element. The
query language has been developed for the purpose of the 3D City Database
but is strongly inspired by and very similar to the OGC Filter Encoding
2.0 and the query expressions used by the OGC Web Feature
Service 2.0.
To provide an XML-based query expression, click on XML query [5] at the bottom right of the export dialog (cf. Fig. 5.8). The simple filter dialogs will be replaced with an XML input field like shown below.
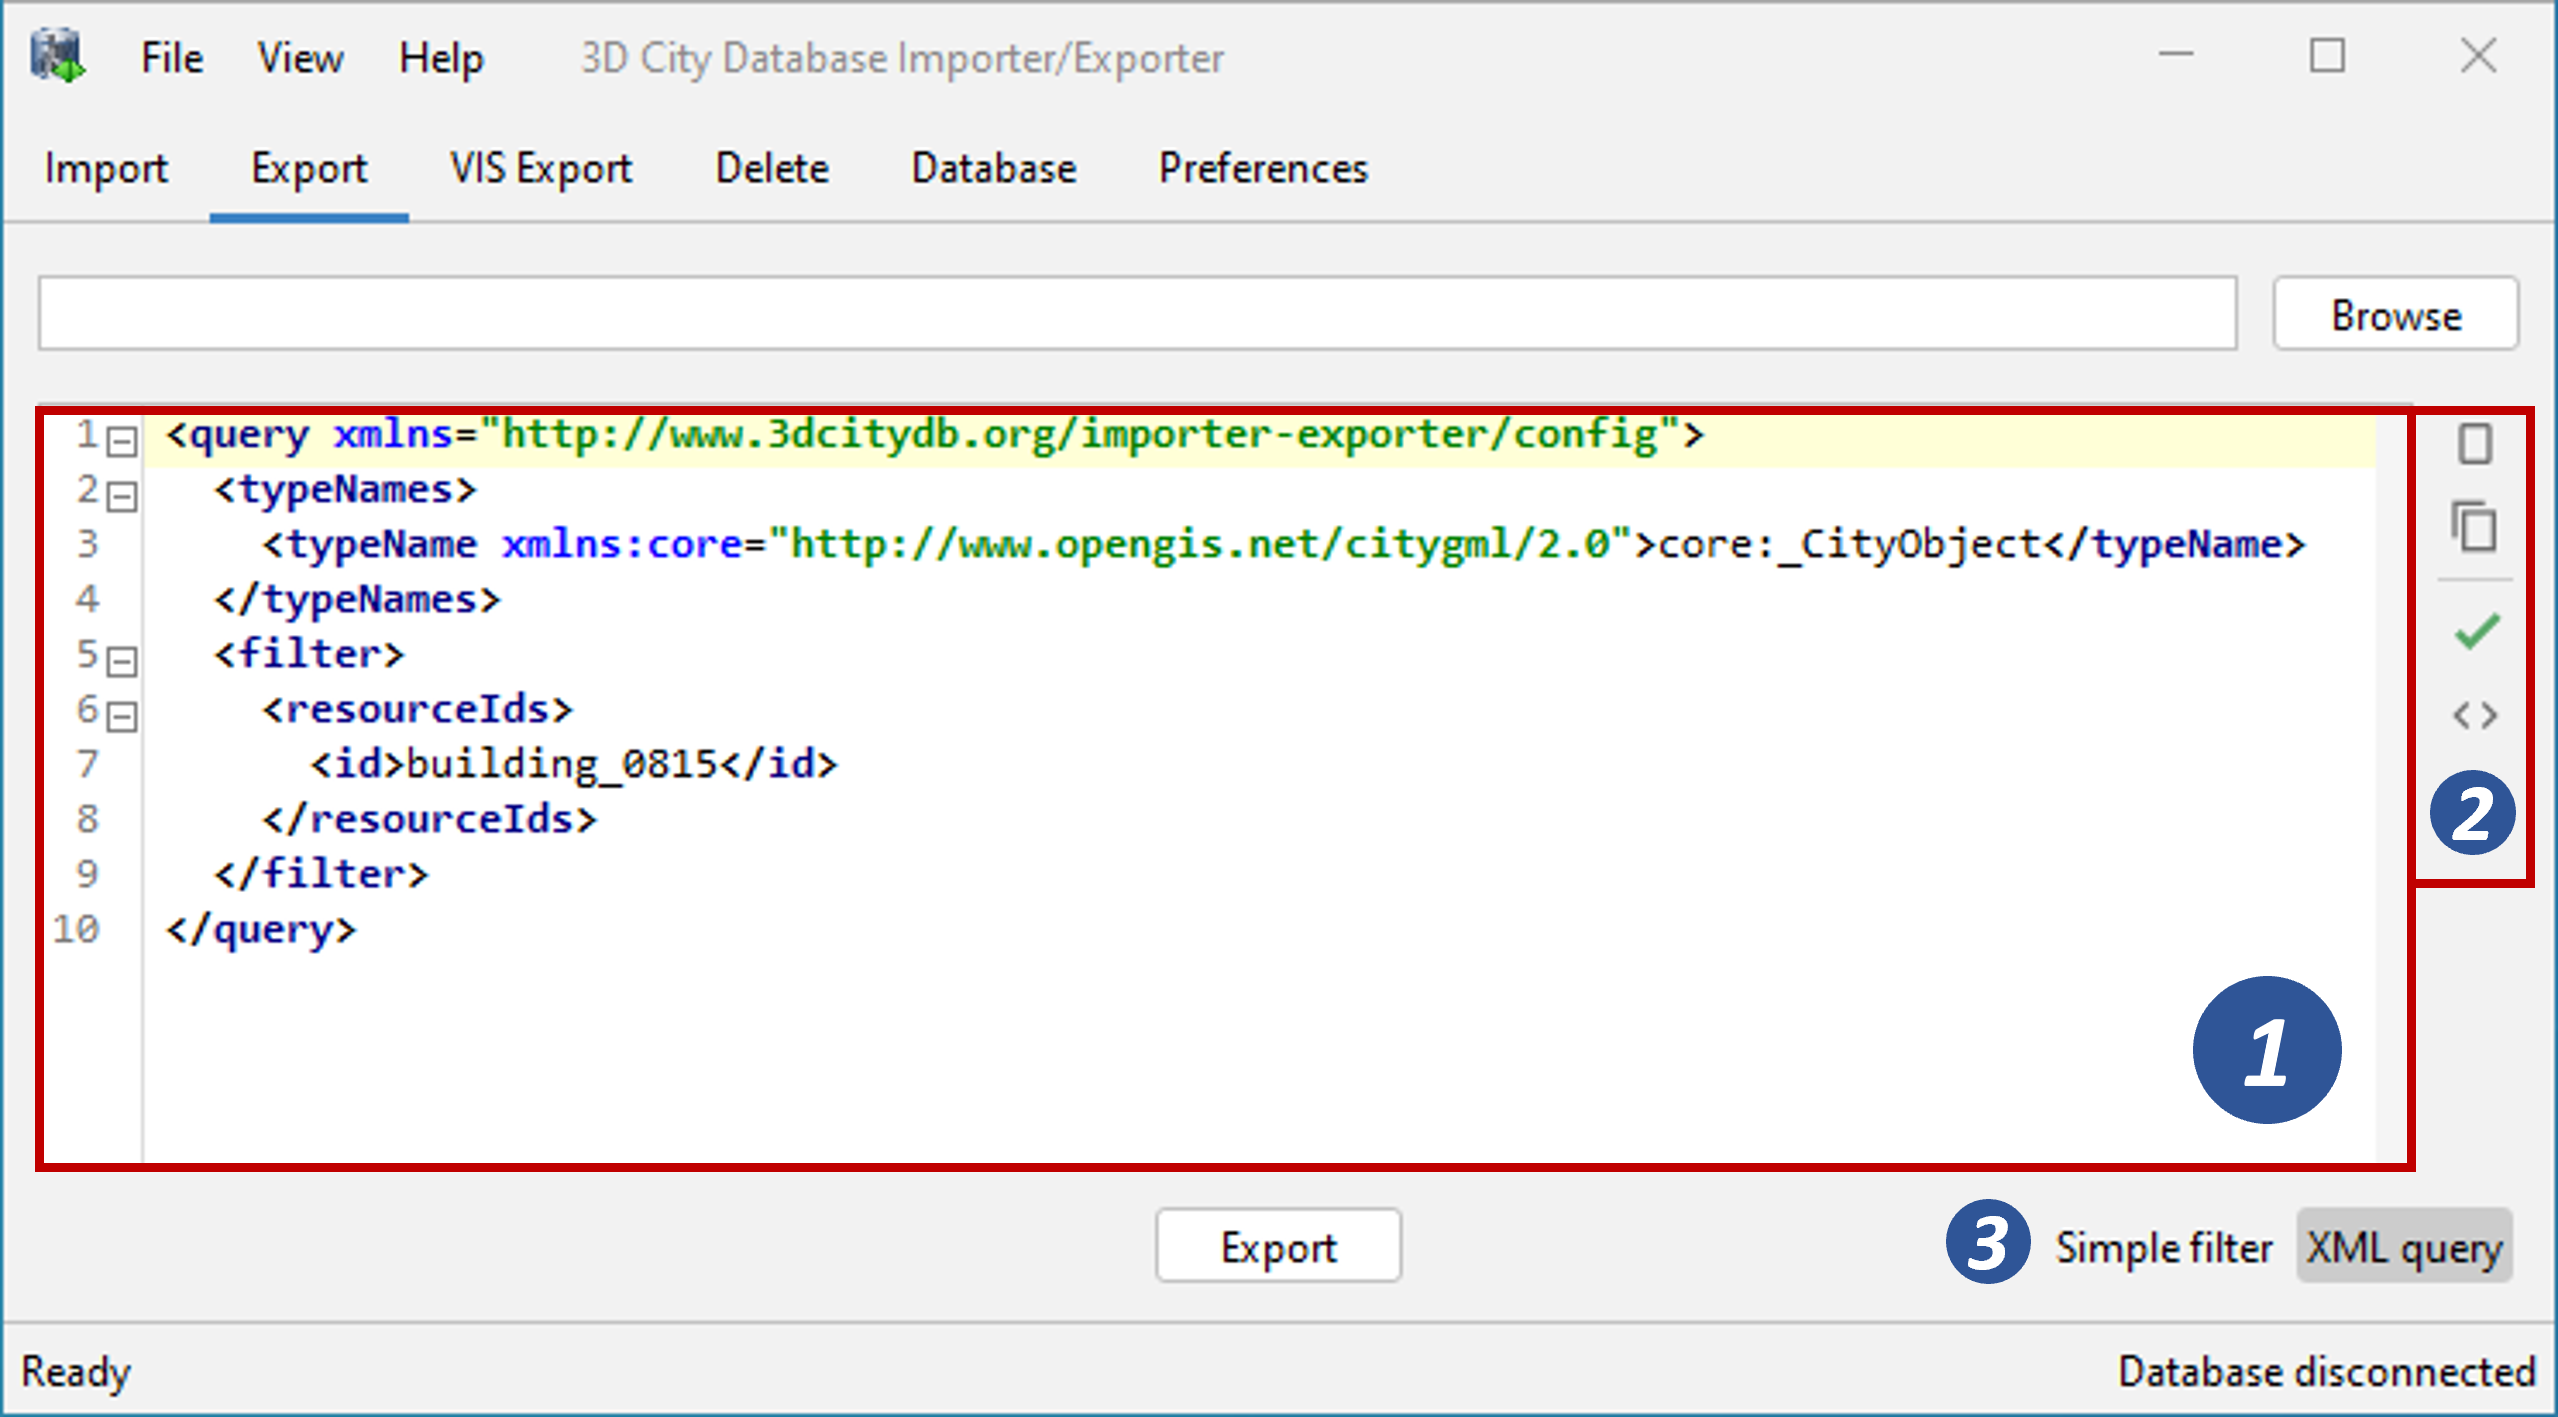
Fig. 4.54 Input field to enter an XML-based query expression.
The XML query is entered in [1]. This requires knowledge about the structure and the allowed elements of the query language. A documentation of the query language is provided in Section 4.5.8.
The new query button  on the right side of the input field
[2] can be used to create an empty query expression that contains all
allowed elements of the query language. The copy query button
on the right side of the input field
[2] can be used to create an empty query expression that contains all
allowed elements of the query language. The copy query button  translates all
settings made for the simple filters to an XML query representation.
The results of both actions can therefore be used as starting
point for defining your own query expression. The validate query
button
translates all
settings made for the simple filters to an XML query representation.
The results of both actions can therefore be used as starting
point for defining your own query expression. The validate query
button  performs a validation of the query entered in [1]
and prints the validation report to the console window. Only valid query
expressions are accepted by the export operation. Finally, the generate SQL
button
performs a validation of the query entered in [1]
and prints the validation report to the console window. Only valid query
expressions are accepted by the export operation. Finally, the generate SQL
button  translates the XML query to a SQL
 SELECT statement
that you can directly copy and use with a database client. Note that you must
first connect to a 3DCityDB instance before you can create the SQL expression.
The Simpe filter button [3] takes you back to the simple filter dialog.
Note
You can also use an external XML editor to write query expressions.
External editors might be more comfortable to use and often offer
additional tools like auto completion. The XML Schema definition of the
query language (required for validation and auto completion) can be
exported via “File -> Save Settings XSD As…” on the main menu of the
Importer/Exporter (cf. Section 4.2). Make sure to use a <query> element
as root element of the query expression in your external XML editor.
Tiled exports
When exporting 3D city model content to a single output file, the file size may quickly grow. For CityGML files, the Importer/Exporter supports writing files of arbitrary size (only limited by the file system of the operating system). However, such files might become too large to be processed by other applications. Tiled exports are useful in this case because the export is split into a regular grid of tiles each of which is written to its own output file. Every tile only contains a subset of all city objects to be exported and, thus, the file sizes will be smaller compared to a single output file. To enable tiling, you must use a bounding filter (see Section 4.5.6) or a corresponding XML query expression.
You still have to specify just a single output file in [1] for tiled exports.
Each tile is automatically stored in its own subfolder named tile_x_y
with x and y being the row and column of the tile in the grid.
The names of both the subfolders and the tile files can be augmented
with tile-specific suffixes (see the tiling options
in chapter Section 4.5.9.3).
Export preferences
More fine-grained preference settings affecting the export operation are available on the Preferences tab of the operations window [6]. Make sure to check these settings before starting the export process. A full documentation of the export preferences is provided in Section 4.5.9. The following table provides a summary overview.
Preference name
|
Description
|
General options like the CityGML version to be used for exports.
|
|
Replace all object identifiers with UUIDs.
|
|
Settings for tiled exports. Requires that tiling is enabled on the bounding box filter.
|
|
Defines whether group members are exported by value or by reference.
|
|
Defines whether appearance information should be exported.
|
|
Allows applying an affine transformation to all output geometries.
|
|
(CityGML only)
|
General options affecting the CityGML export.
|
(CityGML only)
|
Controls the way in which xAL address fragments are exported from the database.
|
(CityGML only)
|
Controls whether referenced features or geometry objects are exported using XLinks or as deep copies.
|
(CityGML only)
|
Defines one or more XSLT stylesheets that shall be applied to the exported city objects in the given order before writing them to file.
|
(CityJSON only)
|
General options affecting the CityJSON export.
|
Allocation of computer resources used in the export operation.
|
Starting the export process
Once all export settings are correct, the Export button [4] starts the export process (cf. Fig. 5.8). If a database connection has not been established manually beforehand, the currently selected entry on the Database tab is used to connect to the 3D City Database. The separate steps of the export process as well as all errors and warnings that might occur during the export are reported to the console window. The overall progress is shown in a separate status window. This status window also offers a Cancel button to abort the export process at any time.
Caution
While CityGML files can be written in a streaming fashion (i.e., one top-level feature after the other), which allows for keeping the memory footprint low, large parts of a CityJSON file must be kept in main memory before the entire file can be written to the file system. In order to avoid memory issues when exporting to CityJSON, it is therefore strongly recommended to reduce the number of city objects to be exported to the CityJSON output file. This can be achieved, for instance, by applying export filters or by using a tiled export (recommended).