1.2. Installation of the Importer/Exporter
Download the installer 3DCityDB-Importer-Exporter-{version}-Setup.jar
from the GitHub release section
or from the 3D City Database website at https://www.3dcitydb.org and save it to your
local file system. In addition to the Importer/Exporter tool, the installer also bundles
the 3DCityDB setup and database scripts, the 3D Web Map Client,
optional plugins for the Importer/Exporter, and test datasets.
The installer is shipped as executable Java Archive (JAR) file. A setup wizard will guide you through the steps of the installation process. The wizard can be run with a graphical user interface (GUI) and as command-line version. In addition, the installer offers an unattended installation mode to enable automatic installation workflows.
1.2.1. GUI setup wizard
Simply double-click on the installer file to launch the setup wizard in GUI mode. This should work fine on most machines. Alternatively, you can execute the wizard from the command line with the following command.
$ java -jar 3DCityDB-Importer-Exporter-{version}-Setup.jar
Once the wizard has started, click through the steps to accept the license agreement and to specify the installation directory for the Importer/Exporter. Afterwards, the wizard lets you choose the optional software packages that should be installed.
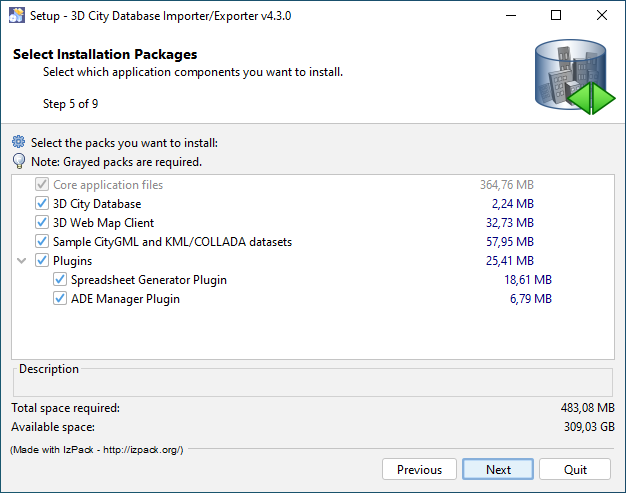
Fig. 1.1 Installation wizard of Importer/Exporter tool.
It is recommended to at least pick the 3D City Database package that contains all shell and SQL scripts required for setting up an instance of the 3D City Database on your spatial database system. Please refer to Section 1.3 for a step-by-step guide on how to use the scripts. The Sample CityGML and KML/COLLADA datasets package contains license-free sample data that may be used in your first tests.
The Plugins option installs plugins for the Importer/Exporter, which add further functionality to the tool. This release is shipped with the Spreadsheet Generator Plugin and the ADE Manager Plugin. More plugins may be added in future releases.
The 3D Web Map Client is a web-based viewer for 3DCityDB content and provides high-performance 3D visualization and interactive exploration of arbitrarily large semantic 3D city models on top of the open source Cesium Virtual Globe.
After successful installation, the contents of all selected installation packages are available from the installation directory. To run the Importer/Exporter, simply use the starter script located in the installation directory. More information on how to run the software in GUI or CLI mode is provided in Section 4.1.
Note
Before the Importer/Exporter can be used to connect to a PostgreSQL or Oracle database, please first follow the instructions in Section 1.3 to set up the 3D City Database schema on your database.
The installation directory contains the following subfolders:
| Folder/File | Optional | Explanation |
|---|---|---|
| 3dcitydb | x | Contains all shell and SQL scripts and stored procedures for operating the 3DCityDB |
| 3d-web-map-client | x | Contains a ZIP archive containing all files required to install the 3D Web Map Client on a web server |
| ade-extensions | Contains extension packages to support CityGML ADEs. ADE extensions must only be copied into this directory to make them available in the program | |
| bin | Contains the platform-specific script impexp that allows you to run the Importer/Exporter from the command line | |
| contribs | Third-party tools required by the Importer/Exporter (e.g. collada2gltf converter binaries) | |
| lib | Contains all libraries required by the Importer/Exporter | |
| licence | Contains the license files of the Importer/Exporter | |
| plugins | Contains plugins of the Importer/Exporter. Plugins only have to be copied into this directory to make them available in the program. | |
| samples | x | Contains CityGML and KML/COLLADA/glTF test datasets |
| templates | Contains HTML templates for information balloons for KML/COLLADA/glTF exports, a selection of coordinate reference systems in the form of XML documents, and example XSLT stylesheets to be used in imports and exports. | |
| uninstaller | Contains a JAR executable that uninstalls the Importer/Exporter | |
| 3DCityDB-Importer- Exporter | Platform-specific starter script to launch the Importer/Exporter with a graphical user interface. For instance, under Windows, simply double-click this script to run the program | |
| README.txt | A brief information about the application |
1.2.2. Command-line installation
The setup wizard can alternatively be run in a full headless mode, i.e., without a graphical user interface. This is useful, for instance, if the target computer does not offer a graphical user interface or in case the installation is done in a remote session, e.g. via SSH or similar means.
To launch the installer in console mode rather than in GUI mode,
simply use the -console option as shown below.
$ java -jar 3DCityDB-Importer-Exporter-{version}-Setup.jar -console
Similar to the GUI mode, the setup wizard guides you through the steps of the installation process and user input is required at each step to complete the installation. For example, you can also choose from the optional software packages like in the GUI mode.
1.2.3. Unattended installation
Instead of installing the Importer/Exporter in an interactive session using the setup wizard, you can also automatically install and deploy the software on multiple machines.
The following steps provide a simple way to build and deploy a default installation:
- Install the Importer/Exporter once using the setup wizard in GUI or in CLI mode as described above. Make sure to select all software packages required for your default installation.
- Create a zip archive from the installation directory.
- Copy the zip archive to the target machine(s) and unzip it to the destination folder.
Alternatively, you can conduct an automatic installation by using an XML-based setup script. The advantage of this approach is that you can adapt the setup script for each target machine. One option to create a setup script is to run the setup wizard once in GUI mode. When you conclude the installation and before you close the wizard, you can save your installation settings to a file by clicking the Generate an automatic installation script button.
You can also use the following template script instead.
1 2 3 4 5 6 7 8 9 10 11 12 13 14 15 16 17 18 19 20 21 22 | <?xml version="1.0" encoding="UTF-8" standalone="no"?> <AutomatedInstallation langpack="eng"> <com.izforge.izpack.panels.HelloPanel id="hello"/> <com.izforge.izpack.panels.InfoPanel id="info"/> <com.izforge.izpack.panels.LicencePanel id="license"/> <com.izforge.izpack.panels.TargetPanel id="target"> <installpath>path/to/installation/directory</installpath> </com.izforge.izpack.panels.TargetPanel> <com.izforge.izpack.panels.TreePacksPanel id="packs"> <pack index="0" name="core" selected="true"/> <pack index="1" name="3dcitydb" selected="false"/> <pack index="2" name="3d-web-map-client" selected="false"/> <pack index="3" name="samples" selected="false"/> <pack index="4" name="plugins" selected="false"/> <pack index="5" name="plugin.spreadsheet.generator" selected="false"/> <pack index="6" name="plugin.ade-manager" selected="false"/> </com.izforge.izpack.panels.TreePacksPanel> <com.izforge.izpack.panels.SummaryPanel id="summary"/> <com.izforge.izpack.panels.InstallPanel id="install"/> <com.izforge.izpack.panels.ShortcutPanel id="shortcut"/> <com.izforge.izpack.panels.FinishPanel id="finish"/> </AutomatedInstallation> |
The installation directory is mandatory input and must be provided as
value of the <installpath> element (see line 7). In addition,
the software packages to be installed can be defined by setting
the selected attribute of the corresponding <pack> element
to either true or false (lines 10-16).
Note
- The
corepackage (l. 10) is mandatory and cannot be deselected. - The
pluginspackage (l. 14) is just a container entry for the different plugins. It therefore makes no difference whether it is selected or not. - The rest of the template file may not be changed.
Once you have completed the setup script, copy it together with the
installer to the target machine. On the target machine, run the
installer from the command line and provide the setup script as argument.
Assuming your setup script is named auto-install.xml, use the
following command to run the automatic installation.
$ java -jar 3DCityDB-Importer-Exporter-{version}-Setup.jar auto-install.xml