1.3. Setting up the 3DCityDB schema
The required scripts for setting up the 3D City Database can be found in the installation directory of the Importer/Exporter within the 3dcitydb/postgresql/ and 3dcitydb/oracle/ subfolders.
1.3.1. Shell Scripts
The 3D City Database is shipped with shell scripts for both Windows and UNIX/Linux/macOS. These shell scripts allow for setting up a new 3DCityDB instance but also cover additional management tasks like dropping a 3DCityDB instance or granting access rights to another database user. The scripts are interactive and prompt the user for all mandatory input. It is also possible to use the scripts in continuous integration workflows. The following table provides an overview of the different shell scripts provided in the ShellScripts/Windows and ShellScripts/Unix subfolders:
| File | PgSQL | Oracle | Explanation |
|---|---|---|---|
| CONNECTION_DETAILS | x | x | Sets database connection details |
| CREATE_DB | x | x | Runs all scripts for creating the relational schema of a 3DCityDB incl. database types and functions |
| CREATE_SCHEMA | x | Creates an additional 3DCityDB instance in a separate schema within the same database | |
| DROP_DB | x | x | Deletes all elements of the 3DCityDB |
| DROP_SCHEMA | x | Removes a given database schema that contains a 3DCityDB instance | |
| GRANT_ACCESS | x | x | Grants read-only or read-write access on the 3DCityDB for a given user |
| REVOKE_ACCESS | x | x | Revokes access rights for a given user |
| MIGRATE_DB | x | x | Migrate an instance of the 3DCityDB from v2 or v3 to v4 |
| UPGRADE_DB | x | x | Upgrade an instance of the 3DCityDB v4 to the latest version |
Note
Prior to executing the shell scripts, the database connection
details must be set in the CONNECTION_DETAILS script. Check
the installation steps below for examples.
The shell scripts can typically be executed with a double click. On some UNIX/Linux distributions though, you will have to run the .sh scripts from within a shell environment. Please open your favorite shell and check whether execution permission is set for the shell script. Change to the location of the shell scripts and enter the following to make them executable for the owner of the file:
$ chmod u+x CREATE_DB.sh
Afterwards, simply run the shell script by typing:
$ ./CREATE_DB.sh
1.3.2. SQL Scripts
The shell scripts are user-friendly wrappers for SQL scripts that actually implement the database actions to set up or drop a 3DCityDB instance. You can also directly invoke the SQL scripts or use them in your workflows. In this case, please make sure to pass all required input to the scripts. The SQL scripts are organized into the following folders beneath the SQLScripts directory:
- SCHEMA
- Includes SQL files for creating the 3D City Database database schema including tables, constraints, datatypes, and indexes. The schema scripts are automatically generated from the schema modelling tools pgModeler (PostgreSQL) and JDeveloper (Oracle) (with minor manual edits).
- CITYDB_PKG
- Contains scripts that create database objects and stored procedures mainly used by the Importer/Exporter tool. They are written in PL/pgSQL (PostgreSQL) and PL/SQL (Oracle) and are grouped by the type of the implemented operation (data manipulation, maintenance etc.). The available functions and procedures are discussed in the Stored Procedures chapter.
- UTIL
This folder assembles different database management utilities:
- Grant and revoke access rights to and from a 3D City Database instance (cf. Section 3.4.2)
- Create additional database schemas with a 3D City Database schema (PostgreSQL only, cf. Section 3.4.1)
- Enable or disable versioning (execution can be time-consuming, Oracle only)
- Update table statistics for spatial columns (PostgreSQL only)
- MIGRATION
- Provides migration scripts to update a 3DCityDB instance of a previous major version to the latest 3DCityDB version (e.g., from version 3.x to 4.x) and upgrade scripts for updating 3DCityDB instances of the same major version (e.g., from version 4.0 to 4.1). See Migration chapter for more details.
1.3.3. Installation steps on PostgreSQL
Step 1 - Create an empty PostgreSQL database
Choose a superuser or a user with the CREATEDB privilege to create a new database on the PostgreSQL server (e.g. ‘citydb_v4’). Choose or create a user as owner of this new database who will also set up the 3D City Database schema. In the following steps, this user is called ‘citydb_user’. If you want to set up the schema with a user who is not the database owner, you have to grant this user proper permissions.
Connect to the database and type
CREATE DATABASE citydb_v4 OWNER citydb_user;
or use a graphical database client such as pgAdmin that is shipped with PostgreSQL. Please check the pgAdmin documentation for more details.
Step 2 – Add the PostGIS extension
The 3D City Database requires the PostGIS extension to be added to the database. This can only be done as superuser. The extension is added with the following command (or, alternatively, using pgAdmin):
CREATE EXTENSION postgis;
Some 3D operations such as extrusion or volume calculation are only available through the PostGIS SFCGAL extension. This extension is optional and only needed if you want to use the additional functionality. The installed PostGIS extension should at least be version 2.2 to be able to use the SFCGAL extension:
CREATE EXTENSION postgis_sfcgal;
Note
Starting from PostGIS v3, all the raster functionality has been moved
to a separate extension postgis_raster. Since the 3DCityDB requires
the raster functionality, this extension must be installed if PostGIS 3 or
a higher version is used.
CREATE EXTENSION postgis_raster;
Step 3 – Edit the CONNECTION_DETAILS[.sh | .bat] script
Go to the 3dcitydb/postgresql/ShellScripts directory, choose the folder corresponding to your operating system and open the file named CONNECTION_DETAILS with a text editor. There are five variables that will be used to connect to the DBMS. If psql is already registered in your system path, you do not have to set the directory for the PGBIN variable. The other parameters should be obvious to PostgreSQL users. Here is an example how the complete CONNECTION_DETAILS can look like under Windows:
set PGBIN=C:\Program Files\PostgreSQL\13\bin  ::Directory containing the psql binary
set PGHOST=localhost                          ::Name of the database server
set PGPORT=5432                               ::Port of the database server
set CITYDB=citydb_v4                          ::Name of the 3DCityDB database to connect to
set PGUSER=citydb_user                        ::Database user to connect with
Step 4 - Execute the CREATE_DB script
As soon as the database credentials are defined, run the CREATE_DB script. Is is located in the same folder as CONNECTION_DETAILS (see also Section 1.3.1).
Step 5 – Specify the coordinate reference system
After executing the CREATE_DB script, the user is prompted for the coordinate reference system (CRS) to be used in the 3D City Database. You have to enter the PostGIS specific SRID (spatial reference ID) of the CRS which – in most cases – resembles the EPSG code of the CRS. There are three prompts in total to define the spatial reference:
- First, specify the SRID to be used for the geometry columns of the database. Unlike previous version of the 3D City Database there is no default CRS defined.
- Second, specify the SRID of the height system if no true 3D CRS is used for the data. This can be regarded as metadata and has no effect on the geometry columns in the database. The default value is 0 – which means “not set”.
- Third, provide the GML compliant uniform resource name (URN)
encoding of the CRS. The default value uses the OGC namespace and
comprises of the first two user inputs:
urn:ogc:def:crs,crs:EPSG::<crs1>[,crs:EPSG::<crs2>].
More information about the SRID and the URN encoding can be found in Section 3.3.
Note
The setup process will terminate immediately if an error occurs during the setup process. Reasons might be:
- The user executing CREATE_DB script is neither a superuser nor the owner of the specified database (or does not own privileges to create objects in that database);
- The PostGIS extension has not been installed; or
- Parts of the 3D City Database do already exist because of a previous
setup attempt. Therefore, make sure that the schemas
citydbandcitydb_pkgdo not exist in the database when setting up the 3D City Database.
After a series of log messages reporting the creation the 3DCityDB schema and stored procedures, the chosen reference system is applied to the spatial columns (expect for those that will store data with local coordinate systems). This takes some seconds. The setup process is successfully completed when ‘Done’ is printed to the console.
The following figure exemplifies the user input for the CREATE_DB script.
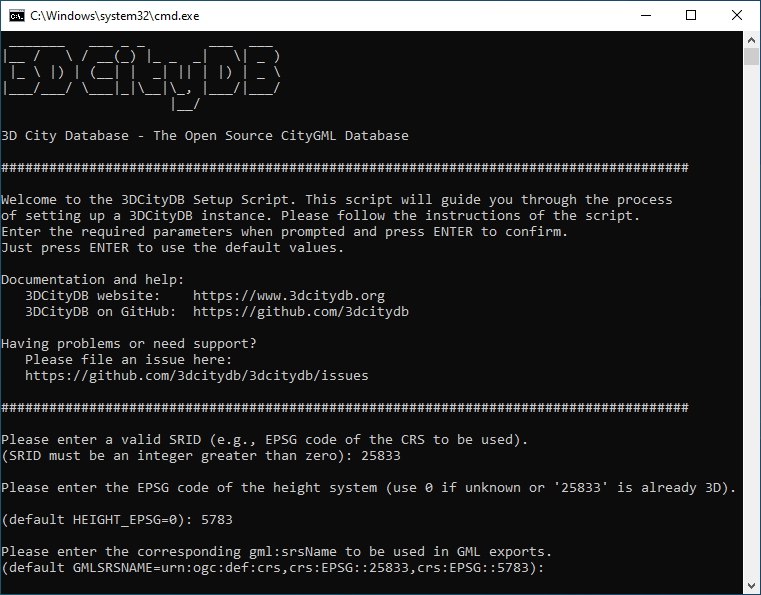
Fig. 1.2 Example user input when executing CREATE_DB for a PostgreSQL database.
Step 5 – Check if the setup is correct
The 3D City Database is stored in a separate PostgreSQL schema called
citydb. The stored procedures are written to a separate PostgreSQL
schema called citydb_pkg. Usually, different schemas have to be
addressed in every query via dot notation, e.g.
SELECT * FROM citydb.building;
Fortunately, this can be avoided when the corresponding schemas are on the database search path. The search path is automatically adapted during the setup. Execute the command
SHOW search_path;
to check if the search path contains the schemas citydb, citydb_pkg
and public (required for PostGIS elements).
Note
When using the created 3D City Database as a template database for new databases, the search path information is not transferred and thus has to be set again for the new database, e.g.:
ALTER DATABASE new_citydb_v4 SET search_path TO citydb, citydb_pkg, public;
The search path will be updated upon the next login, not within the same session.
To drop the 3D City Database with all data, execute the DROP_DB script in the same way like CREATE_DB. Simply dropping the schemas ‘citydb’ and ‘citydb_pkg’ in a cascading way will also do the job.
1.3.4. Installation steps on Oracle
Step 1 - Define a user for the 3D City Database
A dedicated database user should be created for your work with the 3D City Database. This user must have the roles CONNECT and RESOURCE assigned and must own the privileges CREATE SEQUENCE and CREATE TABLE.
Note
The privileges CREATE SEQUENCE and CREATE TABLE are required for enabling and disabling spatial indexes. It is not sufficient to inherit these privileges through a role.
Step 2 – Edit the CONNECTION_DETAILS[.sh | .bat] script
Go to the 3dcitydb/oracle/ShellScripts directory, choose the folder corresponding to your operating system and open the file named CONNECTION_DETAILS within a text editor. There are five variables that will be used to connect to the DBMS. If SQL*Plus is already registered in your system path, you do not have to set the directory for the SQLPLUSBIN variable. The other parameters should be obvious to Oracle users. Here is an example how the complete CONNECTION_DETAILS can look like under Windows:
set SQLPLUSBIN= C:\\Oracle\\instantclient_11_2 ::Directory containing the SQL*Plus binary
set HOST=localhost                             ::Name of the database server
set PORT=1521                                  ::Port of the database server
set SID=orcl                                   ::SID of the 3DCityDB database to connect to
set USERNAME=citydb_v4                         ::Database user to connect with
Note
The scripts to grant or revoke read access require SYSDBA privileges. You can specify a SYSDBA user in the CONNECTION_DETAILS script using the additional parameter called SYSDBA_USERNAME.
Step 3 - Execute the CREATE_DB script
As soon as the database credentials are defined run the CREATE_DB script. It is located in the same folder as CONNECTION_DETAILS (see also Section 1.3.1).
Step 4 - Define the coordinate reference system
Like with PostgreSQL, the user is prompted to enter the SRID used for the geometry columns, the SRID of the height system and the GML compliant URN encoding of the coordinate reference system (see Section 3.3 for more information).
Step 5 – Enable or disable versioning
After providing the CRS information, the user is asked whether or not the database should be versioned-enabled. Versioning is realized based on Oracle’s Workspace Manager functionality (see the Oracle documentation for more information). Please enter ‘yes’ or ‘no’. The default value ‘no’ is confirmed by simply pressing Enter. Note that, in general, insert, update, delete and index operations on version-enabled tables take considerably more time than on tables without versioning support.
Step 6 – Choose Spatial or Locator license option
You can set up a 3D City Database instance on an Oracle database with Spatial or Locator support. Since Locator differs from Spatial with respect to the available spatial data types, you need to specify which license option is valid for your Oracle installation. Simply enter ‘L’ for Locator or ‘S’ for Spatial (default value) to make your choice.
Note
Since Locator lacks the GeoRaster data type, the 3D City Database tables for storing raster reliefs (RASTER_RELIEF, GRID_COVERAGE, GRID_COVERAGE_RDT) are not created when choosing Locator.
Note
Several spatial operations and functionalities that are available in Oracle Spatial are not covered by the Locator license even though they might be available from your Oracle installation. It is the responsibility of the database user to observe the Oracle license option. Choosing Locator or Spatial when setting up the 3D City Database does neither affect the license option nor the users’ responsibility.
Step 7 – Check if the setup is correct
After successful completion of the setup procedure, the tables, sequences and packages (that contain stored procedures) should appear in the user schema.
Versioning of the database can also be switched on and off at any time. The corresponding scripts are ENABLE_VERSIONING and DISABLE_VERSIONING. These scripts invoke routines of the Oracle Workspace Manager and will take some time for execution depending on the amount of data stored in the 3D City Database instance.
Last but not least, the schema and stored procedures of the 3D City Database can be dropped with the DROP_DB script, which is executed like CREATE_DB. Similar to CREATE_DB, you need to provide the license option (Locator or Spatial). Note that the script will delete all data stored in the 3D City Database schema. The database user will, however, not be deleted.