5.2.2. Export tabular data
The Spreadsheet Generator plugin adds the Table Export tab to the operations window of the Importer/Exporter to export attributes of the city objects stored in the 3D City Database in tabular form. The following figure shows the content of the Table Export tab.
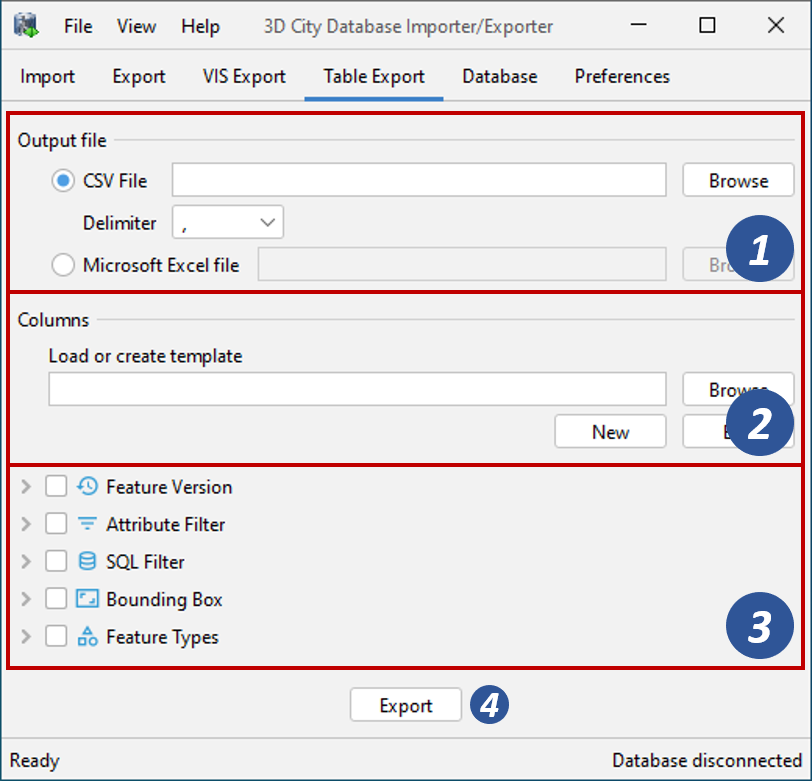
Fig. 5.9 The table export dialog.
Output file selection
At the top of the export dialog, the target output file must be specified [1].
You can choose to either export the attribute data as CSV or as Microsoft
Excel (XLSX) file. Enter the output file manually or open a file selection dialog
via the Browse button. When selecting CSV as output format, the delimiter to be
used for separating the values in the CSV file can be additionally defined
with the corresponding drop-down list. By default, a comma , is used as delimiter.
Columns to export
The Columns section of the Table Export operation tab lets you define the attributes that shall be exported as separate columns of the output file [2]. You can load an existing template file that defines the table layout to be used in the export. Simply enter the path to the template file or use a file selection dialog by clicking on the Browse button. Alternatively, click on the New button if you want to define a new table layout for the export instead. This will bring up an additional user dialog as illustrated below. The same dialog is shown if you load a template file but want to adapt it before exporting by pushing the Edit button.
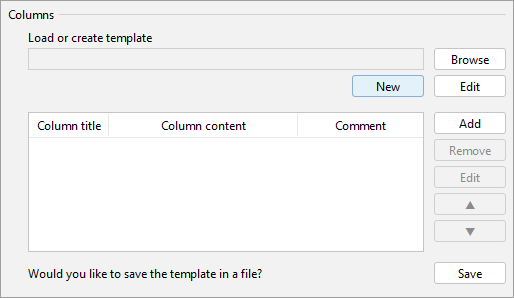
Fig. 5.10 Dialog to create a new table layout or edit an existing one loaded from a template file.
The columns to be exported are listed as separate entries of the table in Fig. 5.10. Each column has a Column title that is used as header information for the column in the output file. The Column content defines the feature attribute that shall be mapped to this column. You can also add an optional Comment that, however, is just meant for documentation and will not be exported to the output file. The table is automatically populated with the content of the template file or will be empty in case no template file was loaded.
During an export, the table export operation iterates over all city objects to be exported. For each city object, a new record is created in the output file that consists of the columns defined in the above table layout. The values of the attributes chosen as Column content are queried from the database and written to the corresponding fields of the record.
Note
For every city object, its object identifier stored in the GMLID column of the CITYOBJECT table will always be exported as first column of each record in the output file. The name of this first column is always “GMLID”. Thus, there is no need to define your own column for the GMLID value.
The columns are written to a record in the same order as they are listed in the table layout. Select an entry in the table and use the Up (▲) and Down (▼) buttons on the right of the table to change its position in the list. Click on Remove to delete the selected entry from the table layout.
Add a new column or edit an existing one
You can add a new column to the output file by pushing the Add button next to the table in Fig. 5.10. This will open the following dialog window.
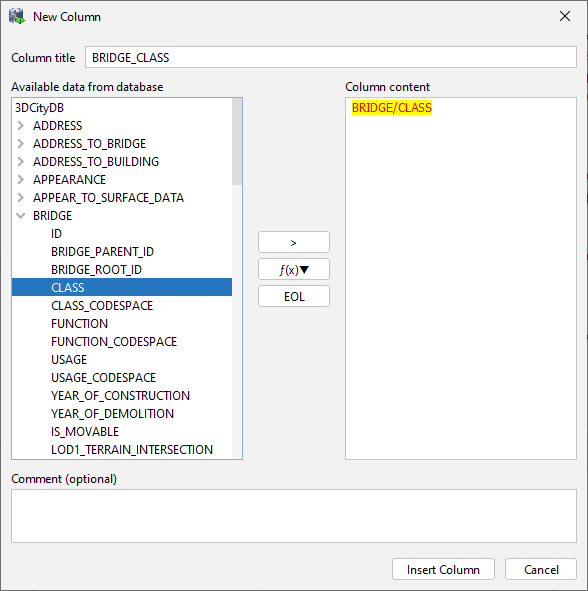
Fig. 5.11 Add a new column to the table layout for the output file.
Enter the column title, content and an optional comment into the corresponding input fields. Both the title and the content are mandatory. If you leave the title field empty, a default value as combination of the table and column name in the database is chosen.
To pick an attribute from the database as content for the column, you can use the tree view
called Available data from database on the left of the dialog. This view lists
all predefined tables of the 3DCityDB schema as nodes of the tree. When
clicking on one of the nodes, the columns available for the corresponding table are shown.
Select the database column you want to export and click the > button in the
middle of the dialog to accept it as content for the column in the output file.
The content field is automatically populated with an expression that references
the database column. The syntax of this expression is based on the balloon content language
used by the visualization export operation and explained in more detail in Section 5.2.2.1.
The expression is dynamically evaluated during export and the value stored
in the referenced column for a given city object is written to the output file.
Note
The tree view will also list tables and columns of CityGML ADEs if a corresponding ADE extension has been registered with the 3D City Database and the Importer/Exporter.
If a database table contains multiple entries for the same city object,
then the different values for the chosen column are exported as comma-separated
list to the output file. If you rather prefer a single value, you can use one
of the aggregation functions MAX, MIN, AVG, COUNT, SUM, FIRST,
or LAST. Simply click on the f(x)▼ button instead of > to copy a database
column into the Column content field and pick the function you want from the
choice list. Note that the expression now also contains the chosen aggregation function.
Multi-line content is also supported for a column in the output file. Click on
the EOL (end of line) button to add a break line to the column content. The
break lines is encoded as [EOL] in the expression.
You can also enter the column content manually into the corresponding input field.
Instead of a dynamic expression, you can also provide a static value that
shall be exported as-is for every record in the output file.
For example, assume you want to have a field called CITY in the output file
that has the value Munich for every record. Then simply enter Munich into
the Column content field.
Note
The Column content field may contain a combination of dynamic expressions and static values, possible separated by break lines.
The comment input field is optional and can be left empty. When clicking on the Insert column button at the bottom of the dialog window, the newly defined column will be carried to the table of columns for the output file (see Fig. 5.10). When you select an entry from this table and push the Edit button, you can edit the title, content and comment for this column using the same dialog window as shown in Fig. 5.11.
Save template file
If you want to reuse a table layout for multiple exports, you can save it as template file using the Save button as shown in Fig. 5.10. Use the Load button to restore the template file when you use the table export operation the next time. You can also create template files manually without using the Table Export user interface. Please stick to the rules for template files as discussed in Section 5.2.2.2 in this case.
Note
The Spreadsheet Generator plugin is shipped with example template
files that are available from the templates folder within the
installation directory of the plugin.
Export filters
Similar to the CityGML/CityJSON export process, the table export operation offers thematic and spatial filters to restrict an export to a subset of the 3D city model content stored in the database [3]. The following filters are available and discussed in separate sections of this chapter:
- 5.2.2.3 Feature version filter
- 5.2.2.4 Attribute filter
- 5.2.2.5 SQL filter
- 5.2.2.6 Bounding box filter
- 5.2.2.7 Feature type filter
To enable a filter, simply select its checkbox. This will automatically make the filter dialog visible. Make sure to provide the mandatory input for the filter to work correctly. If more than one filter is enabled, the filters are combined in a logical AND operation, i.e. all filter criteria must be fulfilled for a city object to be exported. If no checkbox is enabled, no filters are applied and, thus, all features contained in the database will be exported.
Note
All export filters are only applied to top-level features but not to nested sub-features.
Starting the export process
Once all settings are complete, the table export is triggered with the Export button [4] at the bottom of the dialog (cf. Fig. 5.9). If a database connection has not been established manually beforehand, the currently selected entry on the Database tab is used to connect to the 3D City Database. The separate steps of the export process as well as all errors and warnings that might occur during the export are reported to the console window. The overall progress is shown in a separate status window. This status window also offers a Cancel button to abort the export process at any time.