3.8. Using the command line interface (CLI)
In addition to the graphical user interface, the Importer/Exporter also offers a command line interface (CLI). The CLI allows a user to run the Importer/Exporter from the command line (or a shell script) and to easily embed it in batch processing workflows and third-party applications.
To use the CLI, you first need to start a shell environment offered by
the operating system of your choice. The general command to run the
Importer/Exporter from a shell environment (or a shell script) is shown
below. Please replace the {version} token in the file name
with your current version.
$ java -jar lib/impexp-client-{version}.jar [-options]
This command consists of two parts. The first part executes the Java
Virtual Machine (JVM) through the java command. The -jar argument of
the JVM is used to denote the path to the Importer/Exporter JAR file
impexp-client-{version}.jar to be executed. After the JAR filename, you can
provide additional program arguments to trigger a specific operation of
the Importer/Exporter.
Note
The above command assumes that you first change the directory
to the installation directory of the Importer/Exporter. Otherwise,
you must provide the full path to the impexp-client-{version}.jar file,
or include it in your PATH environment variable.
You may add any further JVM arguments to the above command that you
think are required in your environment. It is recommended to at least
start the JVM with a minimum amount of main memory using the -Xms
argument. For instance, use java -Xms1G to allocate 1 GB of your main memory
for the Importer/Exporter at startup.
To get a list of program arguments offered by the Importer/Exporter, use
the -help option:
$ java -jar lib/impexp-client-{version}.jar -help
This will produce an output like shown below.
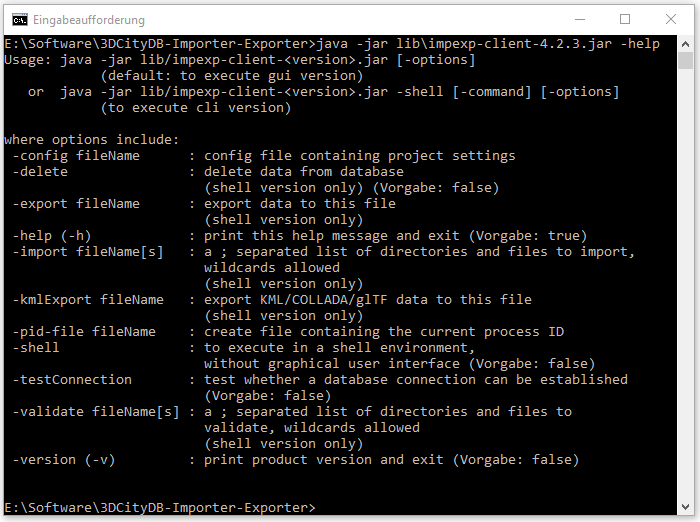
Fig. 3.74 Help text of the command line interface.
The available program arguments are:
Argument
|
Description
|
-shell |
This argument is mandatory to start the shell version of the Importer/Exporter.
If this argument is not provided, then the GUI version is launched by default.
|
-config |
Provides the path and filename of the config file to be used. If this argument
is omitted, the config file in the default path is used instead. Using environment
variables, the default path can be identified dynamically
(cf. Section 3.1):
|
-import |
Triggers a CityGML import process. Provide a list of one or more input files
separated by semicolons (;) in addition. The list may also contain folders. A folder
and all its nested subfolders are recursively scanned for CityGML input files.
|
-validate |
Triggers a XML Schema validation on the provided list of input files
(see the import argument).
|
-export |
Triggers a CityGML export process. Provide the path and name of the output file.
|
-kmlExport |
Triggers a KML/COLLADA/glTF export process. Provide the path and name of the
output file.
|
-delete |
Deletes data from the database according to the settings in the config file.
|
-testConnection |
Connects to the database using the connection details provided in the config file
and exits afterwards. Evaluate the exit code (and optionally the log messages on
the console) to check whether the connection was established successfully.
|
-pid-file |
Creates a file containing the process identifier (PID) of the Importer/Exporter
process. Provide the path and name of the PID file.
|
The full range of preferences and settings affecting the different
operations of the Importer/Exporter are not
offered as separate program arguments. Instead, it is assumed that the
config file (either the default one or the one provided through the
-config argument) contains all the settings that should be used in a
specific operation (e.g., the database connection details, filter
settings for imports and exports, etc.). The config file is encoded as
XML and hence can be edited by a user manually. However, a simple way
to obtain a valid config file is as follows:
- Run the Importer/Exporter with the graphical user interface (GUI).
- Make all your settings in the GUI.
- Save your settings to a local config file via the Project Save Project As… dialog from the main menu bar.
- Make manual changes to the config file if required.
- Feed this config file to the command line interface using the
-configargument.
Note
You can also create a config file programmatically in Java. The JAR file impexp-config-{version}}.jar in the installation directory of the Importer/Exporter contains all the classes required for reading and writing a config file. Once you have the JAR file on your classpath, use the class org.citydb.config.ConfigUtil as starting point.