3.1. Interfaces
The 3D City Database Importer/Exporter offers both a graphical user interface (GUI) and a command line interface (CLI). The CLI allows for embedding the tool in batch processing workflows and third-party applications. The usage of the CLI is documented in Section 3.8.
To launch the GUI, simply use the starter scripts located in the bin
subfolder of the installation directory of the 3D City Database
Importer/Exporter. A desktop icon as well as shortcuts in the start menu
of your operating system will additionally be available in case you
chose to create shortcuts during setup. Depending on your platform, one
of the following starter scripts is provided:
3DCityDB-Importer-Exporter.bat(Microsoft Windows family)3DCityDB-Importer-Exporter.sh(UNIX/Linux/Mac OS family)
On most platforms, double-clicking the starter script or its shortcut runs the Importer/Exporter.
For some UNIX/Linux distributions, you will have to run the starter script from within a shell environment though. Please open your favourite shell and first check whether execution rights are correctly set on the starter script. If not, change to the installation folder and enter the following command to make the starter script executable for the owner of the file:
$ chmod u+x 3DCityDB-Importer-Exporter.sh
Afterwards, simply run the software by issuing the following command:
$ ./3DCityDB-Importer-Exporter.sh
Note
With every release, the README.txt file in the installation folder provides version-specific information on how to run the Importer/Exporter.
The starter scripts define default values for the Java Virtual Machine
(JVM) that runs the Importer/Exporter. Most importantly, they specify
the minimum amount of main memory for the application through the –Xms
parameter of the JVM. The default value has been chosen to be reasonable
for most platforms but may need to be adapted to your needs before
launching the application (e.g., if you want to increase or limit the
available main memory).
The graphical user interface of the Importer/Exporter is organized into four main components as shown in Fig. 3.1. A menu bar [1] is located either below (Windows, some Linux distributions) or above (Mac, some Linux distributions) the title bar. The main application window is divided into an operations window [2] that renders the user dialogs of the separate operations of the Importer/Exporter and a console window [4] that displays log messages. Via the View entry in the menu bar, the console window can be detached from the main window and rendered in a separate window. At the bottom of the operations window, a status bar [3] provides information about running processes and database connections.
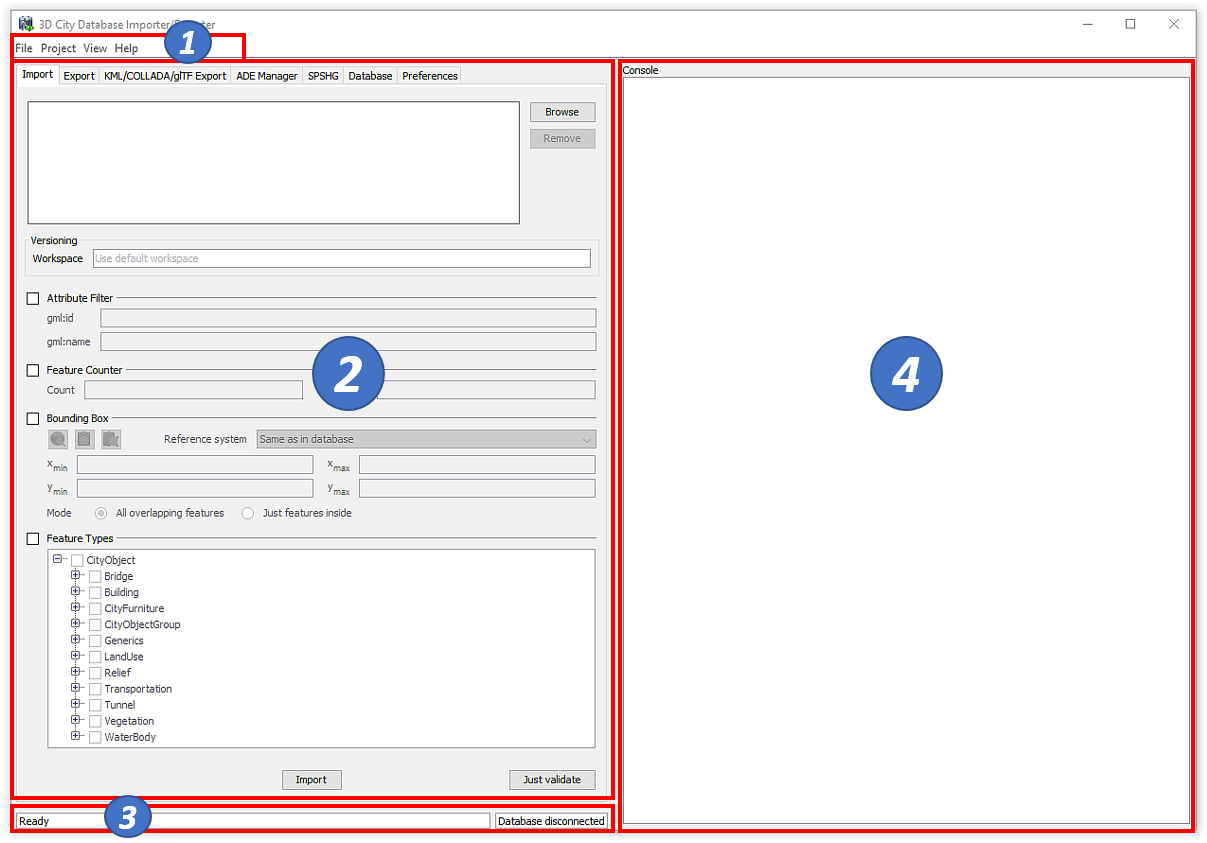
Fig. 3.1 Organization of the Importer/Exporter GUI.
The tab menu on top of the operations window lets you switch between the operations of the Importer/Exporter and their user dialogs. The following tabs are available:
- Import: Import of CityGML models into the database
- Export: Export of city model data as CityGML
- KML/COLLADA/glTF Export: Export of city model data in KML, COLLADA or glTF format
- Database: Database connection settings and operations
- Preferences: Preference settings for each operation
Note
If you have installed plugins, the tab menu may contain additional entries. Please refer to the documentation of your plugin in this case.
The main menu bar [1] offers the entries File, Project, View and Help. The File menu only contains one entry Exit to close the application.
The Project menu lets a user store and load settings from a config file. The separate menu entries provide the following functionality:
- Open Project…: Load a config file and recover all settings from this file.
- Save Project: Save all settings made in the GUI to the default config file.
- Save Project As…: Save all settings made in the GUI to a separate config file.
- Restore Default Settings: Set all settings to default values.
- Save Project XSD As…: Save the XML Schema defining the XML structure of config files to a separate file. The XML Schema is helpful in case a user wants to manually edit the config file. Only config files conforming to the XML Schema definition will be successfully loaded by the Importer/Exporter.
- Recently Used Projects…: List of recently loaded config files.
The Importer/Exporter uses one default config file per operating
system user running the Importer/Exporter. All settings made in the GUI
are automatically stored to this default config file when the
Importer/Exporter is closed and are loaded from this file upon program
start. The default config file is named project.xml and is stored in the
home directory of the user. Precisely, you will find the config file
in the subfolder 3dcitydb/importer-exporter/config. Note that the
location of the home directory differs for different operating systems.
Using environment variables, the location can be identified dynamically:
%HOMEDRIVE%%HOMEPATH%\3dcitydb\importer-exporter\config(Windows 7 and higher)$HOME/3dcitydb/importer-exporter/config(UNIX/Linux, Mac OS families)
The View menu affects the GUI elements of the Importer/Exporter and offers the following entries:
- Open Map Window: Opens the 2D map window for bounding box selections (cf. Section 3.7).
- Detach Console: Renders the console window in a separate application window.
- Restore default perspective: Restores the GUI to its default settings.
Finally, the Help menu gives access to this online documentation and provides a Read Me file shipped with the Importer/Exporter. The About dialog displays, amongst other information, the official version and build number of the Importer/Exporter.