3.7. Map window for bounding box selections
The Importer/Exporter offers a 2D map window that allows a user to display the overall bounding box calculated from the city model content stored in a 3D City Database instance and to graphically select a bounding box for data imports and exports.
There are two ways to open the map window:
Choose the entry View -> Open Map Window from the menu bar at the top of the application window.
Click the map button
 on the bounding box dialog that is
available for the different import and export operations.
on the bounding box dialog that is
available for the different import and export operations.
The 2D map is rendered in a separate application window shown below.
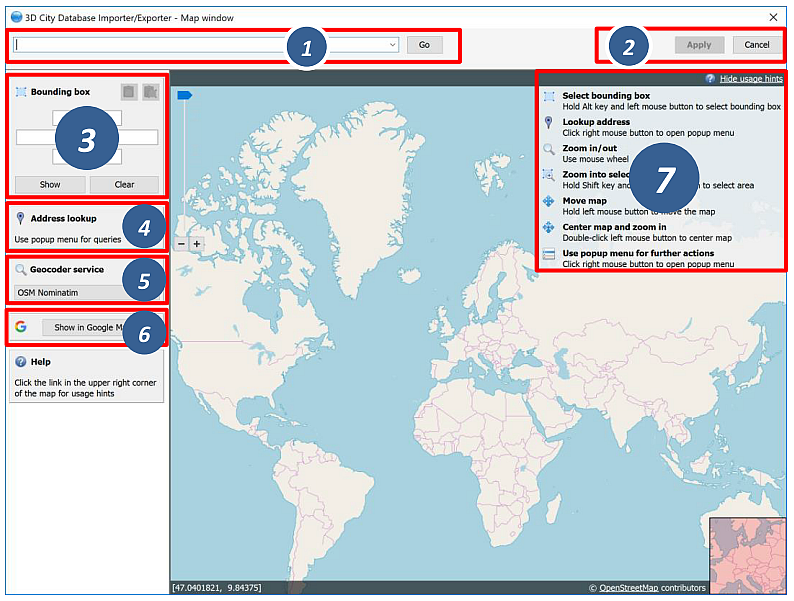
Fig. 3.71 2D map window for bounding box selections.
The map content is provided by the OpenStreetMap (OSM) service and is subject to the OSM usage and license terms. Make sure your computer has internet access to load the map. This might require setting up network proxies (see Section 3.6.5.3). Please consult your network administrator.
The map offers default mouse controls for panning and zooming. For convenience, a geocoding service is included in the map window [1]. Simply type in an address or a geo location (given by geographic lat/lon coordinates separated by a comma) and click the Go button. The map will automatically zoom to the first match. Further matches are available from the drop-down list [1]. The geocoding service uses the free OSM Nominatim service by default. You can pick the Goolge Geocoding API as alternative service from the drop-down list in [5]. Note that the Goolge Geocoding API is not free but requires an API key that must be entered in the global preferences of the Importer/Exporter (cf. Section 3.6.5.4). Otherwise the service will respond with an error message. Independent of the service you choose, make sure that you adhere to its terms of use.
To display the result of the geocoding query on Google Maps in your default internet browser, simply click the Show in Google Maps button [6].
A list of usage hints is available at the right top of the map window [7]. Please click on the Show usage hints link to display this list. The map controls are also described in the following.
- Select bounding box: Move the mouse while pressing the ALT key and the left mouse button to select a bounding box. Once the left mouse button is released, the coordinates of the bounding box are automatically filled in the Bounding Box dialog on left of the map [3]. If you have opened the map window from a bounding box filter dialog, then clicking the Apply button on the upper right corner of the window [2] closes the map window and carries the bounding box values to the filter dialog. In addition, the values are copied to the clipboard.
- Lookup address: Right-click on the map to bring up a context menu
for the geo location at the mouse pointer. From the context menu,
choose Lookup address here. This will trigger a reverse geocoding
query using the geocoding service selected in [5]. The resulting
address will be displayed on the left of the window [4]. The
 icon denotes which location on the map is associated with the
address, whereas the
icon denotes which location on the map is associated with the
address, whereas the  icon shows where you clicked on the map
(see Fig. 3.72).
icon shows where you clicked on the map
(see Fig. 3.72). - Zoom in/out: Use the mouse wheel or the context menu (right-click).
- Zoom into selected area: Move the mouse while pressing the SHIFT key and the left mouse button to select an area. Once the left mouse button is released, the map zooms into the selected area. If the maximum zoom level is reached this action has no further effect.
- Move map: Keep the left mouse button pressed to move the map.
- Center map and zoom in: Double click the left mouse button to center the map at that position and to increase the current zoom level by one step.
- Use popup menu for further actions: Right-click on the map to bring up a context menu offering additional functions such as Zoom in, Zoom out, Center map here and Lookup address here (see above). The Get map bounds function is equivalent to selecting the visible map content as bounding box, and the map bounds are transferred to the Bounding Box dialog on the left [3].
To close the map, simply click the Cancel button in the upper right corner [2].

Fig. 3.72 Address lookup in the map window.
The coordinates in the map window and of the selected bounding box are always given in WGS 84 regardless of the coordinate reference system of the 3D City Database instance.
When opening the map window from a bounding box dialog that already contains coordinate values, the map window will automatically display this bounding box. If the coordinate values of the provided bounding box are not in WGS 84, a transformation to WGS 84 is required. Since the Importer/Exporter uses functionality of the underlying spatial database system for coordinate transformations, a connection to the database must have been established beforehand. In case there is no active database connection, the following pop-up window asks the user for permission to connect to the database.
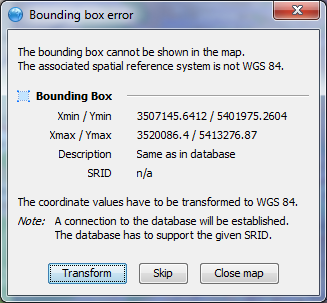
Fig. 3.73 Asking for permission before connecting to a database for coordinate transformation.
The Apply button on the upper right corner of the map window [2] is a
shortcut for copying the coordinate values to the clipboard and pasting
them in the bounding box fields of the calling tab on the operations
window. Furthermore, coordinate values can now be easily copied from one
tab to another by simply clicking on the copy button  in one of them, say Import tab, with filled bounding box values,
changing to another, say KML/COLLADA/glTF Export tab and clicking on the
in one of them, say Import tab, with filled bounding box values,
changing to another, say KML/COLLADA/glTF Export tab and clicking on the
 button there. Previously existing values in the bounding box fields of
the KML/COLLADA/glTF Export tab (if any) will be overwritten.
button there. Previously existing values in the bounding box fields of
the KML/COLLADA/glTF Export tab (if any) will be overwritten.