3.3. Importing CityGML files
To load 3D city model content into a 3D City Database instance, the Importer/Exporter supports the import of CityGML files. Supported CityGML versions are 2.0.0, 1.0.0 and 0.4.0. The CityGML import operation is available on the Import tab of the operations window as shown below.

Fig. 3.12 The CityGML import dialog.
Input file selection. At the top of the Import dialog [1], a list of one or more CityGML files to be imported must be provided. Files can be selected through clicking on the Browse button, which opens a regular file selection dialog. Alternatively, you can drag&drop files from your preferred file explorer onto the Import tab. If the file list already contains entries, the drag&drop operation will replace its content. If you want to keep the previous entries and only append additional files, keep the CTRL key pressed while dropping (on Windows). The Remove button or DEL key lets you remove selected entries from the input files. Note that adding folders to the list is also supported. Each folder will be recursively scanned for CityGML files, and every CityGML file found will be imported.
The importer supports the following file formats for CityGML datasets: 1) regular XML files (*.gml, *.xml), 2) GZIP compressed XML files (*.gz, *.gzip), and 3) ZIP archives (*.zip). ZIP archives are recursively scanned for contained XML files. Additional files such as texture images will also be imported from the ZIP archive if they are correctly referenced from the XML file(s) using relative paths within the ZIP archive.
Workspace selection. If the 3D City Database instance is version-enabled (Oracle only), the name of the workspace into which the data shall be imported can be specified [2]. If no workspace is given, the default workspace is assumed (Oracle: LIVE).
Note
Importing into version-enabled tables typically takes considerably more time than importing into non-version-enabled tables. The import time can be reduced if spatial indexes are disabled beforehand.
Import filter. The import dialog allows for setting thematic and spatial filter criteria to narrow down the set of CityGML top-level features that are to be imported from the input files. The checkboxes on the left side of the import dialog let you choose between an attribute filter, a feature counter filter, a spatial bounding box filter and a feature type filter. If more than one filter is chosen, then the filter criteria are combined in a logical AND operation. If no checkbox is enabled, no filter criteria are applied and thus all CityGML features contained in the input file(s) will be imported.
- Attribute filter: This filter takes a gml:id and/or a gml:name as parameter [3] and only imports CityGML features having a matching value for the respective attribute. More than one gml:id can be provided in a comma-separated list. Multiple gml:name values are not supported though.
- Counter filter: The feature counter filter lets you import a subset of the top-level features based on their position index over all input file(s). Simply provide the lower and upper boundary [4] for the position index to define the subset (both boundary limits are inclusive).
- Bounding box filter: This filter takes a 2D bounding box as parameter that is given by the coordinate values of its lower left (xmin, ymin) and upper right corner (xmax, ymax) [5]. The bounding box is evaluated against the gml:boundedBy property of the CityGML input features. You can choose whether features overlapping with the provided bounding box are to be imported, or whether features must be inside of it.
- Feature type filter: With the feature types filter, you can restrict the import to one or more CityGML features types by enabling the corresponding checkboxes [7]. Only features of the chosen type(s) will be imported.
Note
All filters only work on top-level features but not on nested sub-features.
For the bounding box filter, make sure that you choose a coordinate reference system from the drop-down choice list that matches the provided coordinate values. Otherwise, the spatial filter may not work as expected. The coordinate reference system list can be augmented with user-defined reference systems (see Section 3.6.4 for more information).
The coordinate values of the bounding box filter can either be entered
manually or chosen interactively in a 2D map window. To open the map
window, click on the map button  [6].
[6].
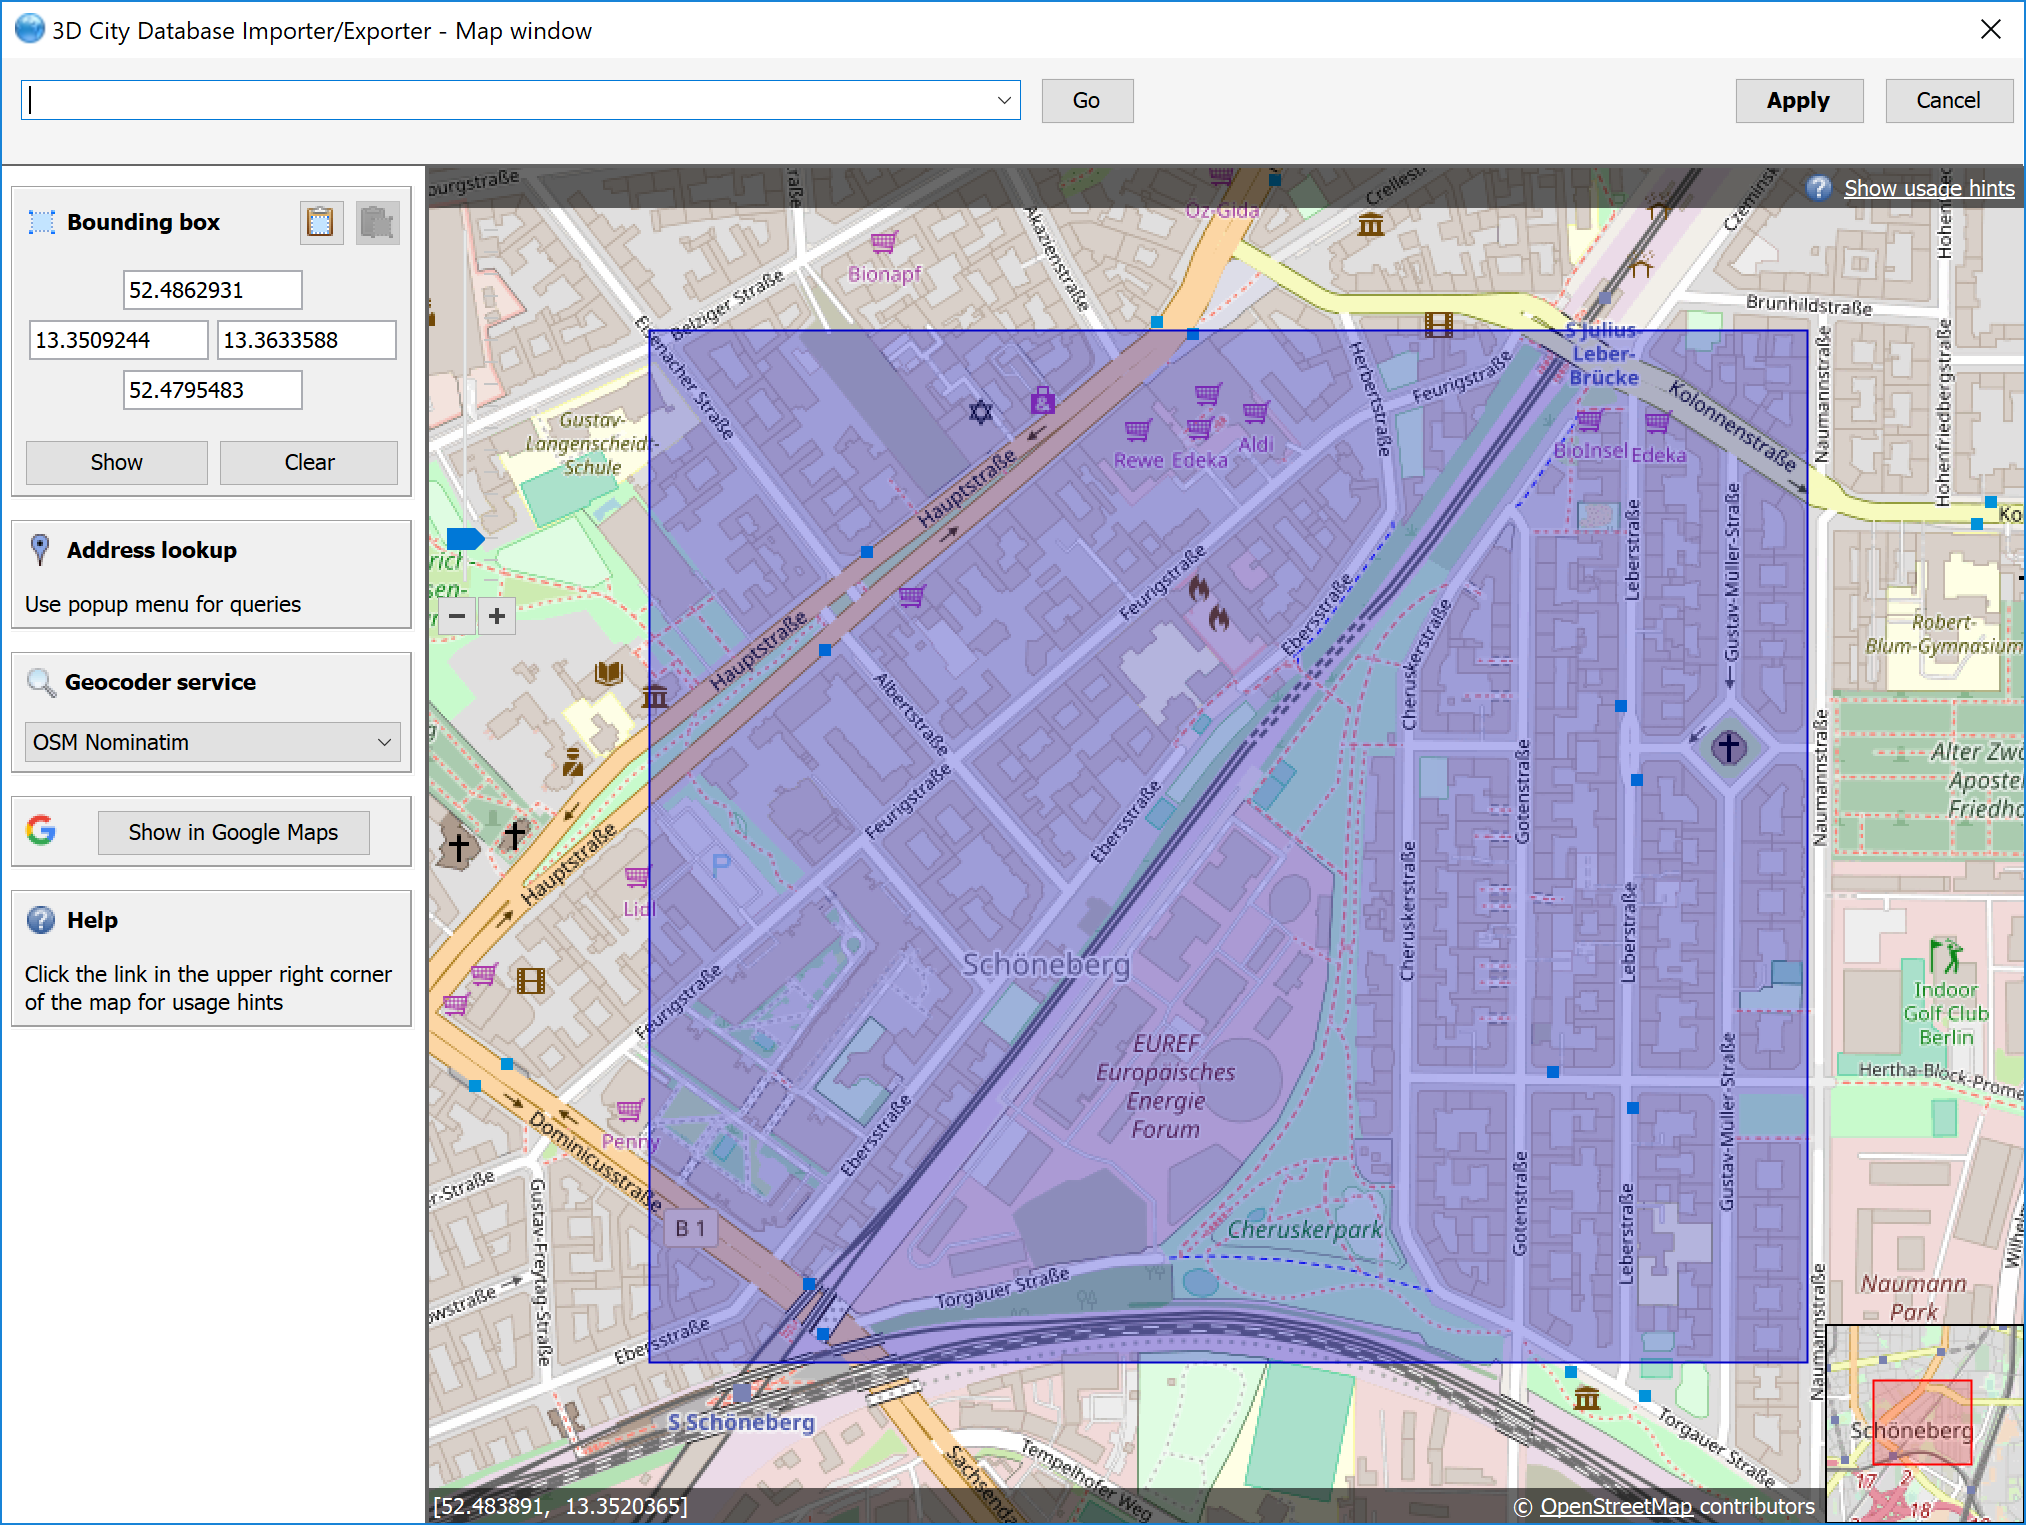
Fig. 3.13 Bounding box selection using the 2D map window.
In the map window, keep the left mouse button clicked while holding the ALT key. This lets you draw a bounding box on the map. In order to move the map to a specific location or address, simply enter the location or address in the input field on top of the map and click the Go button or use the map navigation controls. If you are happy with the bounding box selection, click the Apply button. This will close the map window and carry the coordinate values of the selected area into the corresponding fields of the bounding box filter [5]. Click Cancel if you want to close the map window but skip your selection. A more comprehensive guide on how to use the map window is provided in chapter Section 3.7.
With the  button on the bounding box filter dialog [6], you can copy a bounding
box to the clipboard, while the
button on the bounding box filter dialog [6], you can copy a bounding
box to the clipboard, while the  button pastes a bounding box from the clipboard to the input fields of
the bounding box filter [5] (or use the right-click context menu).
button pastes a bounding box from the clipboard to the input fields of
the bounding box filter [5] (or use the right-click context menu).
XML validation. Before importing, the CityGML input files can be validated against the official CityGML XML schemas. Simply click the Just Validate button [9] in order to run the validation process. Filter settings are not considered in this process. Note that this operation does not require internet access since the XML schemas are packaged with the application. The CityGML features are not imported into the database during validation. The validation results are printed to the console window.
Note
It is strongly recommended that only CityGML files having successfully passed XML validation are imported into the database. Otherwise, errors in the data may lead to unexpected behavior or abnormal termination.
Import preferences. More fine-grained preference settings affecting the CityGML import are available on the Preferences tab of the operations window. Make sure to check these settings before starting the import process. A full documentation of the import preferences is available in Section 3.6.1. The following table provides a summary overview.
Preference name
|
Description
|
Continuation
|
Metadata that is stored for every object in the database such as the data
lineage, the updating person or the creationDate property.
|
gml:id handling
|
Generates UUIDs where gml:ids are missing on input features or replaces all
gml:ids with UUIDs.
|
Address
|
Controls the way in which xAL address fragments are imported into the
database.
|
Appearance
|
Defines whether appearance information is imported.
|
Geometry
|
Allows for applying an affine transformation to the input geometry.
|
Indexes
|
Settings for automatically enabling/disabling spatial and normal indexes
during imports.
|
XML validation
|
Performs XML validation automatically and exclude invalid features from
being imported.
|
XSL transformation
|
Defines one or more XSLT stylesheets that shall be applied to the city objects
in the given order before import.
|
Import log
|
Creates a list of all successfully imported CityGML top-level features.
|
Resources
|
Allocation of computer resources used in the import operation.
|
CityGML import. Once all import settings are correct, the Import button [8] starts the import process. If a database connection has not been established manually beforehand, the currently selected entry on the Database tab is used to connect to the 3D City Database. The separate steps of the import process as well as all errors that might occur during the import are reported to the console window, whereas the overall progress is shown in a separate status window. The import process can be aborted at any time by pressing the Cancel button in the status window. The Importer/Exporter will make sure that all pending city objects are completely imported before it terminates the import process.
After having completed the import, a summary of the imported CityGML top-level features is printed to the console window.
Note
The import operation does not automatically apply a coordinate transformation to the internal reference system of the 3D City Database instance. Thus, if the coordinate reference system of the CityGML input data does not match the coordinate reference system defined for the 3D City Database instance, the user must transform the coordinate values before importing the data (or use an affine transformation during import if this is enough). A possible workaround procedure can be realized as follows:
- Set up a second (temporary) instance of the 3D City Database with an internal CRS matching the CRS of the CityGML instance document.
- Import the dataset into this second 3D City Database instance.
- Export the data from this second instance into the target CRS by applying a coordinate transformation (see CityGML export documentation in Section 3.4).
- The exported CityGML document now matches the CRS of the target 3D City Database instance and can be imported into that database. The temporary database instance can be dropped.
Alternatively, you can change the reference system in the database to the one used by the imported geometries (see the corresponding database operation in Section 3.2.2).
Note
The Importer/Exporter does not check by any means whether a CityGML feature from an input file already exists in the database. Thus, if an import is executed twice on the same dataset, all CityGML features contained in the dataset will be imported twice.