3.6.1. CityGML import preferences
3.6.1.1. Continuation
The Continuation preferences allow for specifying metadata that is assigned to every city object at import time. The metadata is carried to columns of the table CITYOBJECT and is therefore accessible in SQL queries.
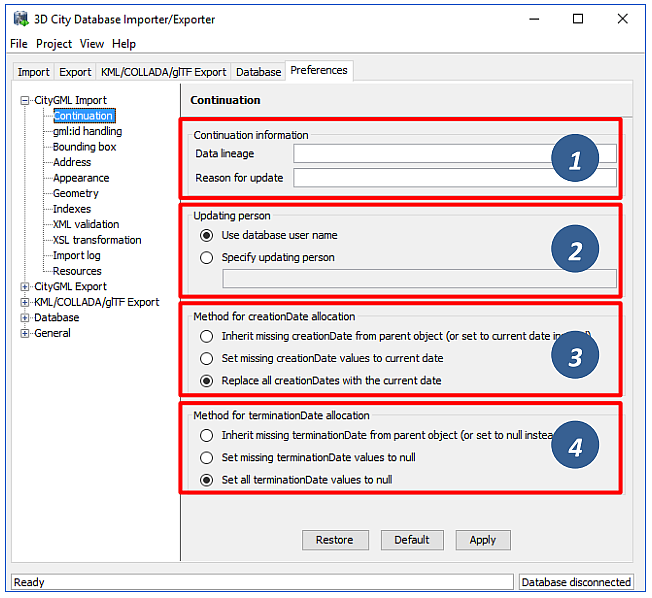
Fig. 3.26 CityGML import preferences – Continuation.
The following metadata can be set:
ADE Metadata
|
Description
|
Data lineage [1]
|
A string value denoting the origin of the data.
(column: LINEAGE; default value: NULL)
|
Reason for update [1]
|
A string value providing the reason for a data update.
(column: REASON_FOR_UPDATE; default value: NULL)
|
Updating person [2]
|
A string value identifying the person being responsible for importing
or updating the city object.
(column: UPDATING_PERSON; default value: name of the database user)
|
creationDate [3]
|
A timestamp value denoting the date of creation of the city object.
If this date is not available from the CityGML feature during import,
it may either be set to the import date or be inherited from the parent
feature (if available). Alternatively, the user can choose to replace
all creation dates from the input files with the import date.
(column: CREATION_DATE; default value: import date)
|
terminationDate [4]
|
A timestamp value denoting the date of termination of the city object.
If this date is not available from the CityGML feature during import,
it may either be set to NULL or be inherited from the parent feature
(if available). Alternatively, the user can choose to replace all termination
dates in the input files with NULL.
(column: TERMINATION_DATE; default value: NULL)
|
Note
Both creationDate and terminationDate are CityGML properties of city objects and therefore are exported to CityGML datasets. The remaining metadata information does not map to CityGML properties. It is therefore not exported to CityGML datasets but is only available in the database.
3.6.1.2. gml:id handling
Globally unique object identifiers are crucial for ensuring data consistency and for enabling data management workflows. Especially when it comes to (subsequently) updating the city model content in the database, unique identifiers will help to quickly identify and replace objects in the database with candidates from external datasets. Unfortunately, gml:id values do not meet the requirement of global uniqueness since they are, per definition, optional and only unique within the scope of a single dataset.

Fig. 3.27 CityGML import preferences – gml:id handling.
Per default, the Importer/Exporter assumes that the gml:id values associated with the city objects to be imported are globally unique and therefore imports them “as is” into the database. Only in case a city object (or geometry object) lacks a gml:id, a UUID value will be generated at import time and stored with the object.
This default behavior can be overridden with this preferences dialog in order to let the Importer/Exporter replace all gml:id values in the input file(s) with generated UUID values. The user may choose a prefix for the gml:id value. Use this option with caution. The original gml:id value may optionally be stored as external reference to not lose this information.
In addition to the gml:id, the 3DCityDB allows for storing a second GMLID_CODESPACE metadata value. The idea is that the compound value of gml:id and GMLID_CODESPACE is globally unique. The user can choose to use the file name of the CityGML import file, its complete path or a user-defined string as GMLID_CODESPACE. Per default, the Importer/Exporter does not import a GMLID_CODESPACE value though.
Note
The Importer/Exporter internally only relies on the gml:id value to identify objects, for example, when resolving XLink references. The GMLID_CODESPACE value therefore supports user-defined data management processes in the first place.
3.6.1.3. Address
CityGML relies upon the OASIS Extensible Address Language (xAL) standard for the representation and exchange of address information. xAL provides a flexible and generic framework for encoding address data according to arbitrary address schemes. The columns of the ADDRESS table of the 3D City Database however only map the most common fields in address records (cf. Section 2.7). Moreover, the Importer/Exporter currently does not support arbitrary xAL fragments but is tailored to the parsing of following two xAL templates that are taken from the CityGML specification.
<bldg:Building>
  …
  <bldg:address>
    <Address>
      <xalAddress>
        <!-- Bussardweg 7, 76356 Weingarten, Germany -->
        <xAL:AddressDetails>
          <xAL:Country>
            <xAL:CountryName>Germany</xAL:CountryName>
            <xAL:Locality Type="City">
              <xAL:LocalityName>Weingarten</xAL:LocalityName>
              <xAL:Thoroughfare Type="Street">
                <xAL:ThoroughfareNumber>7</xAL:ThoroughfareNumber>
                <xAL:ThoroughfareName>Bussardweg</xAL:ThoroughfareName>
              </xAL:Thoroughfare>
              <xAL:PostalCode>
                <xAL:PostalCodeNumber>76356</xAL:PostalCodeNumber>
              </xAL:PostalCode>
            </xAL:Locality>
          </xAL:Country>
        </xAL:AddressDetails>
      </xalAddress>
    </Address>
  </bldg:address>
</bldg:Building>
<bldg:Building>
  …
  <bldg:address>
    <Address>
      <xalAddress>
        <!-- 46 Brynmaer Road Battersea LONDON, SW11 4EW United Kingdom -->
        <xAL:AddressDetails>
          <xAL:Country>
            <xAL:CountryName>United Kingdom</xAL:CountryName>
            <xAL:Locality Type="City">
              <xAL:LocalityName>LONDON</xAL:LocalityName>
              <xAL:DependentLocality Type="District">
                <xAL:DependentLocalityName>Battersea</xAL:DependentLocalityName>
                <xAL:Thoroughfare>
                  <xAL:ThoroughfareNumber>46</xAL:ThoroughfareNumber>
                  <xAL:ThoroughfareName>Brynmaer Road</xAL:ThoroughfareName>
                </xAL:Thoroughfare>
              </xAL:DependentLocality>
              <xAL:PostalCode>
                <xAL:PostalCodeNumber>SW11 4EW</xAL:PostalCodeNumber>
              </xAL:PostalCode>
            </xAL:Locality>
          </xAL:Country>
        </xAL:AddressDetails>
      </xalAddress>
    </Address>
  </bldg:address>
</bldg:Building>
If xAL address information in a CityGML instance document does not comply with one of the templates (e.g., because of additional or completely different entries), the address information will only partially be stored in the database (if at all). In order to not lose any original address information, the entire <xal:AddressDetail> XML fragment can be imported “as is” from the input CityGML file and stored in the XAL_SOURCE column of the ADDRESS table in the 3D City Database.
For this purpose, simply check the Import original <xal:AddressDetail> XML option (this is the default value). Note that the import of the XML fragment does not affect the filling of the remaining columns of the ADDRESS table (STREET, HOUSE_NUMBER, etc.) from the xAL address information.
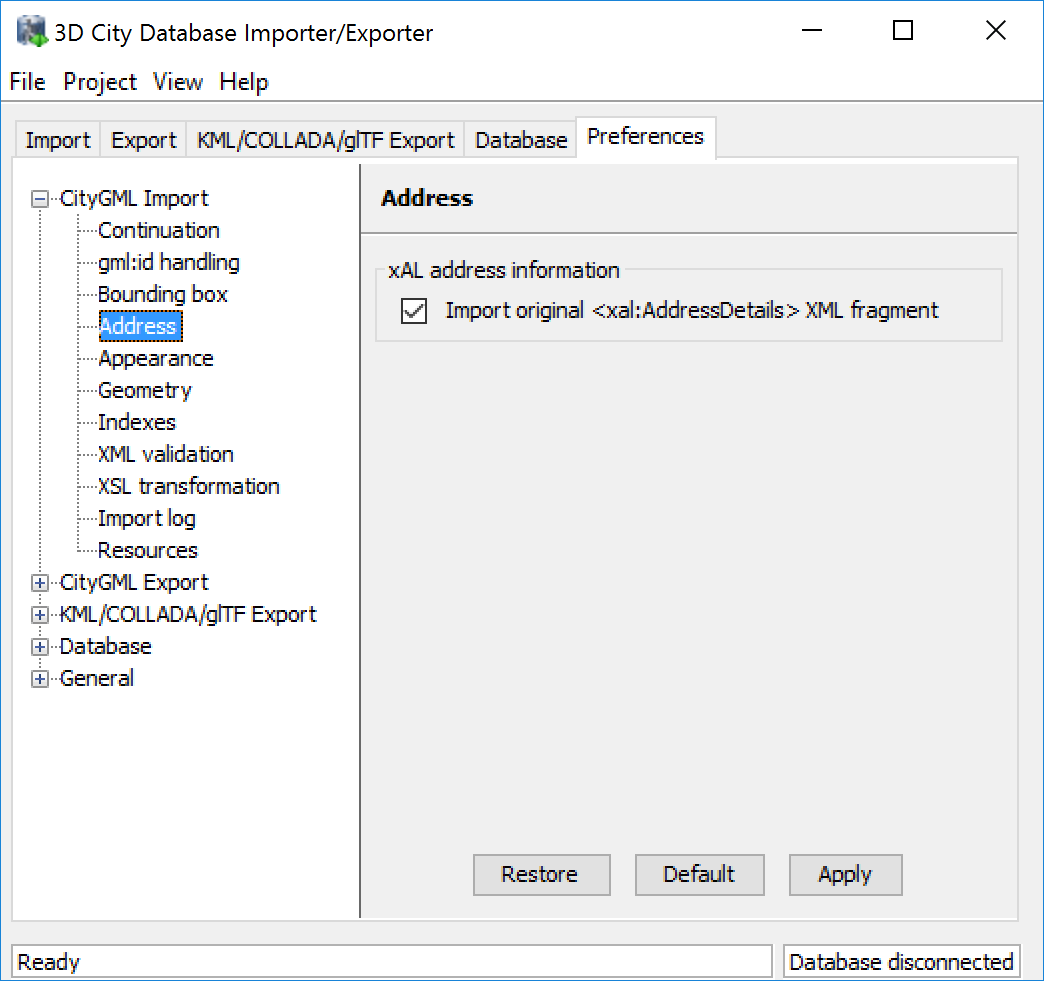
Fig. 3.28 CityGML import preferences – Address.
The symmetrical setting for CityGML exports (i.e., recovering the xAL fragment from XAL_SOURCE) is explained in Section 3.6.2.4.
3.6.1.4. Appearance
The Appearance preference settings define how appearance information (i.e., materials and textures associated with the observable surfaces of a city object) is processed at import time.
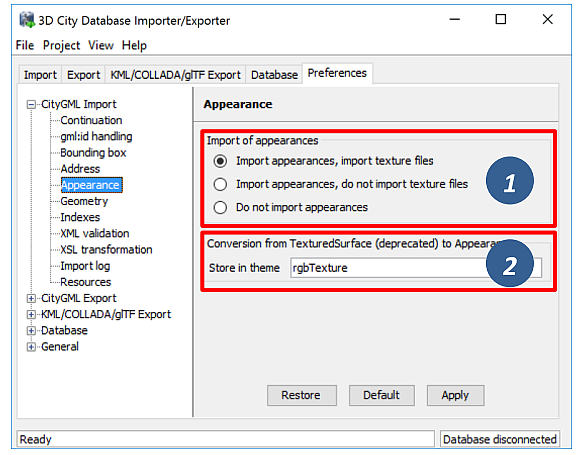
Fig. 3.29 CityGML import preferences – Appearance.
Per default, all appearance information as well as all related texture image files are loaded into the 3D City Database [1]. The Importer/Exporter will work on both image files located in a relative path to the CityGML dataset and image files referenced by a valid URL. The latter might require network access. Alternatively, a user may choose to only consider the appearance information but to not load the texture image files. As a third option, appearance information can be completely skipped during import [1].
Prior to version 1.0 of the CityGML standard, material and texture information of surface objects was modelled using the TexturedSurface concept. This concept was however replaced by the Appearance module in CityGML 1.0 and therefore is marked deprecated. Although the CityGML specification disadvises the use of the TexturedSurface concept, it is still allowed even in CityGML 2.0 datasets. The Importer/Exporter can parse and interpret TexturedSurface information but will automatically convert this information losslessly into the Appearance module. Since TextureSurface information is not organized into themes but a theme is mandatory in the context of the Appearance module, the user has to define a theme that shall be used in the conversion process [2]. The default value is rgbTexture.
3.6.1.5. Geometry
Before importing the city objects into the 3D City Database, the Importer/Exporter can apply an affine coordinate transformation to all geometry objects. Per default, this option is disabled though.
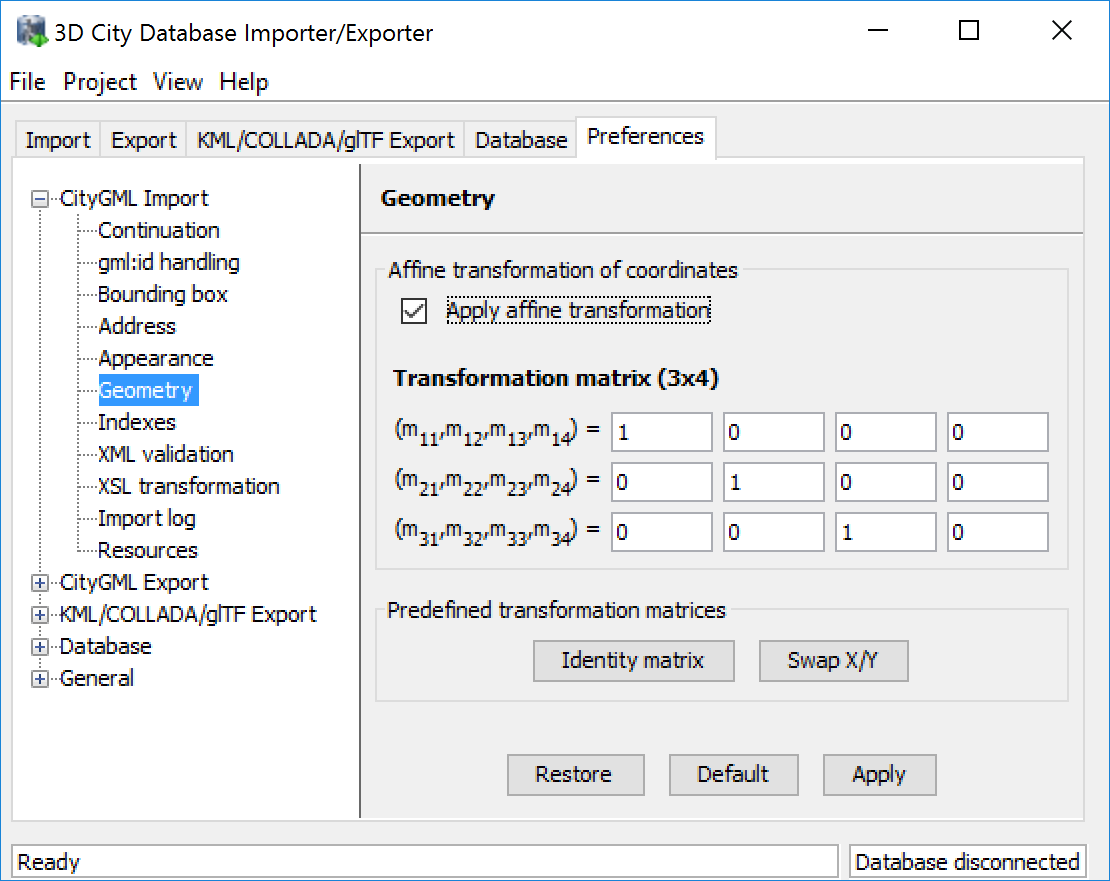
Fig. 3.30 CityGML import preferences – Geometry.
An affine transformation (cf. [Weis2015]) is any transformation that preserves collinearity (i.e., points initially lying on a line still lie on a line after transformation) and ratios of distances (e.g., the midpoint of a line segment remains the midpoint after transformation). It will move lines into lines, polylines into polylines and polygons into polygons while preserving all their intersection properties. Geometric contraction, expansion, dilation, reflection, rotation, skewing, similarity transformations, spiral similarities, and translation are all affine transformations, as are their combinations.
The affine transformation is defined as the result of the multiplication of the original coordinate vectors by a matrix plus the addition of a translation vector.
In matrix form using homogenous coordinates:
The coefficients of this matrix and translation vector can be entered in this preferences dialog (cf. Fig. 3.30). The first three columns define any linear transformation; the fourth column contains the translation vector. The affine transformation does neither affect the dimensionality nor the associated reference system of the geometry object, but only changes its coordinate values. It is applied the same to all coordinates in all objects in the original CityGML file. This also includes all matrixes in CityGML like the 2x2 matrixes of GeoreferencedTextures, the 3x4 transformation matrixes of TexCoordGen elements used for texture mapping and the 4x4 transformation matrixes for ImplicitGeometries.
Warning
An affine transformation cannot be undone or reversed after the import using the Importer/Exporter.
Two elementary affine transformations are predefined: 1) Identity matrix (leave all geometry coordinates unchanged), which serves as an explanatory example of how values in the matrix should be set, and 2) Swap X/Y, which exchanges the values of x and y coordinates in all geometries (and thus performs a 90 degree rotation around the z axis). The latter is very helpful in correcting CityGML datasets that have northing and easting values in wrong order.
Example: For an ordinary translation of all city objects by 100 meters along the x-axis and 50 meters along the y-axis (assuming all coordinate units are given in meters), the identity matrix must be applied together with the translation values set as coefficients in the translation vector:
3.6.1.6. Indexes
In addition to the Database tab on the operations window, which lets you enable and disable spatial and normal indexes in the 3D City Database manually (cf. Section 3.2.2), with this preference settings a default index strategy for database imports can be determined.
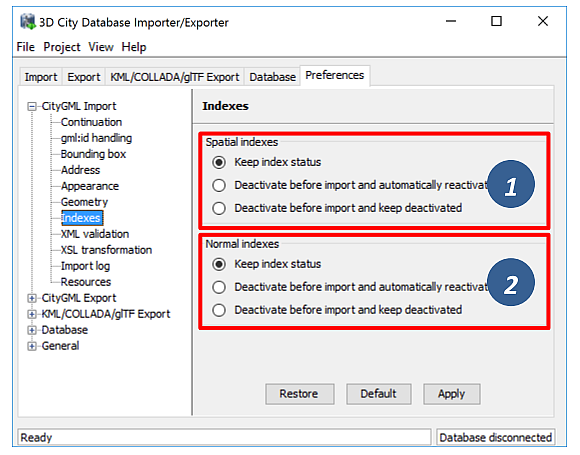
Fig. 3.31 CityGML import preferences – Indexes.
The dialog differentiates between settings for spatial indexes [1] and normal indexes [2] but offers the same options for each index type.
The default setting is to not change the status (i.e., either enabled or disabled) of the indexes. This default behavior can be changed so that indexes are always disabled before starting and import process. The user can choose whether the indexes shall be automatically reactivated after the import has been finished.
Note
All indexes are enabled after setting up a new instance of 3D City Database.
Note
It is strongly recommended to deactivate the spatial indexes before running a CityGML import on a big amount of data and to reactive the spatial indexes afterwards. This way the import will typically be a lot faster than with spatial indexes enabled. The situation may be different if only a small dataset is to be imported. Deactivating normal indexes should however never be required.
Warning
Activating and deactivating indexes can take a long time, especially if the database fill level is high. Note that the operation cannot be aborted by the user since this could result in an inconsistent database state.
3.6.1.7. XML validation
On the Import tab of the operations window, the CityGML input files to be imported into the database can be manually validated against the official CityGML XML Schemas. This preference dialog lets a user choose to perform XML validation automatically with every database import.
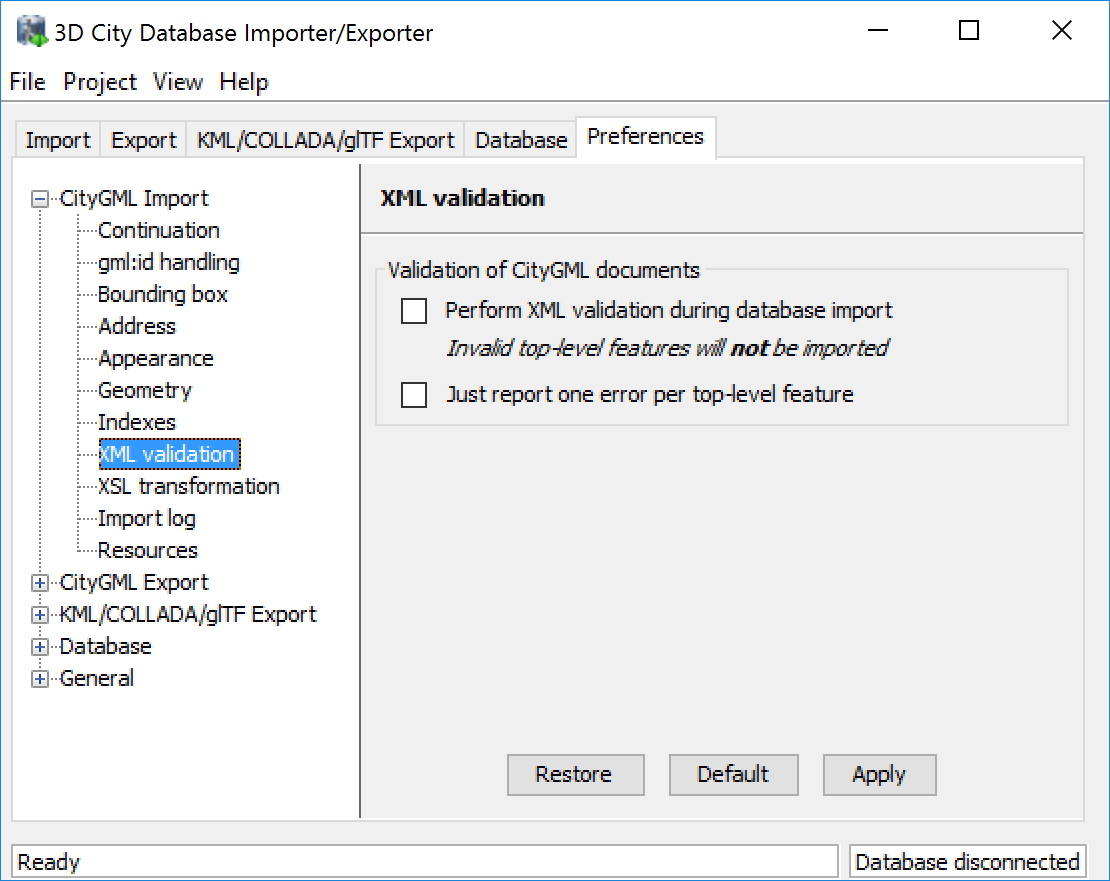
Fig. 3.32 CityGML import preferences – XML validation.
In general, it is strongly recommended to ensure (either manually or automatically) that the input files are valid with respect to the CityGML XML schemas. Invalid files might cause the import procedure to behave unexpectedly or even to abort abnormally.
If XML validation is chosen to be performed automatically during imports, then every invalid top-level feature will be discarded from the import. Nevertheless, the import procedure will continue to work on the remaining features in the input file(s).
Validation errors are printed to the console window. Often, error messages quickly become lengthy and confusing. To keep the console output low, the user can choose to only report the first validation error per top-level feature and to suppress all subsequent error messages.
Note
The XML validation in general does not require internet access since the CityGML XML schemas are packaged with the Importer/Exporter. These internal copies of the official XML schemas will be used to check CityGML XML content in input files. The user cannot change this behavior. External XML schemas will only be considered in case of unknown XML content, which might require internet access. Precisely, the following rules apply:
- If an XML element’s namespace is part of the official CityGML 2.0 or 1.0 standard, it will be validated against the internal copies of the official CityGML 2.0 or 1.0 schemas (no internet access needed).
- If the element’s namespace is unknown, the element will be validated against the schema pointed to by the xsi:schemaLocation value on the root element or the element itself. This is necessary when, for instance, the input document contains XML content from a CityGML Application Domain Extension (ADE). Note that loading the schema might require internet access.
- If the element’s namespace is unknown and the xsi:schemaLocation value (provided either on the root element or the element itself) is empty, validation will fail with a hint to the element and the missing schema document.
3.6.1.8. XSL Transformation
This preference is used to apply changes to the CityGML input data before it is imported into the database using XSL transformations. Simply check the Apply XSLT stylesheets option and point to an XSLT stylesheet in your local file system using the Browse button. The stylesheet will be automatically considered by the import process to transform the CityGML data.
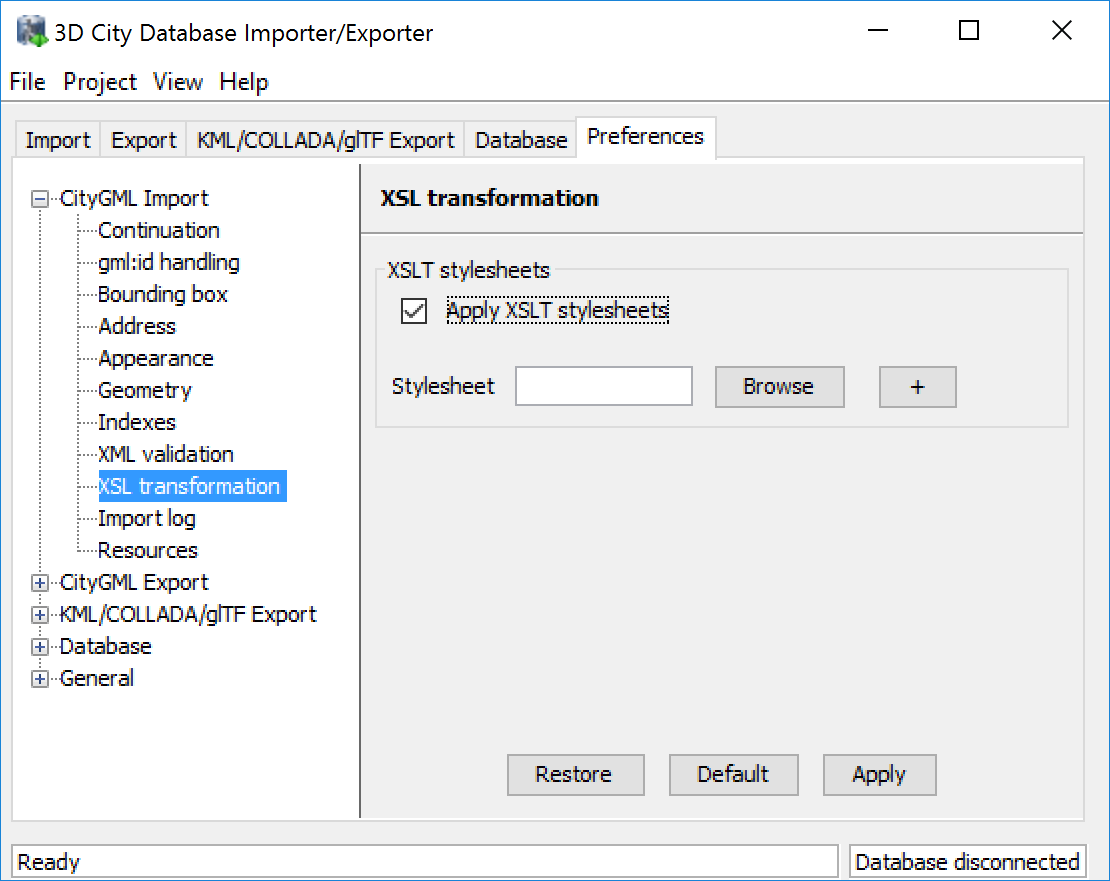
Fig. 3.33 CityGML import preferences – XSL transformation.
By clicking the + and - buttons, more than one XSLT stylesheet can be fed to the importer. The stylesheets are executed in the given order, with the output of a stylesheet being the input for its direct successor. The Importer/Exporter is shipped with example XSLT stylesheets in subfolders below templates/ XSLTransformations in the installation directory.
Note
To be able to handle arbitrarily large input files, the importer chunks every CityGML input file into top-level features, which are then imported into the database. Each XSLT stylesheet will hence just work on individual top-level features but not on the entire file.
Note
The output of each XSLT stylesheet must again be a valid CityGML structure.
Note
Only stylesheets written in the XSLT language version 1.0 are supported.
3.6.1.9. Import log
A CityGML import process not necessarily works on all CityGML features within the provided input file(s). An obvious reason for this is that spatial or thematic filters that naturally narrow down the set of imported features. Also, in case the import procedure aborts early (either requested by the user or caused by severe import errors), not all input features might have been processed. To understand which top-level features were actually loaded into the database during an import session, the user can choose to let the Importer/Exporter create an import log.
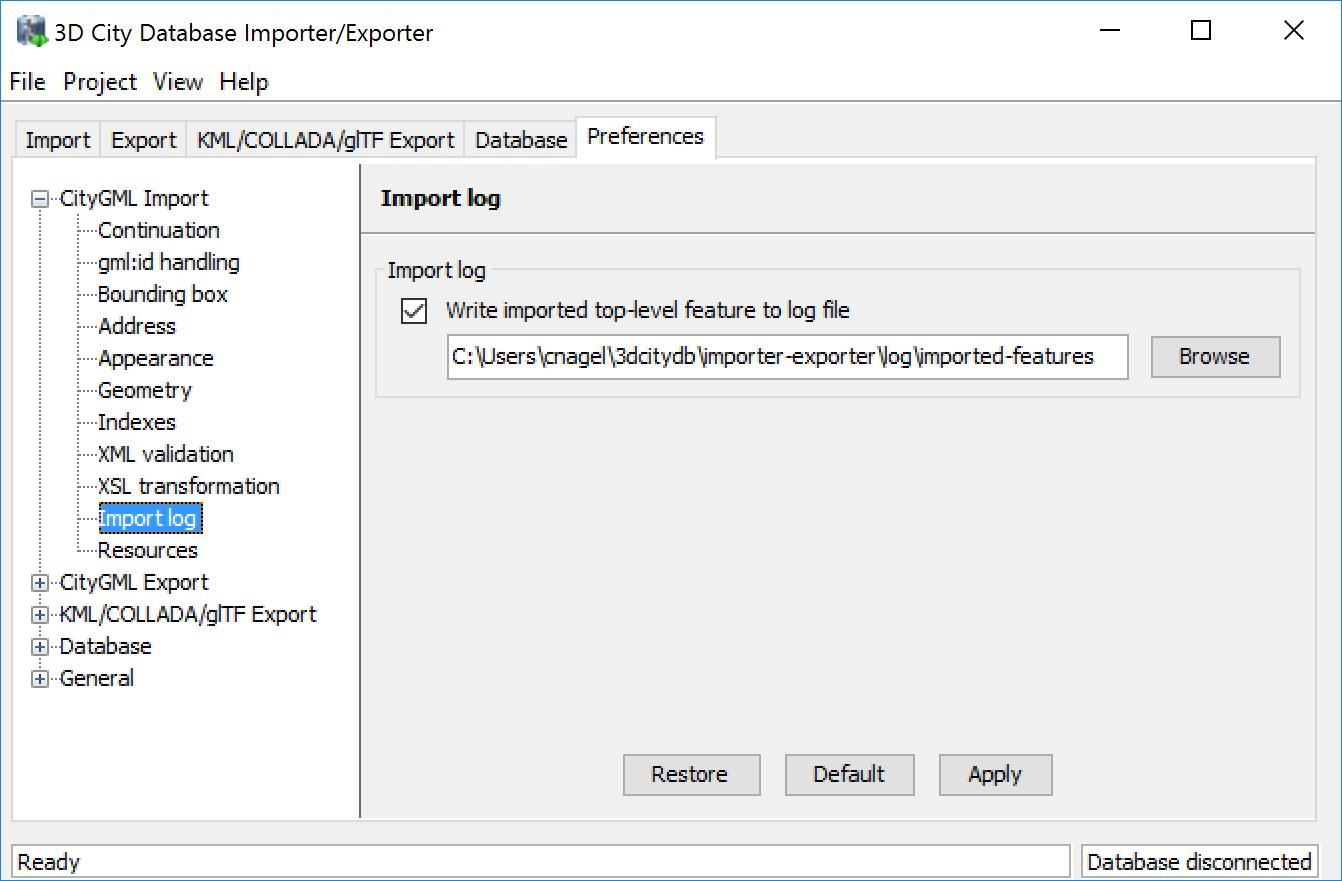
Fig. 3.34 CityGML import preferences – Import log.
Simply enable the checkbox on this settings dialog to activate import logs (disabled per default). You additionally must provide a folder where the import log files will be created in. Either type the folder name manually or use the Browse button to open a file selection dialog. The application proposes to use a folder within your user’s home directory, but this proposal can be overridden.
To easily relate import logs to different 3D City Database instances managed on the Database tab, the Importer/Exporter creates one subfolder for each connection entry below the folder provided in the settings dialog. The description text of the connection entry (cf. Section 3.2.1) is used as folder name. Within that subfolder, a separate log file is created for every input file during an import to that 3D City Database connection. The filename includes the date and time of the import session according to following pattern:
imported-features-yyyy_MM_dd-HH_mm_ss_SSS.log
The import log is a simple CSV file with one record (line) per imported top-level feature. The following figure shows an example.
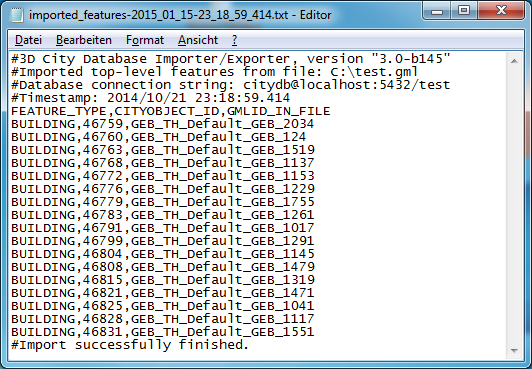
Fig. 3.35 Example import log.
The first four lines of the import log contain metadata about the version of the Import/Exporter that was used for the import, the absolute path to the CityGML input file, the database connection string, and the timestamp of the import. Each line starts with # character in order to mark its content as metadata.
The first line below the metadata block provides a header for the fields of each record. The field names are FEATURE_TYPE, CITYOBJECT_ID, and GML_ID_IN_FILE. A single comma separates the fields. The records follow the header line. The meaning of the fields is as follows:
- FEATURE_TYPE An uppercase string representing the type of the imported CityGML feature.
- CITYOBJECT_ID The value of the ID column (primary key) of the CITYOBJECT table where the feature was inserted.
- GML_ID_IN_FILE The original gml:id value of the feature in the input file (might differ in database due to import settings).
The last line of each import log is a footer that contains metadata about whether the import was successfully finished or aborted.
3.6.1.10. Resources
Multithreading settings. The software architecture of the Importer/Exporter is based on multithreading. Put simply, the different tasks of an import process are carried out by separate threads. The decoupling of compute bound from I/O bound tasks and their parallel non-blocking processing usually leads to an increase of the overall application performance. For example, threads waiting for database response do not block threads parsing the input document or processing the CityGML input features. In a multi-core environment, threads can even be executed simultaneously on multiple CPUs or cores.
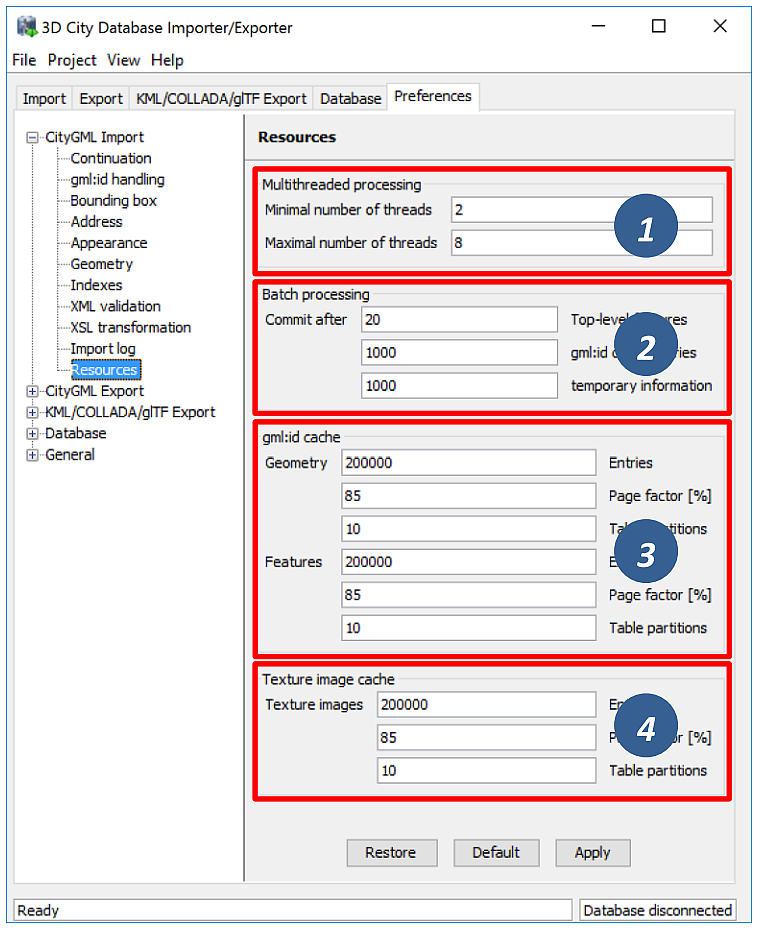
Fig. 3.36 CityGML import preferences – Resources.
The Resource settings allow for controlling the minimum and maximum number of concurrent threads during import [1]. Make sure to enter reasonable values depending on your hardware configuration. By default, the maximum number is set to the number of available CPUs/cores times two. Before starting the import process, the minimum number of threads is created. Further threads up to the specified maximum number are only created if necessary.
Warning
A higher number of threads does not necessarily result in a better performance. In contrast, a too high number of active threads faces disadvantages such as thread life-cycle overhead and resource thrashing. Also, note that each thread requires its own physical connection to the database. Therefore, your database must be ready to handle enough parallel physical connections. Ask you database administrator for assistance.
Cache settings. The Importer/Exporter employs strategies for parsing CityGML datasets of arbitrary file size and for resolving XLink references. A naive approach for XLink resolving would read the entire CityGML dataset into main memory. However, CityGML datasets quickly become too big to fit into main memory. For this reason, the import process follows a two-phase strategy: In a first run, features are written to the database neglecting references to remote objects. If a feature contains an XLink though, any context information about the XLink is written to temporary database tables. This information comprises, for instance, the table name and primary key of the referencing feature/geometry instance as well as the gml:id of the target object.
In addition, while parsing the document, the import process keeps track of every encountered gml:id as well as the table name and primary key of the corresponding object in database. It is important to record this information because a priori it cannot be predicted whether or not a gml:id is referenced by an XLink from somewhere else in the document. In order to ensure fast access, the information is cached in memory. If the maximum cache size is reached, the cache is paged to temporary database tables to prevent memory overflows. In a second run, the temporary tables containing the context information about XLinks are revisited and queried. Since the entire CityGML document has been processed at this point in time, valid references can be resolved and processed accordingly. With the help of the gml:id cache, the referenced objects can be quickly identified within the database.
The caching and paging behaviour for gml:id values can be influenced via the Resource preferences [3]. The dialog lets a user enter the maximum number of gml:id values to be held in main memory (default: 200,000 entries), the percentage of entries that will be written to the database if the cache limit is reached (page factor, default: 85%), as well as the number of parallel temporary tables used for paging (table partitions, default: 10). The Importer/Exporter employs different caches for gml:id values of geometries and features [3]. Moreover, a third cache is used for handling texture atlases and offers similar settings [4].
Batch settings. In order to optimize database response times, multiple database statements are submitted to the database in a single request (batch processing). This allows for an efficient data processing on the database side. The user can influence the number of SQL statements in one batch through the settings dialog [2]. The dialog differentiates between batch sizes for CityGML features (default: 20) and gml:id caches respectively temporary XLink information (default: 1000 each).
Note
All database operations within one batch are buffered in main memory before being submitted to the database. Thus, the Importer/Exporter might run out of memory if the batch size is too high. After a batch is submitted, the transaction is committed.