4.6.9. Recommendations
This chapter provides general recommendations and best practices for using the visualization export operation of the Importer/Exporter and for loading exports with Google Earth and Cesium.
General settings
Depending on the quality and complexity of 3D city model content stored in the 3DCityDB, export results may greatly very in visual quality and loading performance. Experimenting will be required in most cases for a fine-tuning of the export parameters. However, some general rules apply for almost all cases:
- Using KMZ as output format is recommended when the files will be accessed over a network and the selected display form is either Footprint, Extruded, or Geometry. When exporting glTF models, writing KMZ files is not supported though.
- Visibility values for the different display forms should be increased in steps of around one third of the tile side length.
- Setting visible from to 0 pixels (always visible) should be avoided, especially for large or complex exports, because otherwise the viewer will immediately load all data as it must be visible at once.
- Be careful that tile files do not become too large, otherwise the viewer may become unresponsive. You can influence the tile file size by changing the side length of tiles (whether tiling is automatic or manual). Tests with Google Earth showed that files should be smaller than 10MB. To meet this limit for crowded areas with many city objects, a tile side length between 50 and 100m seemed to be usable.
- When not exporting in the COLLADA/glTF display form, files will seldomly reach this 10MB limit, but viewers might still become unresponsive if the file loaded contains a lot of polygons, so do not use too large tiles for Footprint, Extruded and Geometry exports even if the resulting files are comparatively small.
- Do not choose too small tile sizes, many of them may become visible at the same time and render the tiling advantage useless.
- Using texture atlas generation when producing COLLADA/glTF display form exports always results in faster loading times.
- From these algorithms, BASIC is the fastest (shortest generation time) and produces good results, whereas TPIM is the most efficient (highest ratio of used area of the total atlas size) but also the slowest.
- Texture images can often be scaled down to 0.2 - 0.5 without noticeable quality loss. This depends, of course, on the quality of the original textures.
- Using a highlight style puts the same polygons twice in the resulting export files, one for the features themselves, one for their highlight geometry. This has a negative impact on the viewing performance. The more complex the city objects are, the worse the impact. When highlighting is enabled for exports based on model in LoD3 or higher, especially Google Earth may become quite slow.
- If you want to use the 3DCityDB web map client to visualize the exported datasets, a highlight style should not be used since object highlighting is supported by the web map client in another way without the need for extra highlight geometries.
- The 3DCityDB web map client allows for on-the-fly activating and deactivating shadow visualization for 3D objects exported in the glTF format. However, this functionality is currently not available when viewing KML models exported in the Footprint, Extruded, and Geometry display forms.
- Balloon generation is slightly more efficient when a single template file is applied for all exported objects.
- When exporting in the Footprint or Extruded display forms, the altitude mode settings will be silently ignored but an appropriate value will be automatically chosen to ensure that the exported objects will be properly placed on the terrain. However, when exporting in the Geometry or COLLADA/glTF display forms, the altitude mode settings must be deliberately chosen with regard to the viewer to be used.
- In most cases, the combination of the relative altitude mode with the Move every object on the globe (zero elevation) option for height offsets allows for properly placing objects on the terrain. However, when using the Cesium-based 3DCityDB web map client, its default WGS84 ellipsoid terrain model must be activated.
- When your city objects are stored with absolute height values in the database and you intend to use Google Earth as viewer, you should consider to use the following options (given that you own an API key for the Google Elevation service): 1) absolute altitude mode, 2) use the generic attribute GE_LoDn_zOffset for height offset, and 3) *query the Google Eleveation API”.
Loading exports in Google Earth and Cesium
In order to make full use of the features and functionalities provided by Google Earth, it is highly recommended to use the enhanced version of Google Earth – Google Earth Pro which is available free of charge starting from January 2015. Some of the features described in this documentation, like highlighting, can also flawlessly work in the normal Google Earth with version 6.0.1 or higher.
Displaying a file in Google Earth can be achieved by opening it through the menu (”File”, “Open”) or double-clicking on any KML or KMZ file if these extensions are associated with the program (default option at Google Earth’s installation time).
Loaded files can be refreshed when generated again after loading (if for example the balloon template file was changed) by choosing the “Revert” option in the context menu on the sidebar. There is no need to delete and load them again or shutdown or restart the Earth browser.
For best performance, cache options (”Tools”, “Options”, “Cache”) should be set to their maximum values, 1024 MB for memory cache size, 2000 MB for disk cache. Actual maximums may be lower depending on the computer’s hardware.
Google Earth enables showing the terrain layer by default for realistic display of 3D models. Disabling of terrain layer is only possible in Google Earth Pro. You may need to disable the terrain layer in case that the exported models cannot be seen although shown as loaded in Google Earth’s sidebar, since they are probably buried into the ground (see Section 4.6.7.4).
When exporting balloons into individual files (one for each object) written together into a balloons directory access to local files and personal data must be allowed (”Tools”, “Options”, “General”). Google Earth will issue a security warning that must be accepted, otherwise the contents of the balloons (when in individual files and not as a part of the doc.kml file) will not be displayed.
It is also possible to upload the generated KML/COLLADA/glTF files to a web server and access them from there via internet browser with Cesium Virtual Globe (starting from December 2015, the Google Earth Plugin is no longer supported by most modern web browsers due to security considerations). In this case, the Cross Origin Resource Sharing (CORS) shall be enabled on the web server to allow cross-domain AJAX requests sent from the based-web frontend.
Note
Starting with version 7 (and at least up to version 7.1.1.1888) Google Earth has changed the way transparent or semi-transparent surfaces are rendered. This is especially relevant for visualizations containing highlighting surfaces (explained in Section 4.6.7.2). When viewing KML/COLLADA models in Google Earth it is strongly recommended to use Google Earth (Pro) version 7 or higher and switch to the OpenGL graphic mode for an optimal viewing experience. Changing the Graphic Mode can be achieved by clicking on Tools, Options entry, 3D View Tab.
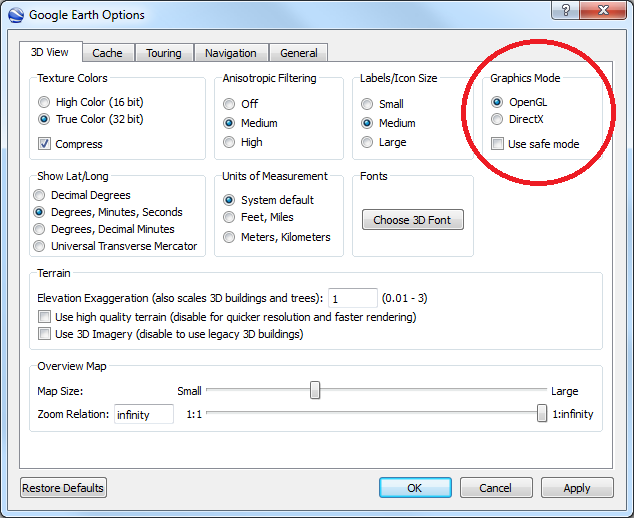
Fig. 4.74 Setting the Graphics Mode in Google Earth.
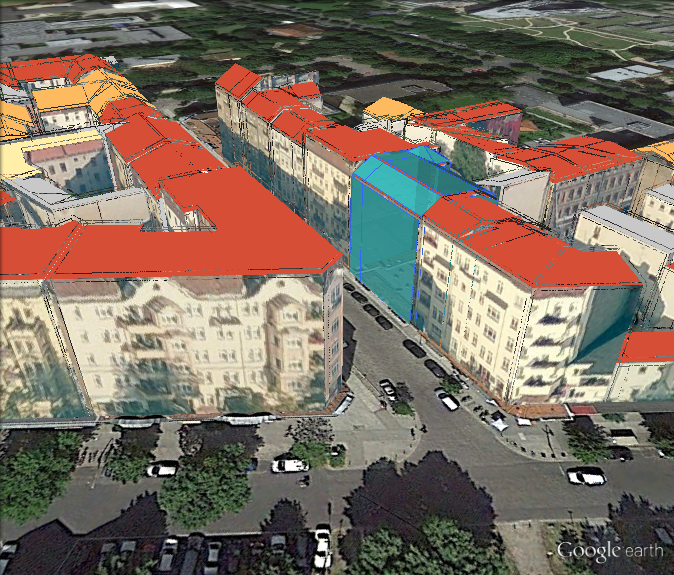
Fig. 4.75 KML/COLLADA models rendered with DirectX, highlighting surface borders are noticeable everywhere.
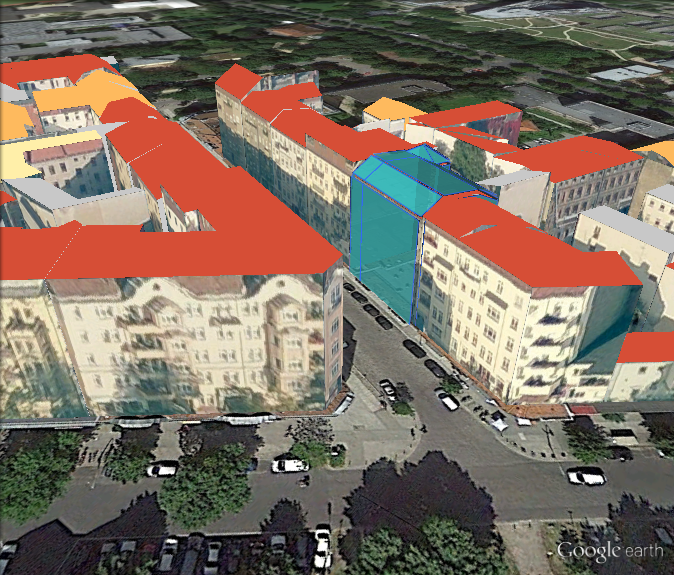
Fig. 4.76 The same scene rendered in OpenGL mode.