5.3.5. ADE transformation
The ADE transformation operation of the ADE Manager plugin allows you to transform the XML Schema definition of a CityGML ADE to a relational database schema that seamlessly integrates with the 3DCityDB schema. The output of the transformation operation is an ADE extension package that can be directly registered with the 3DCityDB using the ADE registration operation of this plugin (see Section 5.3.4).
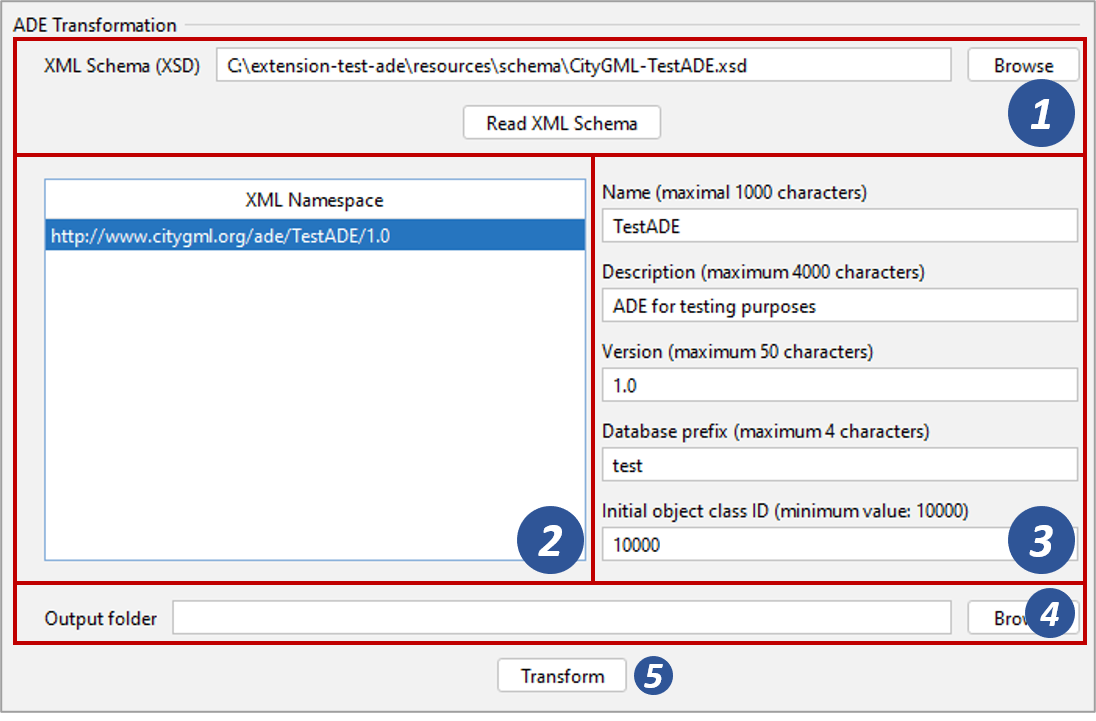
Fig. 5.25 The ADE Transformation dialog of the ADE Manager plugin
Input file selection
The XML Schema file to be transformed must be provided at the top of
the ADE transformation dialog [1]. Enter the path to your file manually
or open a file selection dialog by clicking on the Browse button.
Afterwards, push the Read XML Schema button. The transformation process
will parse the schema file together with all referenced schema files (e.g.
through <xs:import> tags). As a result, all XML namespaces except the default
CityGML and GML namespaces found in the XML Schema file will be listed
in the XML Namespace overview [2] on the left of the dialog.
Namespace selection and ADE metadata
Select the XML namespaces from the list in [2] whose elements shall be considered in the transformation process. Typically, a CityGML ADE only defines a single XML namespace. But multiple namespaces are possible and allowed, so you can also select multiple namespaces from the list. All XML elements associated with a namespace that has not been selected will be ignored in the transformation.
As next step, provide additional metadata about the ADE in the input fields on the right side of the dialog [3]. The metadata comprises the name, a short description and the version number of the ADE. Moreover, you can define the name prefix that shall be used for all tables in the resulting ADE database schema. The initial object class ID must be set to a value greater or equal than 10,000. The values 0 - 9999 are reserved for the 3DCityDB schema. You must make sure that the object class ID values used by different ADEs do not overlap. More details about the meaning of the individual metadata attributes can be found in Section 3.2.16.2.
Adapting the transformation process
The ADE Manager plugin offers two ways to customize the transformation process and result. The first way is to add tagged values to the XML Schema file. The tagged values provide additional information which is typically missing in the XML Schema but required for deriving the relational database schema. Second, you can even create your own rules for the graph transformation engine that is used in the background for the transformation process. Both options are discussed in separate sections of this chapter:
Starting the transformation process
As final step, select the output folder where the transformation result should be stored [4]. Once all transformation settings are correct, the Transform button [5] starts the transformation process (cf. Fig. 5.25). The separate steps of the transformation process as well as all errors and warnings that might occur during the transformation are reported to the console window. This process cannot be aborted by the user.
Note
The transformation operation will create a fully valid ADE extension package inside the output folder, which can directly be used to register the ADE with the 3DCityDB in a subsequent step. See Section 5.3.4 for more details.
Example
If you want to test the ADE transformation process, you can use the open source Test ADE for this purpose. The TestADE is an artificial CityGML ADE for testing and demonstrating the ADE support of the 3D City Database. The GitHub repository at https://github.com/3dcitydb/extension-test-ade contains the UML data model and the XML Schema file of the Test ADE (besides more content). Simply clone this repository and find the XML Schema file in the resources/schema folder. Alternatively, you can download the schema file from here.
Simply provide this schema file as input to the transformation operation in [1]. Choose the XML namespace “http://www.citygml.org/ade/TestADE/1.0” for the transformation from [2] and enter your metadata in [3]. The transformation process should only take a few seconds. Afterwards, register the Test ADE with the 3DCityDB using the transformation result as input.