3.9.3. ADE Manager Plugin
3.9.3.1. Definition
The ADE Manager is a plugin for the 3D City Database Importer/Exporter and allows to dynamically extend a 3D City Database (3DCityDB) instance to facilitate the storage and management of CityGML Application Domain Extensions (ADE). It is implemented based on the Open Source Attributed Graph Grammar (AGG) transformation engine for realizing the automatic transformation from an XML application schema (XSD) to a compact relational database schema (including tables, indexes, and constraints etc.) for a given CityGML ADE. In addition, an XML-based schema mapping file can also be automatically generated which contains the relevant meta-information about the derived database schema as well as the explicit mapping relationships between the source and target schemas and allows developers to implement applications for managing and processing the ADE data contents stored in a 3DCityDB instance.
3.9.3.2. Plugin installation
Like with the Spreadsheet Generator Plugin, the ADE manager plugin can also be optionally installed together with the 3DCityDB Import/Export tool. During the Installation of the Import/Export tool, the wizard will ask you if you want to install the ADE Manager Plugin (cf. the following figure):

Fig. 3.91 GUI wizard for prompting the installation of ADE Manager Plugin
If the users haven’t checked the “ADE Manager Plugin” box during the installation process, it is also possible to install the plugin later. The installation steps are very similar to those operation steps for installing the Spreadsheet Generator Plugin. For more details, please refer to Section 3.9.2.2. Once the Import/Export tool and ADE Manager Plugin have been successfully installed, the user interface of the ADE Manager Plugin should look like the figure below:
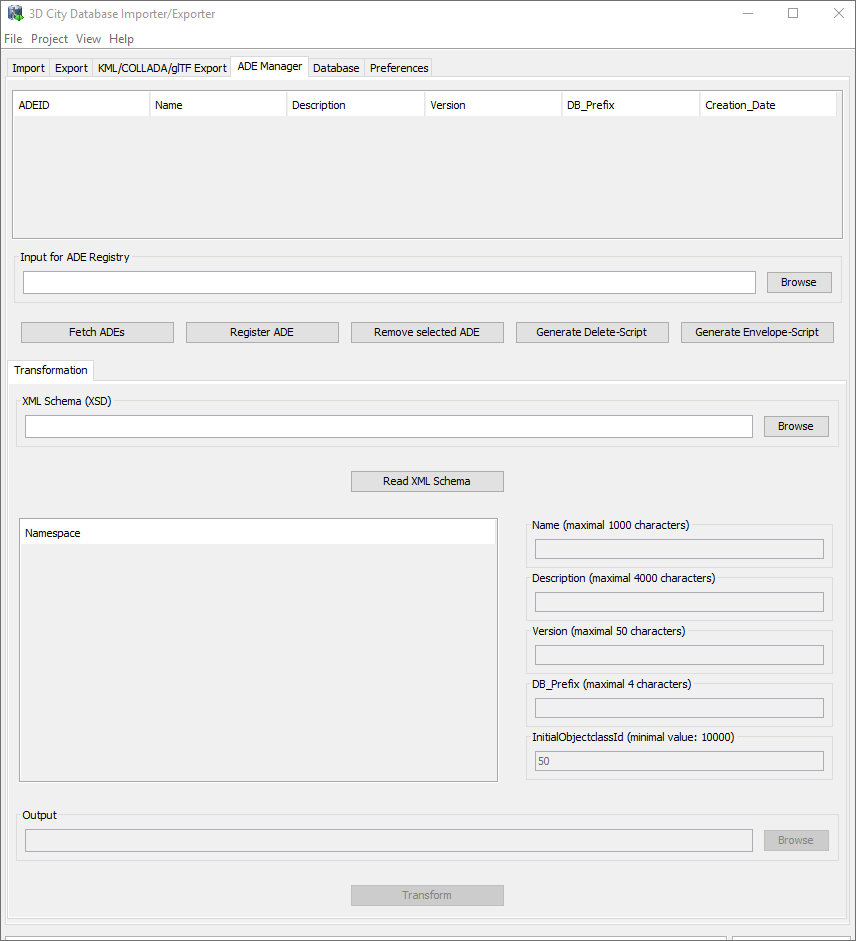
Fig. 3.92 User interface of the ADE Manager Plugin
3.9.3.3. User Interface
3.9.3.3.1. ADE Registration
The user interface of the ADE Manager Plugin is composed of two parts. The first part is mainly used for registering CityGML ADEs into a 3DCityDB database instance. During the ADE registration process, new ADE-specific database objects such as feature tables, foreign key contstraints, sequences, simple and spatial indexes are added to the existing 3DCityDB database schema. Also, the metatdata tables (cf. Section 2.7.3.1) are populated with the meta-information about the registered ADE. To run the ADE registration process, the input files required by the ADE Manager Plugin must be strictly organized according to the following folder structure.
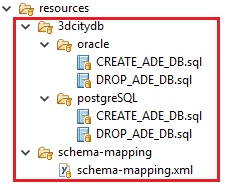
Fig. 3.93 Specific folder structure of the required input files for ADE registration
The input folder must comprise at least two mandatory subfolders namely 3dcitydb and schema-mapping. The first subfolder 3dcitydb further contains two subfolders oracle and postgresql, which contain the SQL definition file CREATE_ADE_DB.sql. This file can be excuted by the ADE Manager Plugin for creating the 3DCityDB-compliant ADE database schema according to the database type (Oracle or PostgreSQL) being used. The SQL file DROP_ADE_DB.sql contains the DDL-statements for removing the corresponding ADE database schema. These DDL-statements are imported into the metadata table ADE during the ADE registration process and hence are persistently stored at the database side. When unregistering an ADE, the DDL-statements will be read from the table ADE and excuted by the ADE Manager Plugin.
The second subfolder schema-mapping shall contain an XML-formatted file which holds the relevant meta-information (e.g. name, description, XML namespace, and value range of object class id etc.) about an ADE as well as the explicit mapping information between the XML application schema and relational database schema. This schema-mapping file is not only used for the ADE registration purpose but also required for the Importer/Exporter and WFS tools to control the query and transaction of ADE datasets. The Importer/Exporter also uses a schema-mapping file for mapping the elements of the CityGML XML schemas to tables and columns of the 3DCityDB core schema. This mapping file, its XML Schema definition as well as a Java API for reading and writing a valid schema-mapping files can be found in the Github repository.
3.9.3.3.1.1. Registration of a Test ADE
The TestADE is an artificial CityGML ADE which is intended to be used for testing and demonstrating how to use the citygml4j and 3DCityDB software APIs to implement 3DCityDB-compilant applications for working with the real-world ADEs. The TestADE has been designed to reflect the most typical modelling structures offered by the CityGML ADE mechanism such as subtyping or property injection. Moreover, the contained feature and data types have been copied (and simplified) from existing CityGML ADEs such as the Energy ADE and the UtilityNetwork ADE. A central repository containing the TestADE’s UML data model, XML schema definition file, database schema, schema-mapping file as well as the Java classes for reading and writing ADE datasets is hosted in the 3DCityDB’s Github website.
The input SQL and schema-mapping files for ADE registration are located under the relative path “extension-test-ade/test-ade-citydb/resources” of the TestADE’s Github repository. After opening the ADE Manager Plugin, the users can click on the Browse button to open a file chooser dialog for providing the local path of the input folder. After connecting to the target 3DCityDB instance, the ADE registration process can be started by clicking on the Register ADE button.
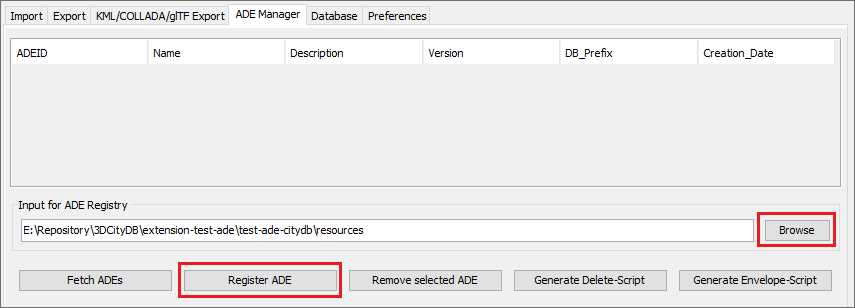
Fig. 3.94 Dialog panel for registering CityGML ADEs
While performing the ADE registration process, the ADE database schema will be firstly created, and the metadata information will be written to the 3DCityDB metadata tables subsequently. In addition, the database stored functions and procedures e.g. DELETE script and ENVELOPE script will also be newly generated. After the ADE has been successfully registered, a list of all ADEs registered in the 3DCityDB instance along with their relevant meta-information is shown on the ADE information panel (cf. the following figure).
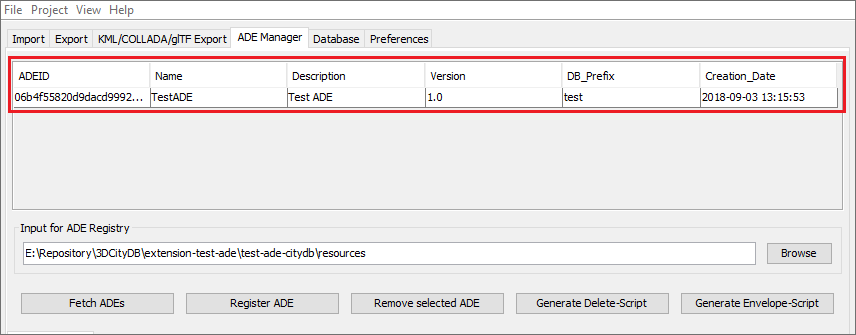
Fig. 3.95 GUI panel for displaying the relevant meta-information of registered ADEs
The users may also use a database client application like pgAdmin (PostgreSQL) and SQLDeveloper (Oracle) to check whether the ADE database schema has been correctly created. All new tables should be prefixed with the characters “test_” and the new delete and envelope functions/procedures should have the prefix “del_test_” and “env_test_” respectively.

Fig. 3.96 Exploration of the newly created ADE tables using pgAdmin
When connecting to another 3DCityDB instance, the users may click on the Fetch ADEs button to update the contents in the meta-information panel and thus to check which ADEs have already been registered into the target database. The Generate Delete-Script and Generate Envelope-Script buttons allow to generate the respective database stored functions/procedures again and display them in a popup dialog window. It is possible to install the script directly by clicking on the the Install button or save it to a SQL file. This gives the developers the possibility to modify the script functions and to install them via the database client applications e.g. pgAdmin and SQLDeveloper.
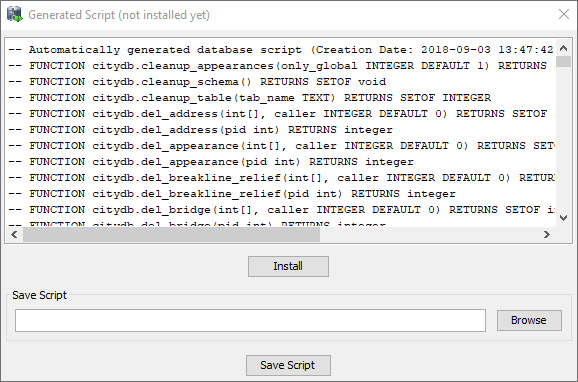
Fig. 3.97 Dialog window for showing and installing newly generated database stored functions/procedures
3.9.3.3.2. ADE Transformation
The second part of the ADE Manager Plugin offers the functionality to read an ADE’s XML application schema definition file and automatically generate the database schema and XML schema-mapping files according to the specific folder structure required for the ADE registration. However, a notable issue is that some relevant meta-information about an ADE are usually missing in its XML schema, since they cannot be encoded using the native syntax of the XML schema and will be lost while deriving the XML schema from its ADE’s UML model (e.g. when using a transformation tool like ShapeChange. Moreover, some certain kinds of meta-information can even not be represented in the UML model. A good model-driven solution for solving this issue is to extend the UML model by adding a few specific taggedValues (cf. the table below) which can be automatically translated and encoded into the <xs:annotation> elements in XML schema.
taggedValue
|
topLevel (true | false) |
Description
|
This taggedValue allows for determining if an ADE feature class is top-level
|
Example
Of using
<xs:annotation>
in XML-Schema
|
<element name="IndustrialBuilding"
  substitutionGroup="bldg:_AbstractBuilding"
  type="TestADE:IndustrialBuildingType">
  <annotation>
    <appinfo>
      <taggedValue tag="topLevel">true</taggedValue>
    </appinfo>
  </annotation>
</element>
|
taggedValue
|
minOccurs and maxOccurs (Integer value | „unbounded”) |
Description
|
The combiniation of the two taggedValues allows for determining the
multiplicity information of each ADE hook property. In UML model, this
multiplicity information can be explicitly specified but it is lost in
the XML schema, because every ADE hook property is hard-encoded with a
multiplicity of [0..*] in the XML schema. Since the current version
(2.5.1) of the ShapeChange tool is still not able to read the multiplicity
of the hook properties from the UML model directly, the two taggedValues
are hence required although they provide the redundant multiplicity
information in UML model
|
Example
Of using
<xs:annotation>
in XML-Schema
|
<element name="ownerName"
  substitutionGroup="bldg:_GenericApplicationPropertyOfAbstractBuilding"
  type="string">
  <annotation>
    <appinfo>
      <taggedValue tag="maxOccurs">1</taggedValue>
    </appinfo>
  </annotation>
</element>
|
taggedValue
|
relationType (association |aggregation | composition) |
Description
|
An enumeration attribute allowing to distinguish the three relationships
between two associated classes. This meta-information is also lost while
mapping UML -> XML schema, because the XML schema doesn’t support the
distinguishment between the three relation types. This taggedValue is also
redundant from the view of UML, but required when using ShapeChange
|
Example
Of using
<xs:annotation>
in XML-Schema
|
<element maxOccurs="unbounded" minOccurs="0" name="boundedBy"
  type="bldg:BoundarySurfacePropertyType">
  <annotation>
    <appinfo>
      <taggedValue tag="relationType">composition</taggedValue>
    </appinfo>
  </annotation>
</element>
|
The realization of the model transformation process is mainly based on the concept of “Graph Transformation” and implemented using the Open Source graph transformation engine AGG. It comes with a graphical editor (a runnable jar file AggV21Build.jar in the folder lib) that allows users to define an arbitrary number of graph-structured transformation rules for mapping complex object-oriented models onto a compact relational database models (cf. [YaKo2017]). While developing the ADE Manager Plugin, around 50 mapping rules have been designed, which can also be modified by developers for customizing the model transformation behaviour. The workspace file containing the transformation rules is located under “/src/main/resources/org/citydb/plugins/ade_manager/graph/Working_Graph.ggx” and can be opened using the AGG editor. Using the predefined mapping rules we were able to correctly transform all well-known CityGML ADEs like the Energy ADE, Noise ADE, UtilityNetwork ADE, Dynamizer ADE, IMGeo3D and further custom ADEs to compact relational schemas. In the future, for some ADEs we may publish complete ADE packages on the 3DCityDB github pages as Open Source. Some will be commercially available from the 3DCityDB development partners.
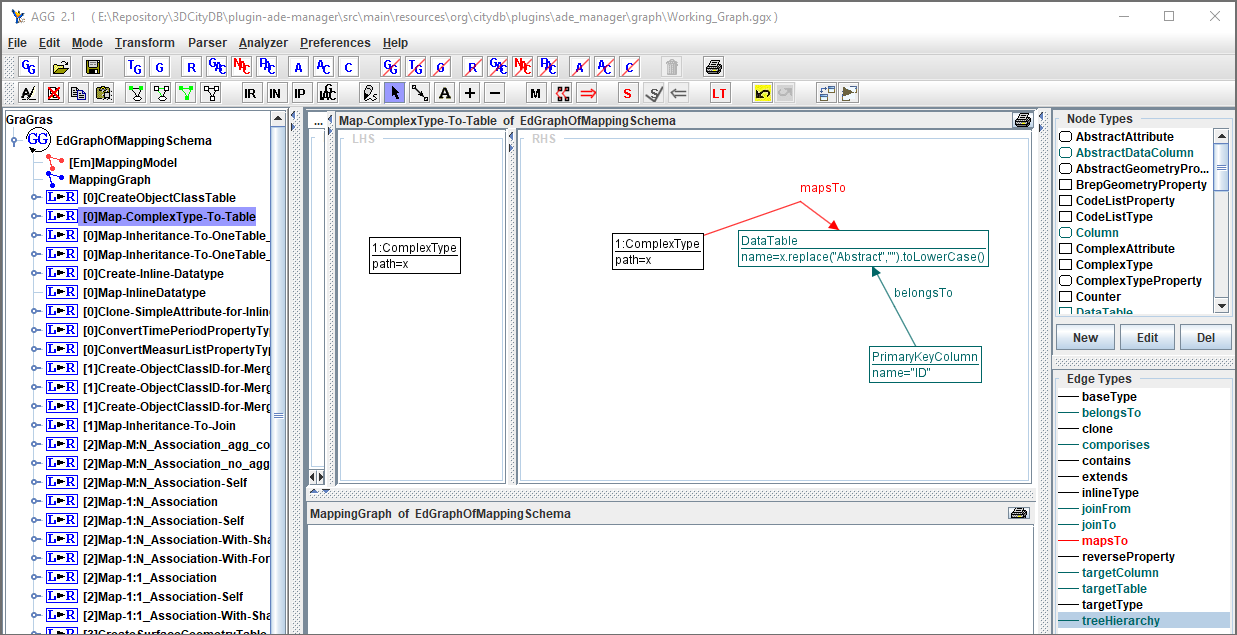
Fig. 3.98 AGG graph editor for defining model transformation rules for the ADE Manager Plugin
3.9.3.3.2.1. Transformation of the TestADE
The XML schema definition file of the TestADE is located under the path “test-ade-citygml4jsrcmainresourcesorgcitygmladetestschemaCityGML-TestADE.xsd”. It can be selected or entered using a file chooser dialog window by clicking on the Browse button in the input panel (cf. [1] in Fig. 3.99). After entering the path of the XML schema and clicking on the button Read XML Schema, the XML schema file will be read and parsed. All namespaces (except the GML and CityGML namespaces) included in the the XML schema file will be listed on the left panel (cf. [2] in Fig. 3.99). The namespace “http://www.citygml.org/ade/TestADE/1.0” of the target ADE shall be selected and its background will be highlighted with blue color. In the next step, some additional relevant meta-information for the ADE must be specified in the panel (cf. [3] in Fig. 3.99) and will be written into the output schema-mapping file. More details about the meaning of the individual metadata attribute are described in Section 2.7.3.1. In the last step, the path for the output files should be specified and the Transform button can be clicked to start the transformation process.
The entire transformation process should take just a few seconds, since the TestADE has a rather simple structure with only 10 classes and data types. The output files are exactly organized according to the specific folder structure described in Section 3.9.3.3.1. A full example of the output files is located under the path “test-ade-citydbresources” which can be directly used as the input folder for performing the ADE registration into a 3DCityDB instance.
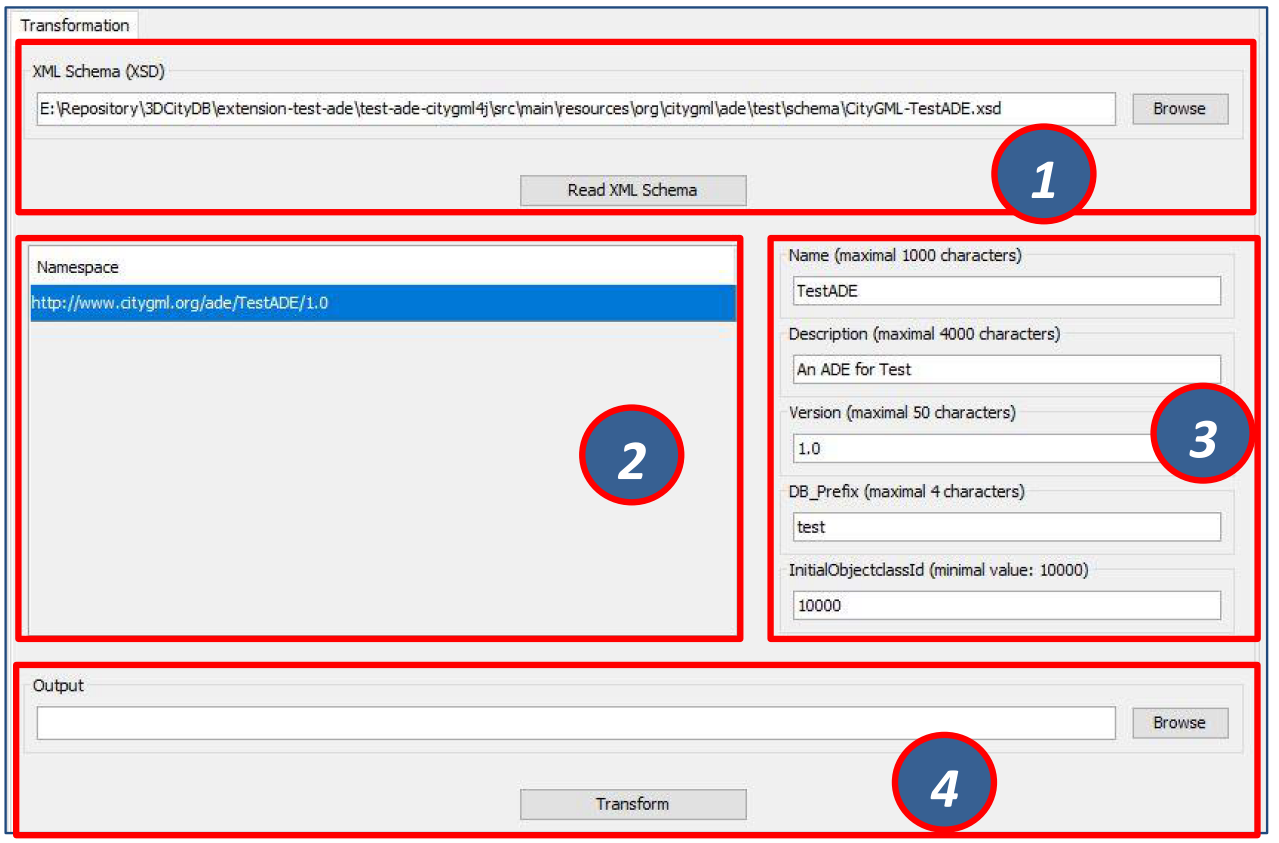
Fig. 3.99 GUI panel for transforming XML schema to 3DCityDB database schema and schema-mapping file
3.9.3.4. Workflow of extending the Import/Export Tool
Once an ADE has been successfully registered into an 3DCityDB instance, the Import/Export tool must be manually extended to support the import and export of the ADE datasets. The Import/Export tool provides a specific Java API that allows developers to implement the ADE-specific Import/Export-extensions based on a simple plugin mechnism. An example of how to implement such Java extensions for the TestADE can be found in the Github repository. In the following, a brief guide about operating the Import/Export tool with ADE extensions is presented.
- Create a folder named “ade-extensions” in the installation directory of the Import/Export tool, if the folder does not exist.
- Download the latest version of the TestADE’s Java extension, database schema, and schema-mapping file from the Github website
- Unpack the zip file to a folder e.g. named “extension-test-ade” which shall contain three subfolders 3dcitydb, lib, and schema-mapping.
- Copy the extension-test-ade folder into the ade-extension folder. The folder structure should look like below.
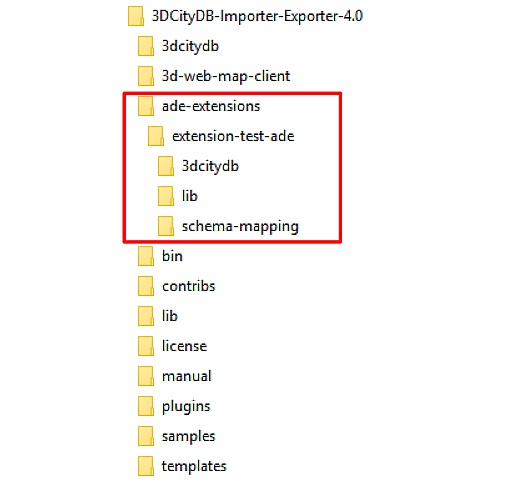
Fig. 3.100 Folder structure of the Import/Export tool with ADE extensions
- Start the Import/Export tool. The JAR files in the extension-test-ade/lib folder along with the schema-mapping file in the extension-test-ade/schema-mapping will be automatically loaded by the Import/Export tool.
- Connect to an empty 3DCityDB instance. This database could be named as “TestADE” and its coordinate reference system can be defined with SRID = 31468
- Open the tab panel Database Database operations ADEs to check whether the ADE-extensions for Import/Export tool is successfully installed.
The screenshot below shows that the Import/Export tool is now enabled for supporting the TestADE, while the connected 3DCityDB instance is still not. Therefore, the next step is to use the ADE Manager plugin to complete the ADE registration and database schema creation.
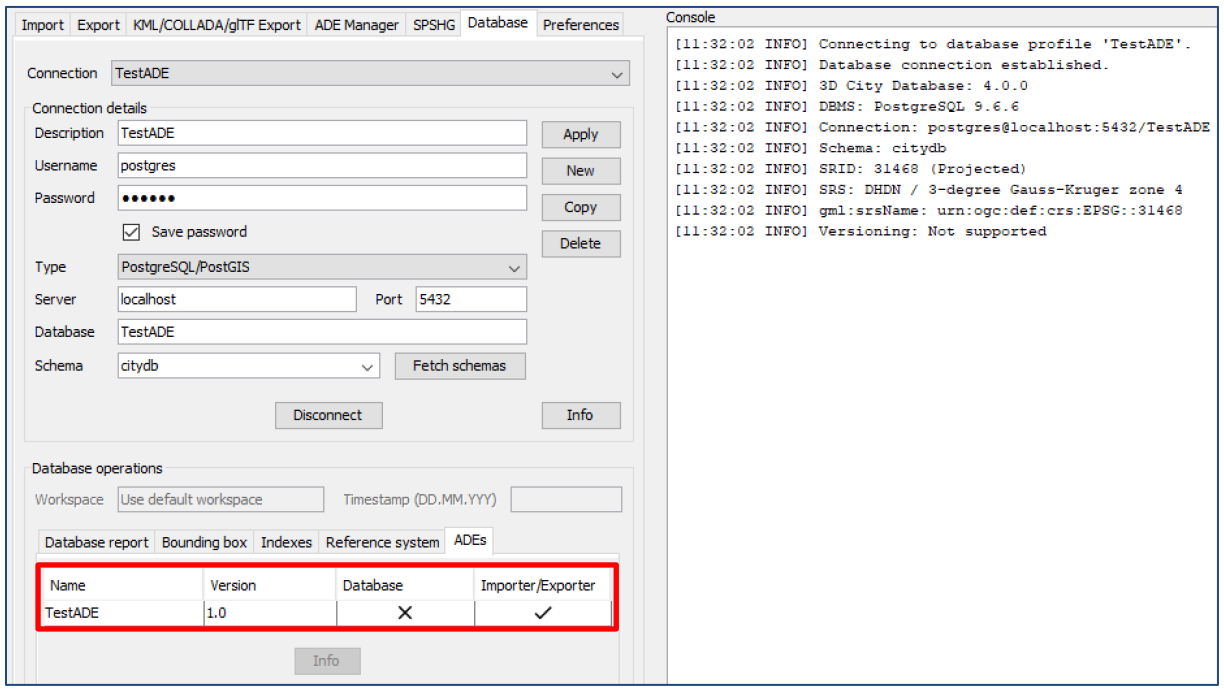
Fig. 3.101 User interface for checking the status of ADE support of database and Import/Export tool
- Activate the ADE Manager Plugin and follow the operation steps described in Section 3.9.3.3.1.
- Reconnect the TestADE database again. The ADE status panel should be updated like the figure below.
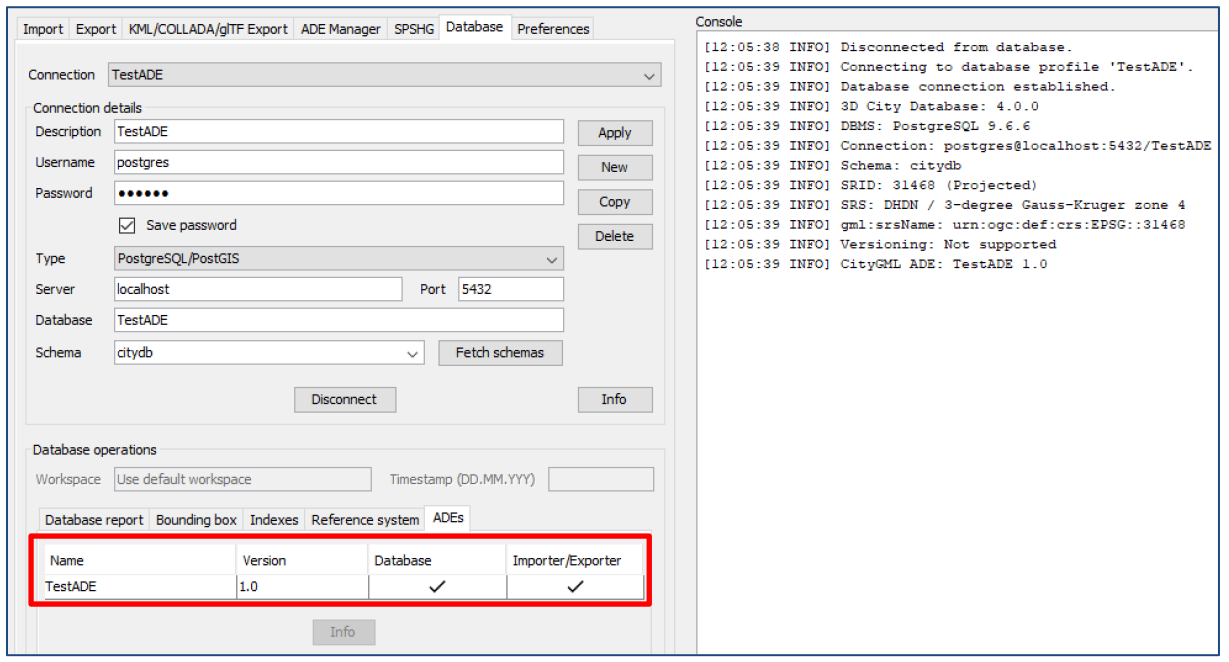
Fig. 3.102 Status indicating the full support of database and Import/Export tool
- To test the Import/Export function, open the Import panel and the select the ADE datasets which are located under the path “resources\datasets\”
It is possible to use the filter options of the CityGML import panel to import a subset of the ADE datasets. For example, if the the Feature classes filter is used (cf. the figure below), only TestADE feature objects will be imported.
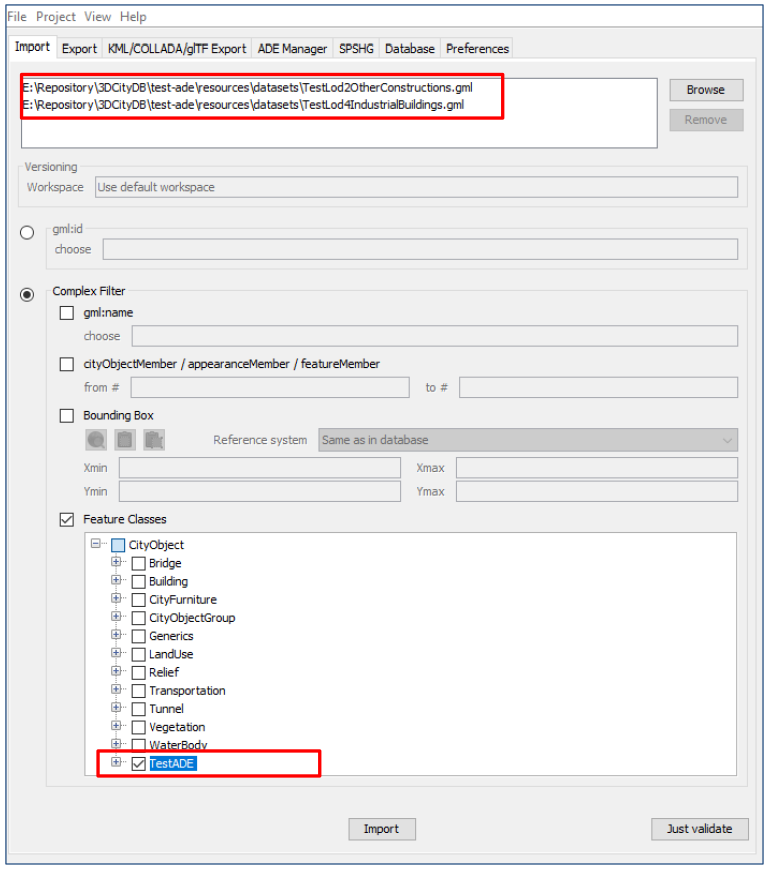
Fig. 3.103 Import of ADE dataset using Feature Class filter
A summary of the ADE import process is printed in the console window like the following screenshot:
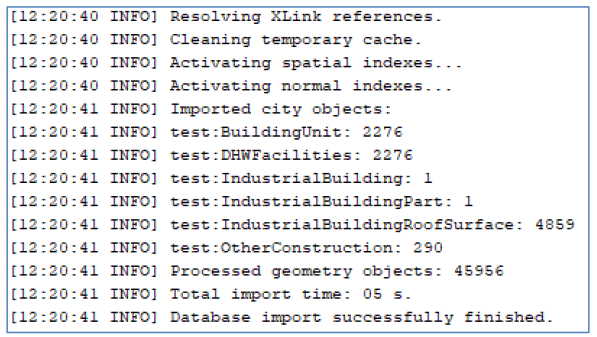
Fig. 3.104 Console window displaying the summary of the ADE import process
- Activate the Database panel and activate the Database report subpanel.
- Click on the Generate database report button to generate a statistic of the data contents stored in the ADE tables.
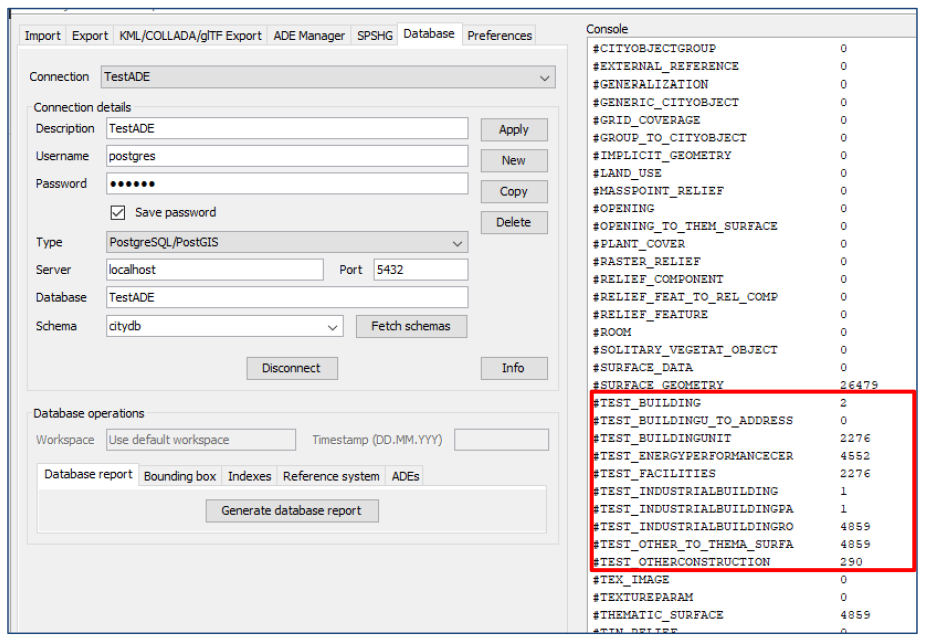
Fig. 3.105 Console window showing a statistic of the ADE tables
The operation steps for performing ADE export are very similar to those for the ADE import.
- Activate the Export panel and configure the filter options e.g. activate the Feature class filter and choose the TestADE
- Click on the Export button to start the export process. The export configuration and a summary of the ADE export process is shown in the figure below:
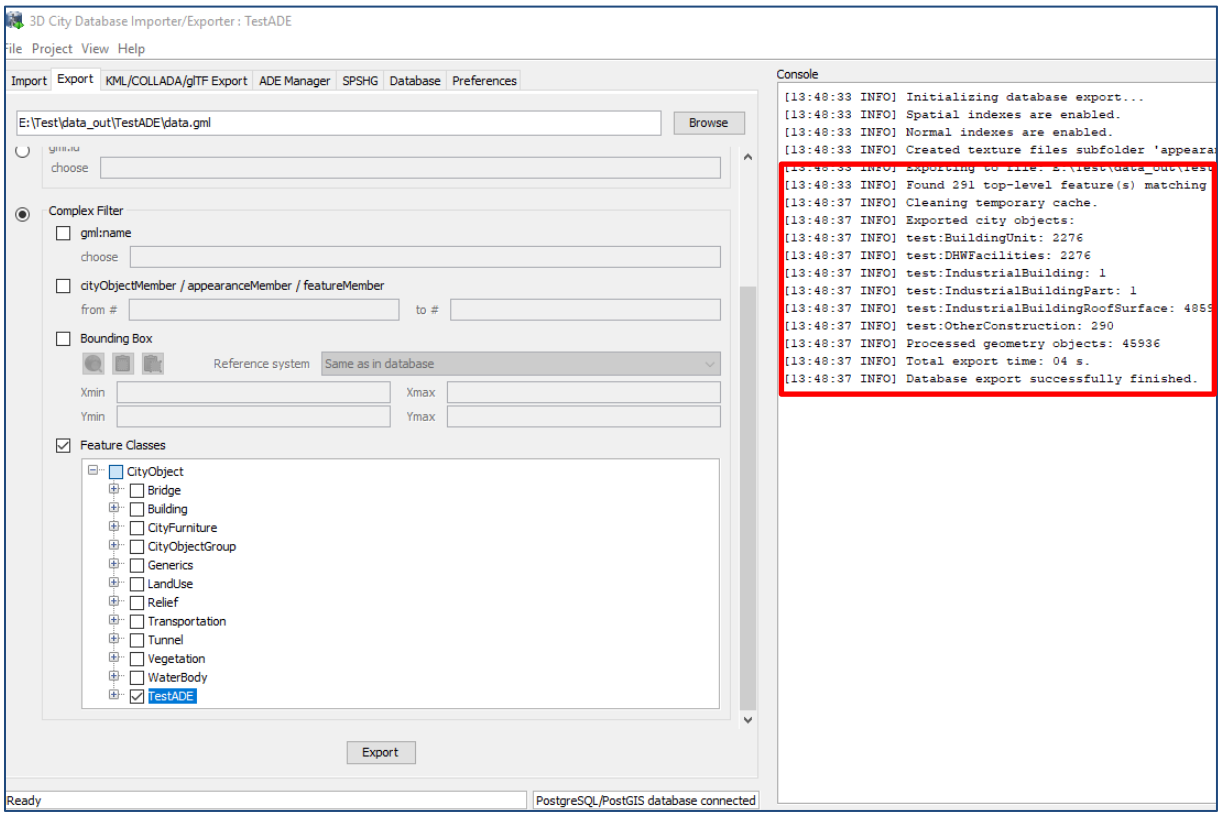
Fig. 3.106 Console window showing a summary of ADE export