3.9.2. Spreadsheet Generator Plugin (SPSHG)
3.9.2.1. Definition
By using the SPSHG (Spreadsheet Generator) plugin, it is possible to export data from a 3D City Database (3DCityDB) instance into a CSV or a Microsoft Excel file. Both types of files can be opened using a spreadsheet application (like Microsoft Excel or Open Office Calc) as well as uploaded to a web based online spreadsheet service (like Google Docs). All features of spreadsheet programs, like calculation and graphing tools, are applicable to the exported data from a 3D City Database instance.
3.9.2.2. Plugin installation
The SPSHG is an additional component which can be installed together with the 3DCityDB Importer/Exporter tool. During the Installation of the Import/Export tool, the wizard will ask you if you want to install Spreadsheet Generator Plugin like in the following figure:
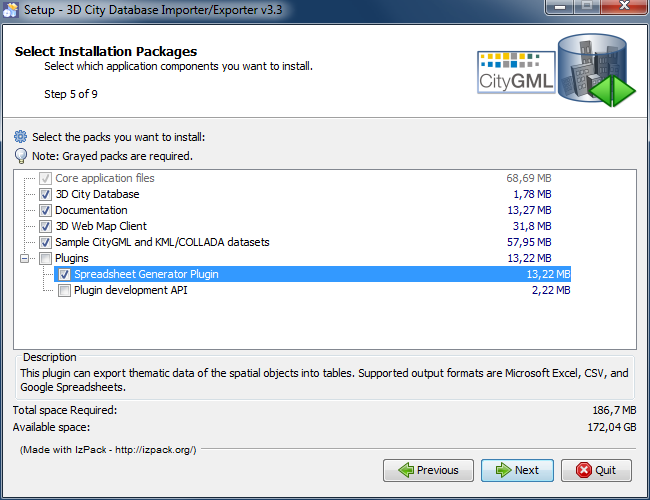
Fig. 3.75 Installation wizard of the Import/Export tool
If you haven’t checked the “Spreadsheet Generator Plugin” box during the installation process, it is also possible to install the SPSHG later. Following simple steps will guide you through the install process:
- Download the SPSHG plugin zip file from the official website of the 3D City Database.
- Open the folder that contains your locally installed instance of the Importer/Exporter version 3.3.0 (the installation directory).
- Open the plugins subfolder. If it is not available, create a new subfolder and name it “plugins”.
- Extract the downloaded SPSHG plugin zip file in the plugins folder. As a result a new folder named spreadsheet_Generator will be created. The spreadsheet_Generator folder will contain all required files and subfolders.
- Run the Importer/Exporter. The SPSHG plugin tab should be visible like in the following figure.
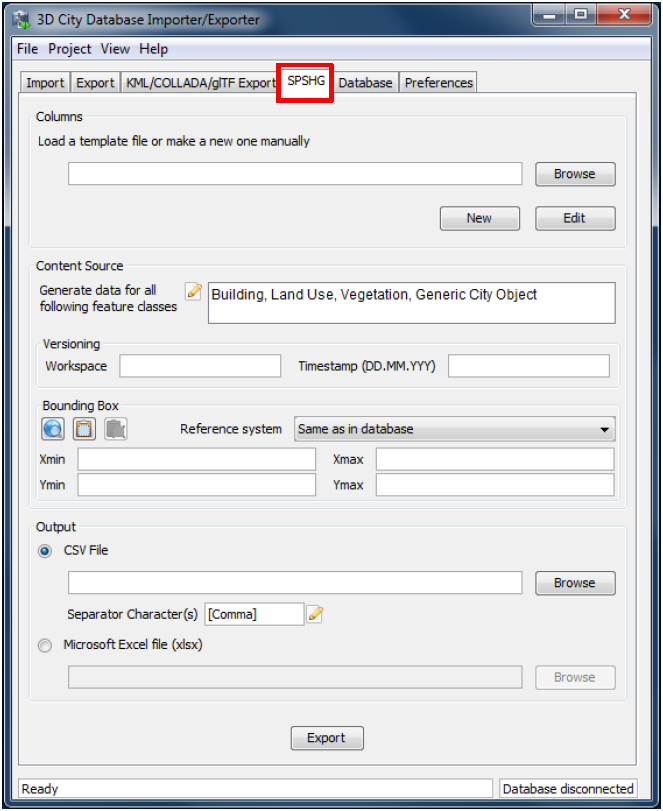
Fig. 3.76 The SPSHG plugin tab allowing for exporting from the 3DCityDB to a spreadsheet
3.9.2.3. User Interface
3.9.2.3.1. Main Parameters
The SPSHG plugin GUI is divided into three main parts. The upper part, titled Columns, refers to the columns of the output spreadsheet file. The Content Source in the middle section refers to the rows of the output spreadsheet. Each output row will always contain the GMLID of a city object and its corresponding selected values for each column. A list of the feature classes of city objects (Top-level features) whose data will be exported to the spreadsheet, the versioning information of the database and a geographic bounding box should be specified. The file path and the file format for the exported data must be specified in the lower part. All input data fields of the SPSHG plugin tab will be now described in more detail.
3.9.2.3.2. Columns
First of all, the columns of your resulting spreadsheet should be defined. You can choose to load a template file or manually create a new one:
Load a template file: type the template file’s path directly into the text field or click on the Browse button to use an Open dialog for selecting the template file. The selected template file can be edited by clicking on the Edit button.
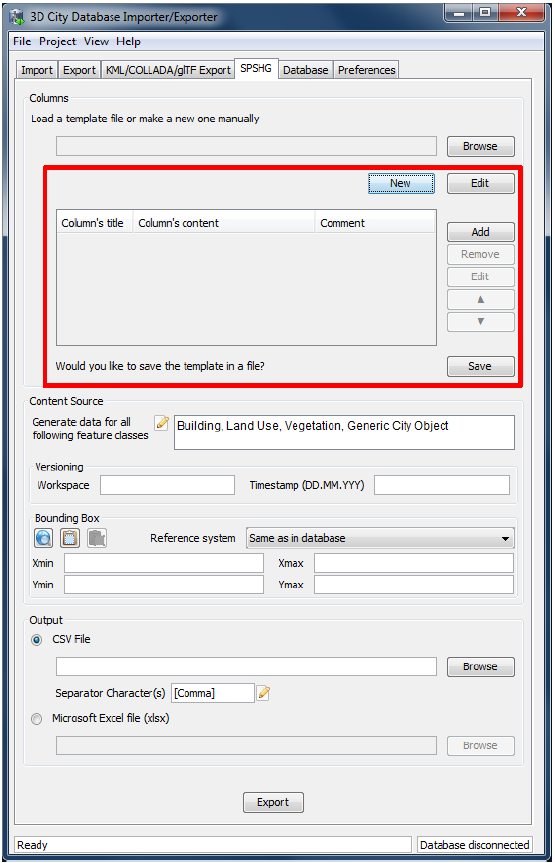
Fig. 3.77 The part for manually creating a new template will appear when clicking on the New button. This part will also be shown when clicking on the Edit button after a template file is selected
3.9.2.3.2.1. Create a new template
Click on the New button to access the part for creating a template (marked in Fig. 3.77). To add a new column click on the Add button and fill all necessary fields of the New Column dialog (cf. Fig. 3.78). A column contains a title, content and comment. The comment field is optional. Each row in the exported data will begin with the GMLID of the corresponding city object. It will be followed by the adapted value of each column for that city object (see next section for more information). Created columns will be listed in the table. You can use the Remove, Edit, Up (▲), and Down (▼) buttons to modify listed columns on the table and their order. By pressing the Save button, manually created (or adapted) templates will be saved in a text file. Path will be specified by the Save dialog.
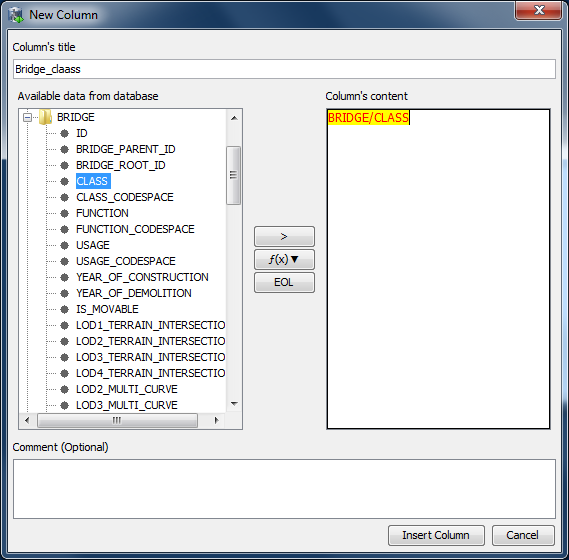
Fig. 3.78 The New Column dialog. Fill the Column’s title, Column’s content fields and click on the Insert Column button to add it to the list of columns. The Comment field is optional. When written to a template file its content serves informational purposes only
3.9.2.3.2.2. New Column dialog
By clicking on the Add button the New Column dialog will be shown (Fig. 3.78). Using the New Column dialog, it is possible to define a new column for the output spreadsheet. A column may contain a title, content and comment fields. The title and content are mandatory. During export time, the content of each column will be adapted for each city object. For each specific column:
- The content may set to be a static value, e.g. “Munich”. As a result, the value of that column in the exported spreadsheet will be equal to the specified static value (in this example “Munich”) for all rows.
- The content of a column may be specified by an expression. The main part of an expression refers to a column in a specific table of a 3D City Database. Each row refers to one city object. Consequently, the value of the spreadsheet’s column will be dynamically adapted for each row at export time. It means that the value of the spreadsheet’s column for a specific row will be equal to the value of that expression for the corresponding city object of that row. Expressions must follow specific rules. They can be added simply by using the GUI or written by hand.
- The content of a spreadsheet’s column may contain a combination of static values and expressions.
3.9.2.3.2.3. Rules for Column’s Content field
Expressions are coded in the following form:
Aggregation function and condition are optional. Table refers to the underlying 3DCityDB table structure (see Chapter Section 2.7 for more details).
Expressions are not case-sensitive.
For each row of output, each expression will only return the value of those entries relevant to the city object for that row. That means an implicit condition clause like
TABLE.CITYOBJECT_ID =
CITYOBJECT.ID
is always considered and does not need to be explicitly written.In a case that more than one entry for the corresponding city object are available, a comma separated list of values will be returned. When only interested in the first result of a list the aggregation function FIRST should be used. Other possible aggregation functions are
LAST,MAX,MIN,AVG,SUMandCOUNT.Conditions can be defined by a simple number (meaning which element from the result list must be taken) or a column name (that must exist in underlying 3DCityDB table structure) a comparison operator and a value. For instance:
[12]or[NAME = 'abc'].Invalid results will be silently discarded
Multiline content is supported. Use
"[EOL]"to start a new line in the same column.
3.9.2.3.2.4. How to use the New Column dialog
Title and content of each column should be specified. On the left hand
side of the New Column dialog, tables of the 3D City Database and their
columns are displayed in a tree structure. Adding an expression is
simple. Select a column in a table from the left hand side tree and
click on the > button. In the case that aggregation functions are
needed, select a column from the left hand side tree and click on the
f(x) button then chose one of the aggregation functions. As a result
of both cases a corresponding expression will be added into the column’s
content in the right hand side.
A column’s content can be several lines long. Write "[EOL]" text in the
column’s content wherever a new line should be started. You can also
press the EOL button to automatically add "[EOL]" text to the content.
During export time, the "[EOL]" text will be replaced by a new line.
After filling all necessary fields click on the Insert Column button. A new column will be created and added to the manually created template.
3.9.2.3.2.5. Examples for Column’s Content
ADDRESS/STREET
Returns the content of the STREET column on the ADDRESS table for each city object. For instance:
Straße des 17. Juni
However ADDRESS table might contain more than one row for some city objects. In such a case a comma separated list of values will be returned. For instance:
Straße des 17. Juni, Straße des 17. Juni, Straße des 17. Juni, Straße des 17. Juni
To avoid that use a proper aggregation function. For instance:
ADDRESS/[FIRST]STREET
Although the ADDRESS table may contain several entries for a city object, result of the above expression will be equal to the street name of first found entry.
ADDRESS/[FIRST]STREET, ADDRESS/[FIRST]HOUSE_NUMBER[EOL]ADDRESS/[FIRST]ZIP_CODE ADDRESS/[FIRST]CITY
Returns the full address of each city object in two lines. For instance:
Straße des 17. Juni, 135 10623 Berlin
CITYOBJECT_GENERICATTRIB/ATTRNAME
Returns the names of all existing generic attributes for each city object. All names will be separated by commas.
CITYOBJECT_GENERICATTRIB/REALVAL[ATTRNAME = ‘SOLAR_SUM_INVEST’]EUR
Returns the content of the REALVAL column of all existing generic attributes for each city object whose ATTRNAME is equal to ‘SOLAR_SUM_INVEST’. The number will be followed by “EUR”. For instance:
23000EUR
3.9.2.3.2.6. Rules for Columns’ Template file
Rules for the template file are simple. A template file contains a list of columns and their description. It may be edited by hand or by saving a manually created template.
- A template file is a plain-text file.
- Each row of a template file may describe a column or be a comment.
- Comment rows MUST start with the character
//; - A column should be specified in one of following forms:
*[Title]*:[*Content]*
[Title]is the column’s title and[content]is the column’s content. In this case,[Title]is specified by the user.
*[Content]*
In this case, the column’s title is not specified by the user. The SPSHG plugin will internally automatically generate a column’s title by means of the column’s content
3.9.2.3.2.7. Example for Template File
Sample template file:
// This is a template file for the export of tabular data.

// Lines starting with // or ; are comments and will be ignored.

Street:ADDRESS/[FIRST]STREET

Houseno:ADDRESS/[FIRST]HOUSE_NUMBER

City:ADDRESS/[FIRST]CITY

Address:ADDRESS/[FIRST]STREET, ADDRESS/[FIRST]HOUSE_NUMBER[EOL]ADDRESS/[FIRST]CITY

// INVEST

Investment:CITYOBJECT_GENERICATTRIB/REALVAL[ATTRNAME = 'SOLAR_SUM_INVEST'] EUR
Fig. 3.79 shows a sample export result.
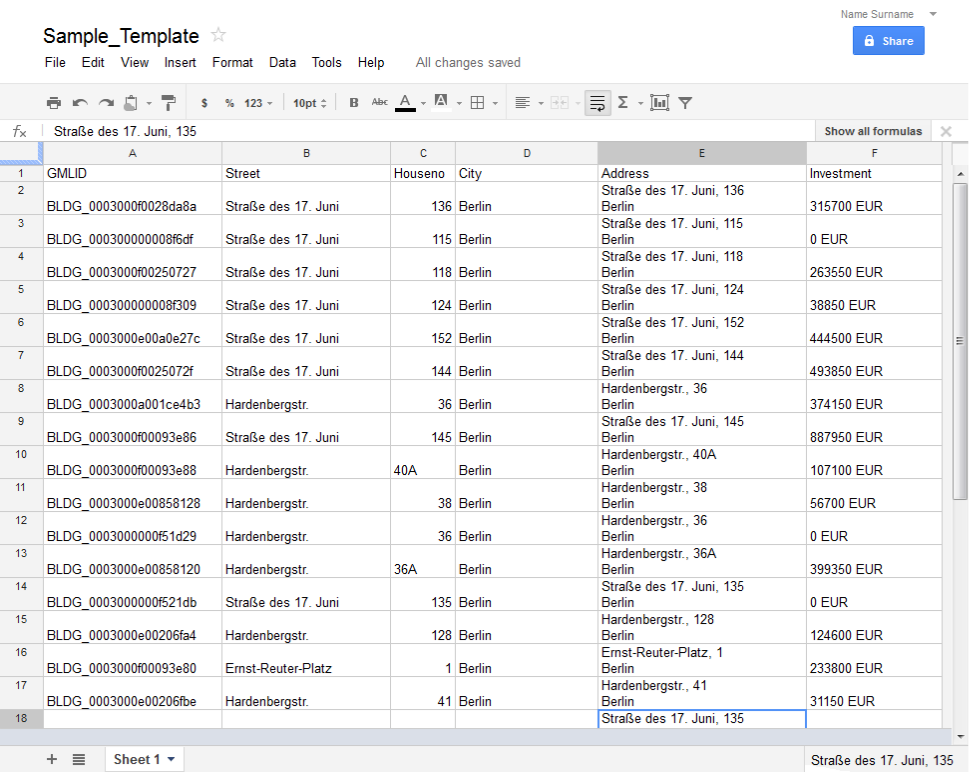
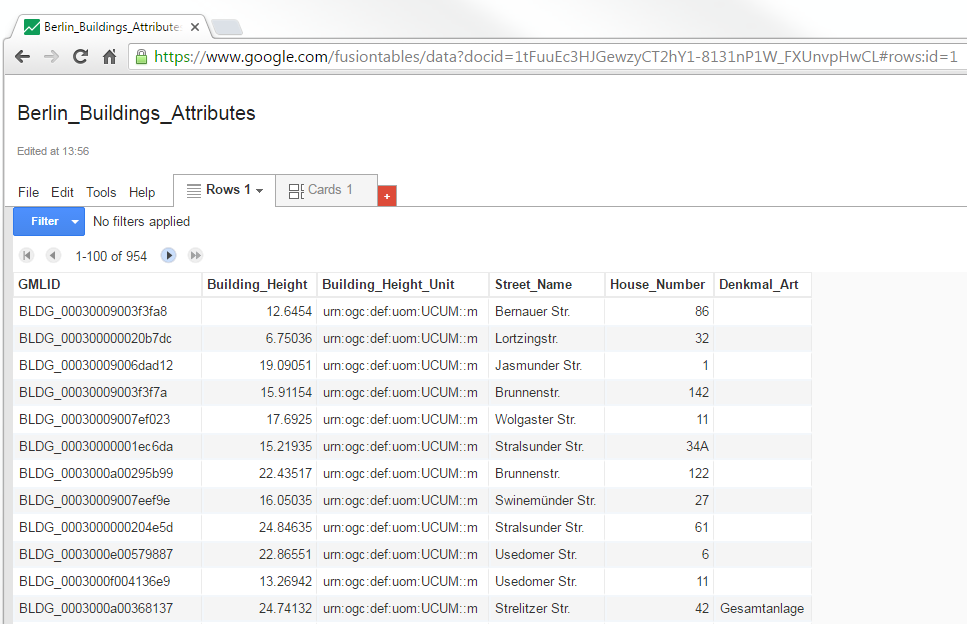
Fig. 3.79 Example of exported data based on sample template presented above from a 3D City Database instance
3.9.2.3.3. Content Source
In this GUI section, the feature class of city objects and their origin (versioning information and geographic bounding box) should be specified.
3.9.2.3.3.1. Feature Classes
City objects of the selected feature class(es) will be exported. Click on the edit button (marked by 1 in Fig. 3.80) to insert or remove a feature class.
3.9.2.3.3.2. Versioning
Oracle’s Workspace Manager enables storing of different versions of the database as named workspaces. The export process will use the specified workspace.
If version management is disabled or the current state of the database should be exported, the default workspace name LIVE must be entered and the timestamp field must remain empty.
Unfortunately, as PostgreSQL does not officially offer any equivalent facility like Workspace Manager, the corresponding elements in the graphical user interface will be disabled whenever the PostgreSQL/PostGIS database instance is connected.
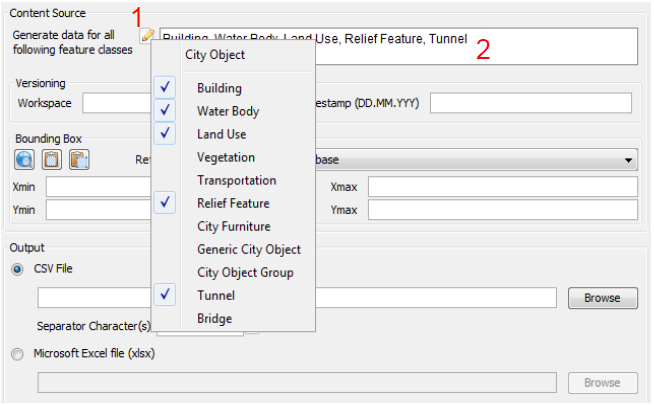
Fig. 3.80 Click on the edit button (marked by 1) to add or remove a CityGML feature class from the list of features classes (marked by 2)
3.9.2.3.3.3. Bounding Box
Use the bounding box section to select an area of interest from which the selected features contained should be exported. Insert lower left and upper right coordinates of the bounding box or click on the map button to select the area from a map. Please refer to Section 3.2.2 for more details on the different options for specifying a bounding box.
3.9.2.4. Output
It is possible to export the data in a CSV or XLSX file on the local computer, or directly into an online spreadsheet hosted in a cloud service.
CSV/XLSX File
A CSV/XLSX file is supported by most spreadsheet applications. It can be easily imported into a local spreadsheet processing program like Microsoft Excel and Open Office Calc or to a web based online spreadsheet service like Google Docs.
Click on the CSV File or XLSX file radio button, and write an output file path or select an output file by clicking on the Browse button. It is also possible to specify another separator character(s) instead of comma (default) for CSV file. Write any arbitrary separator phrase or click on the edit button (marked by 1 in Fig. 3.81) to select it from a list.
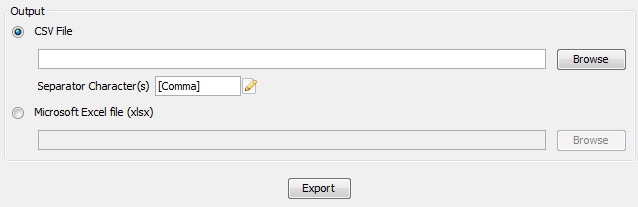
Fig. 3.81 Click on the CSV File radio button and write any output file path or click on the Browse button to select an output file. Type the separator character (s) or click on the edit button (marked by 1) and select one from a list
Note
Starting from April 2015, the earlier versions of the SPSHG plugin are no longer able to directly upload the exported data to the Google cloud service, since the Google OAuth 1.0 API on which the SPSHG plugin relies has been deprecated and is not supported by Google any more. Therefore, starting from version 3.3.0 of the 3DCityDB, the functionality “Directly into the Cloud” has been removed from the SPSHG plugin, and you need to to manually upload the generated CSV/XLSX files to the cloud.
Example: Uploading XLSX file to Google Fusion Table
Here is a step-by-step guide for uploading a XLSX file to the Google Fusion Tables which a cloud-based web application that allows for storing, showing, and sharing large data tables.
Open a web browser (you can use, for example, Google Chrome or Mozilla Firefox, but we recommend not to use Microsoft Internet Explorer) and type the following address into the address bar.
https://www.google.com/fusiontables/data?dsrcid=implicit
When you go to this page, you will be asked to log in by using your Google account.
Enter your Email address and the password of your Google account into the corresponding input fields
After logging in, an Import new table dialog window will be displayed like in the screenshot below:
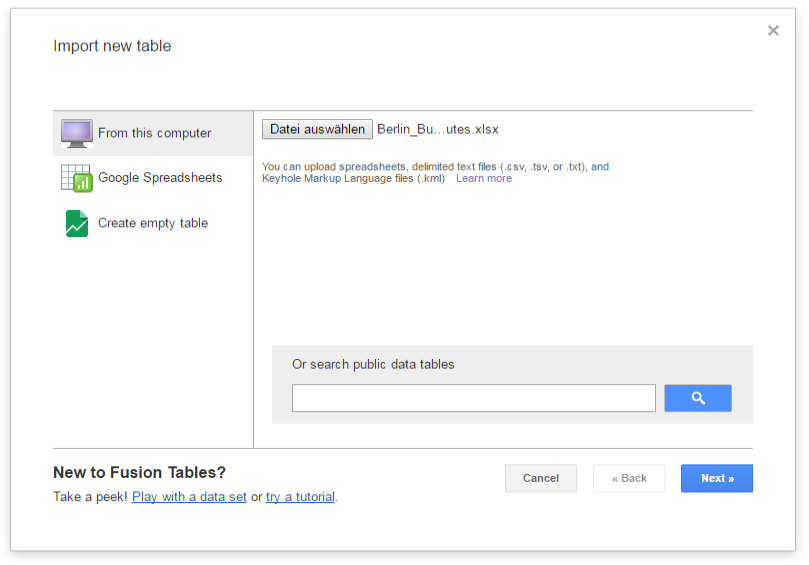
Click the Choose File button to open a file selection window
Navigate to the system path of your created Excel file and select it. The following screenshot show an example Excel file.
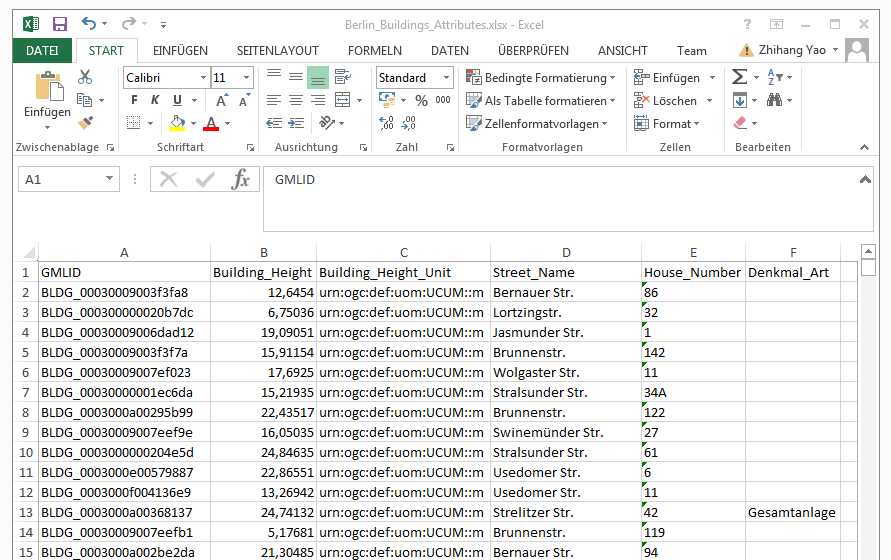
After selecting the Excel file, click the Next button to continue
The contents of the selected table is displayed in the dialog window (see the screenshot below)
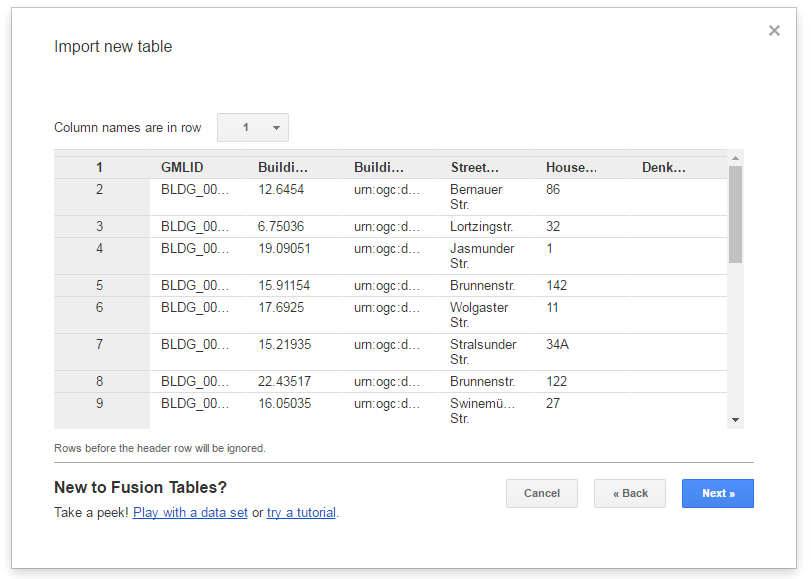
Briefly check the table contents again and then click the Next button
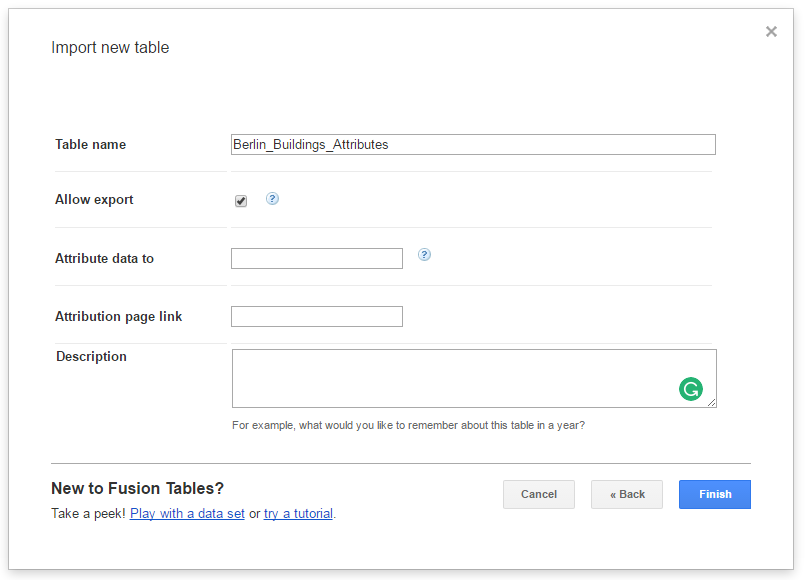
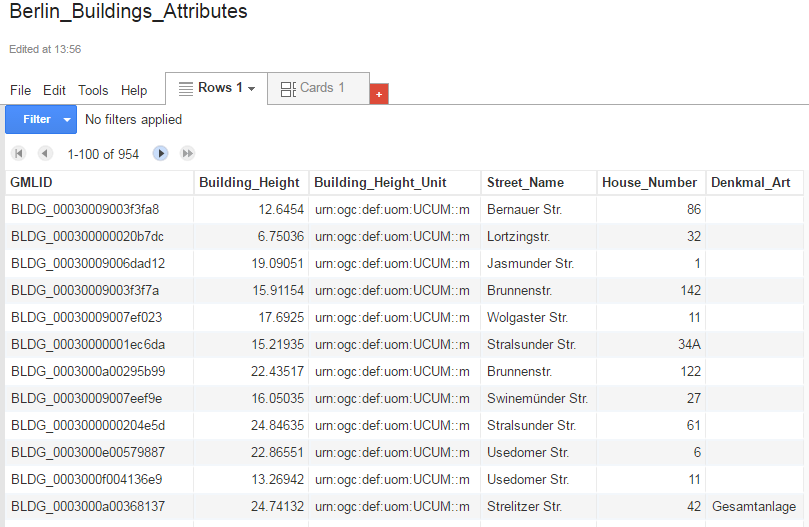
In the following dialog window (see the screenshot below), enter a table name (for example “Berlin_Buildings_Attributes”) into the input field Table name and click the Finish button
Now, your Excel file has been successfully uploaded to the Google Cloud Service and a Google Fusion Table instance has been created (see the screenshot below).
We would like to share our created online spreadsheet with other people. Here we need to change the sharing settings of the Google Fusion Table by completing the following steps:
Choose the File Share… from the menu bar at the top of the online spreadsheet window
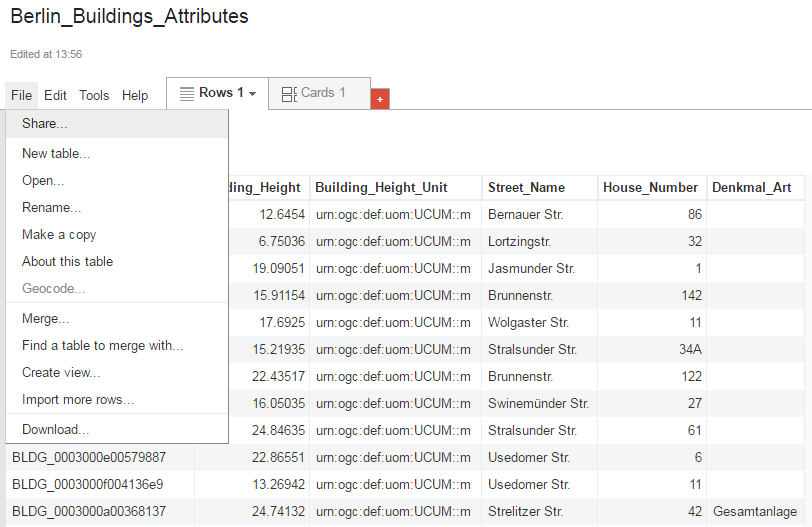
In the Sharing settings window, click on Change… button (see the screenshot below)
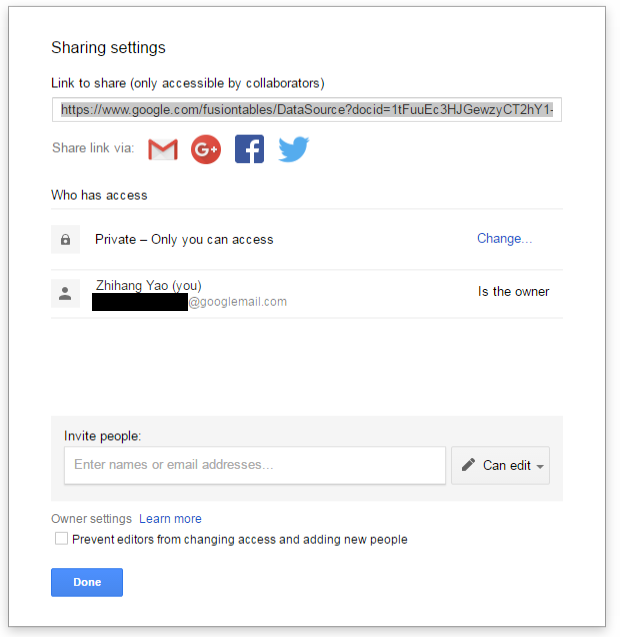
In the Link sharing window (see the figure below), choose the second radio button On – Anyone with the link
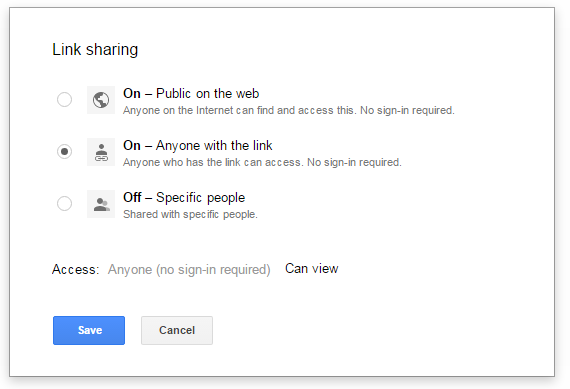
Click the Save button to save the settings and close the share settings window
Now, the spreadsheet is being shared and can be accessed by anybody who has its URL that can be easily obtained from the address bar of the web browser (marked in the screenshot below). With this URL and the first column (GMLID) in the table, the attribute information stored in the spreadsheet are able to be queried and displayed on the 3DCityDB-Web-Map-Client when a city object is clicked on (see Section 5 for more details).